Defining and Configuring the SMS Site
The first step in configuring your new SMS 2.0 site is to identify which clients should become members of the site. SMS 2.0 determines which clients should be assigned to the site according to the site boundaries you configure. SMS 2.0 site boundaries are defined by either an IP subnet address or an IPX network number. A subnet is a segment of a network whose members share the same network address; it is distinguished from other subnets by a subnet number.
For example, in a network using TCP/IP, two typical network host addresses might be 192.168.20.35 and 192.168.30.147, both with a subnet mask of 255.255.255.0. The subnet mask determines the subnet address for that segment of the network. In this case, the subnet address for the first host device would be 192.168.20.0, and the subnet address for the second host device would be 192.168.30.0. The first two positions in this address identify the network address (192.168.0.0), and the third identifies the subnet within that network where you can find that particular host device. The fourth position is the actual device address. In other words, the device with address 192.168.20.35 and the device with address 192.168.30.147 are on two separate subnets within the same IP network. If you want the clients whose addresses begin with 192.168.20 to become SMS clients in the new SMS 2.0 site you just created, you need to add 192.168.20.0 as a site boundary for the site. If you want to include clients in both subnets as SMS clients in the new site, add both 192.168.20.0 and 192.168.30.0 as site boundaries for the site.
A valid site boundary could also be an IPX network number. In Novell NetWare networks using IPX, the IPX network number performs the same function as an IP subnet does in an IP network. Both are methods of segmenting clients by network location.
Don't confuse site assignment with the discovery process. SMS uses any of several configurable discovery processes to "look for" and record an instance of a resource. A resource might be a client computer, but it might also be a user, a global group, or an IP-addressable device such as a switch or a network printer. A resource does not become an SMS client just because it has been discovered by the SMS site server. A client computer cannot become an SMS client until it has been assigned to an SMS site. Once it has been assigned, it can then be installed with the SMS client software. To summarize, clients can be discovered as a site resource by the SMS site server, but not necessarily installed. On the other hand, they can be installed as SMS clients without first being discovered. But in all cases, a client must be assigned to an SMS site before it can be installed. The discovery process is explored in detail in Chapter 7.
When you configure the site boundaries for a site, all the client agent settings that you define will be applied to all the assigned clients when the SMS software is installed. In other words, agent and component settings are sitewide settings and apply equally to all members of the site. If different sets of clients require different client components, you need to create a separate site for those clients. For example, if 100 out of 1000 clients require Remote Tools to be enabled, and the remaining clients do not, you need to segment these clients into their own subnet, create an SMS site for that subnet, assign those 100 clients to that site, and enable Remote Tools for that site. This is one of the reasons a well-conceived deployment strategy will be extremely valuable to you as you construct your SMS site hierarchy.
Clients can also be assigned to more than one site, although doing so is not recommended. If two or more sites include the same subnet in their site boundaries, it is possible for a client to be assigned and installed as a valid SMS client to both sites. The benefit of doing this is to ensure that the client can be managed from whatever network location the client connects from. For example, a laptop user who travels to different company offices in different network locations still needs to be managed by an SMS site. Each office has its own network subnet address. It is not practical or advisable to maintain one large SMS site for a WAN-based organization. So, you can implement SMS sites at each company office and allow the laptop user to be assigned to each site, ensuring that the user can receive advertisements, be managed remotely, and so on.
On the down side, if each site has its own client agent settings, conflicts can arise as SMS tries to determine the scope of functionality that should be enabled. Figure 3-1 demonstrates such a scenario for Remote Tools. Notice that if Remote Tools is enabled at any one site, it is installed on the client. However, the Remote Tools options—remote control, remote chat, remote file transfer, and so on—are evaluated on a most-restrictive basis among the sites. For example, if one site allows the remote control option, but at least one other site does not, the SMS administrator from either site can't establish a remote control session.
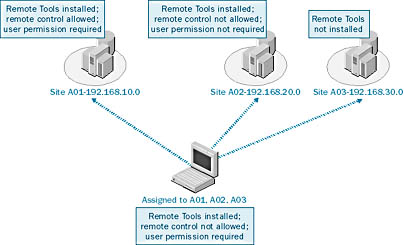
Figure 3-1. Remote Tools access when a client is assigned to and installed on more than one site.
![]()
REAL WORLD Site Boundaries and Subnet MasksWhen SMS 2.0 determines whether to assign a client to a site, it checks the client's discovery record to see whether the client's IP address falls within the IP boundaries set by the SMS administrator. It does so by checking the client's subnet mask. (The subnet mask determines the subnet address for that segment of the network.) Checking the client's subnet mask is significant because many companies do not use a subnet mask of 255.255.0.0 or something similar to define their network segments. In fact, they very likely will use a mask such as 255.255.248.0 to segment the network into different subnets for organizational reasons, network routing considerations, security, localization of resources, and so on.
Using a subnet mask such as 255.255.0.0 makes it easy for us to identify the subnet address. With this particular mask, every number in the third and fourth octets will constitute a host device address. Every number in the first and second octets will constitute a different IP subnet address. For example, consider these two IP addresses: 172.16.10.50 and 172.16.20.50. Using subnet mask 255.255.0.0, it is easy to see that they are both in the same subnet. If you set the SMS site boundary to 172.16.8.0, you will be sure to discover and assign both clients.
Now take the same two IP addresses, but use subnet mask 255.255.248.0 instead. This subnet mask places each client address into a different subnet. The site boundary 172.16.8.0 will discover and assign clients whose IP addresses fall within the range 172.16.8.1 through 172.16.15.254. Thus the client with address 172.16.10.50 would be assigned and the client with address 172.16.20.50 would not. To include the latter client, you would need to add its subnet address—172.16.16.0—to the site boundaries.
You might need to review your IP addressing skills to fully appreciate the significance of subnet masking and SMS 2.0. But rest assured, the subnet mask does make a difference.
Configuring Site Properties
In SMS 2.0, you can configure site boundaries and other site properties, including site accounts and security. In this section, you'll learn how to configure all of these properties.
To display the site properties for an SMS site:
- Open the SMS Administrator Console.
- Under the Systems Management Server group, expand the Site Database folder, and then expand the Site Hierarchy folder to display the site object (in the form sitecode - sitename).
- Right-click on the site object and choose Properties from the context menu. Or select the site object and choose Properties from the Action menu to display the Site Properties window for the site, as shown in Figure 3-2.
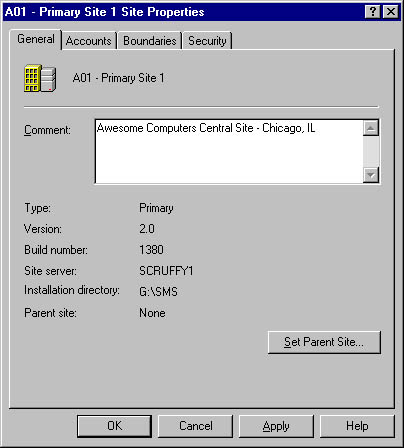
Figure 3-2. The Site Properties window for the site.
Let's begin by configuring site boundaries on the Boundaries tab.
The Boundaries Tab
To configure the site boundaries, follow these steps:
- Click on the Boundaries tab in the Site Properties window, shown in Figure 3-3. The IP subnet address or IPX network number of the segment in which the site server was installed will be displayed by default.
- To add a new IP subnet address or IPX network number, click the New button (the yellow star) to open the New Subnet dialog box, shown in Figure 3-4. Select a subnet type from the drop-down list, and enter the subnet ID (either an IP subnet address or an IPX network number). Then click OK.
- The new boundary will be displayed in the Subnets list on the Boundaries tab. Click OK or Apply to save your changes.
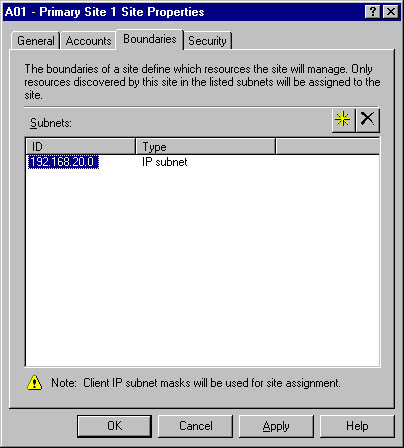
Figure 3-3. The Boundaries tab of the Site Properties window.
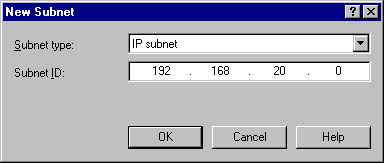
Figure 3-4. The New Subnet dialog box.
The General Tab
Let's take a moment to examine the other tabs in the Site Properties window, beginning with the General tab shown in Figure 3-2. There are really only two things you can do on the General tab: enter a descriptive comment about the site, and identify the parent site for your site. We'll talk about creating parent-child relationships in Chapter 4.
Descriptive comments always add value to objects in SMS 2.0, as they help to provide additional information that might otherwise not be available. In this case, we can use the Comment text box to indicate the name of the company (Awesome Computers), its site hierarchy role (central site), and its location (Chicago, IL).
The Accounts Tab
SMS 2.0 makes use of several different accounts to access other sites, install clients, install packages, access the database, generate reports, and so on. The Accounts tab, shown in Figure 3-5, provides the SMS administrator with the means of modifying three accounts specific to the site itself: the SMS Service account, the SMS Client Remote Installation account, and the SQL Server account.
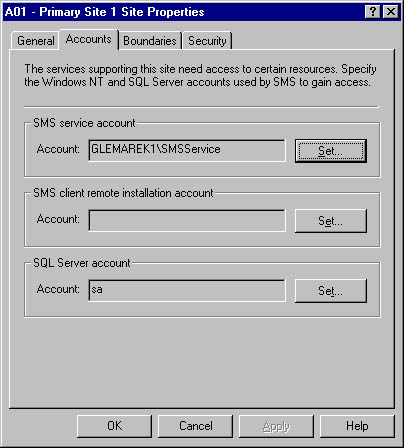
Figure 3-5. The Accounts tab in the Site Properties window.
SMS Service Account The SMS Service account, named SMSService by default, is created by SMS during setup and is the primary service account for the SMS site. It provides the site server with access to most SMS services running on the site server as well as on other site systems. These SMS services include SMS Executive, SMS Site Backup, SMS Site Component Manager, and SMS SQL Monitor. If you installed Crystal Info, its three services (Info Agent, Info APS, and Info Sentinel) also use the SMS Service account to access the database to generate reports.
You don't need to create the account and assign permissions in User Manager For Domains if you want to use the SMS Service account for the SMS site. During the SMS installation process, the SMS Service account is made a member of the local Administrators group on the site server and the Microsoft Windows NT domain's Domain Users and Domain Admins global groups. It is granted the Log On As A Service and Act As Part Of The Operating System user rights for the site server as well. The SMS Service account is created during the SMS setup process; it can be modified later. Follow these steps to modify the SMS Service account name and password:
- Create the new account through User Manager For Domains. Be sure that the new account is a member of the local Administrators group and the Windows NT domain's Domain Admins and Domain Users global groups. Also be sure that you have given the account the Log On As A Service and Act As Part Of The Operating System user rights on the site server.
- On the Accounts tab, click the Set button in the SMS Service Account section of the dialog box to display the Windows NT Account dialog box, shown in Figure 3-6.
- Enter the new account name in the form domainname\username, and then enter and confirm a password. Click OK to save your changes, then click OK again to close the Site Properties window.
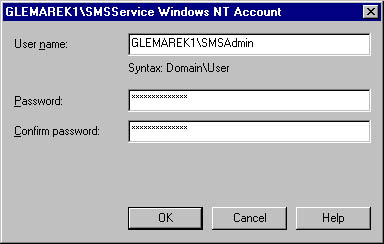
Figure 3-6. The Windows NT Account dialog box.
Alternatively, you can let SMS create the new account for you by running the SMS Setup program in the Systems Management Server program group. To do so, follow these steps:
- Choose Programs from the Start menu, and then choose Systems Management Server and SMS Setup.
- From the Setup Wizard welcome screen, click Next twice to get to the Setup Options screen. Select the Modify Or Reset The Current Installation option, as shown in Figure 3-7.
- Click Next to display the SMS Service Account Information screen, as shown in Figure 3-8. Enter the new account and password that you want SMS to create for you.
- Click Next to pass through the rest of the screens (unless you need to make other modifications), and then click Finish on the final screen. SMS will prompt you to confirm the creation of the new account. Click Yes.
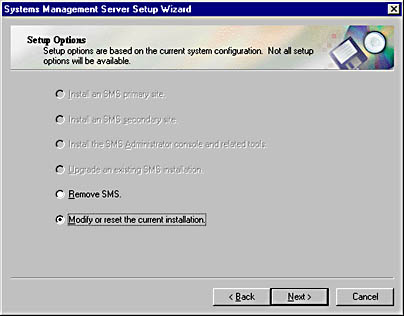
Figure 3-7. The Setup Options screen.
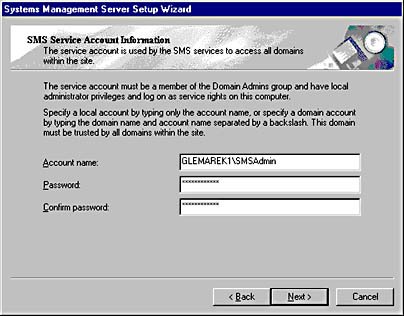
Figure 3-8. The SMS Service Account Information screen.
SMS will create the account, make it a member of the appropriate groups, grant it the appropriate rights, and reset the service account for the site server and its services.

TIP
As with all administrative-level accounts, exercise appropriate security with the SMS Service account. It does, after all, have administrative access across the domain as well as in the SMS site. Use an identifiable name as well as a long and secure password, preferably using some combination of alphanumeric and special characters (for example, gle43kaz$) In addition, consider making the SMS Service account a direct member of the local Administrators group on each site system (CAP, logon point, and so on). By doing this, you can remove the account from the Domain Admins global group for the domain so that the account won't affect the security of other systems in the domain.
Not all SMS services use this account by default, however. As we'll see in the section "Site System Connection Accounts" later in this chapter, specific accounts are preferred for specific access. For example, SMS prefers a separate connection account to NetWare Novell Directory Services (NDS) site systems that has the appropriate level of access defined in NetWare. Nevertheless, because the SMS Service account has administrative rights throughout the domain, it could be used in place of most other SMS accounts.
When SMS attempts to access a site system in another Windows NT domain, SMS uses the SMS Service account you specified to complete its tasks. If your site server and site systems are in separate Windows NT domains, the SMS Service account you specify must have access to the other Windows NT domains. This access can be accomplished by using Windows NT trust relationships or pass-through authentication.
If the Windows NT domain that contains the site system trusts the site server Windows NT domain, you can use the same SMS Service account you (or SMS) created in the site server Windows NT domain to access the site system. All the rules apply, of course. Be sure that the SMS Service account from the trusted domain is a member of the trusted domain's Domain Admins global group, or make it an explicit member of the local Administrators group on the site system in the trusting domain, and grant it the appropriate user rights.
If no trust relationship exists between the two Windows NT domains, you must duplicate the SMS Service account in the site system's Windows NT domain, giving it the appropriate group access and user rights. Duplicating the account means creating an account with the same name and password so that SMS can use pass-through authentication to access the site system.
SMS Client Remote Installation Account The SMS client installation process involves installing .DLL files and loading and starting services. As you may know, such installations require administrative access to the desktop on a Windows NT 4.0 platform. Because many organizations choose not to allow users administrative access to their local Windows NT 4.0 workstations, these users will not have adequate permission on their own to complete the SMS client installation. This is not something for you to be terribly worried about, however. You should expect few, if any, obstacles to getting SMS installed on Windows NT 4.0 workstation clients.
SMS 2.0 offers you two solutions—one is using the SMS Service account to install the SMS client software; the other is creating the SMS Client Remote Installation account, which gives you more control. The SMS Client Remote Installation account is used by SMS—or, more specifically, by Client Configuration Manager, to perform the SMS client software installation on Windows NT 4.0_platform computers. It is used in situations in which the user does not have the appropriate level of permission to complete the installation. It is also used when there is no user logged on, as with a Windows NT 4.0 server kept in a secure location, or for installing the SMS client on new site systems that, of course, need to become SMS clients when they become site systems.
You create the SMS Client Remote Installation account yourself through User Manager For Domains and then give it local administrative permissions on the Windows NT 4.0 member computers in the domain. When a Windows NT computer joins a domain, the Domain Admins global group for that domain automatically becomes a member of the computer's local Administrators group. So, the easy thing to do is to make the SMS Client Remote Installation account a member of the Domain Admins global group. Of course, to be more secure, you could add the account explicitly to the local Administrators group on each Windows NT client.
If you don't create the SMS Remote Client Installation account yourself, never fear! Client Configuration Manager will simply use the SMS Service account to complete the installation.

CAUTION
To use the SMS Service account to complete the SMS client installation, you must not have altered the default group memberships in any way. By default, the SMS Service account is a member of the Domain Admins group that is itself, by default, a member of the local Administrators group on every Windows NT computer that joins the domain. If you have altered this scenario in any way such that the SMS Service account does not have local Administrator access to the client, the client installation will fail.
After you have created the SMS Client Remote Installation account in User Manager For Domains and given it the appropriate level of permissions and user rights, you must follow these steps to tell SMS to use it:
- On the Accounts tab, click the Set button in the SMS Client Remote Installation Account section to display the Windows NT Account dialog box, which looks similar to the one shown in Figure 3-6.
- Enter the new account name in the form domainname\username, and then enter and confirm a password. Click OK to save your changes, and then click OK again to close the Site Properties window.
You've now finished configuring the SMS Client Remote Installation account to ensure that your Windows NT clients can be installed with the SMS client software components. Next we'll look at how to configure the SQL Server account.
SQL Server Account The SMS 2.0 site server uses the SQL Server account to gain access to the SMS database and the software metering database if software metering has been installed. The same account could be used for accessing both the SMS database and the software metering database, or, for added security, you could create separate accounts for each.
The SQL Server account is created during setup and varies with the type of SQL Server security implemented during setup. If SQL Server is using standard security, you could specify the default sa account or another SQL login ID that you create and configure. If SQL Server is using integrated security, SMS will use whatever account the SMS administrator logs on with to access the database.
![]()
NOTE
If SMS 2.0 is installed using Express Setup, SMS uses the SQL sa login ID as the SQL Server account by default.
There should be little need to modify this account. However, if you must change the account that SMS uses, you must first create it with User Manager For Domains and configure it for SQL Server. If your site server and SMS site database are in different domains, you must establish a trust relationship between the domains or duplicate the account and password for the SQL Server account in the domain containing the database for pass-through authentication between domains. After you do so, you can follow these steps to instruct SMS to use the account:
- On the Accounts tab, click the Set button in the SQL Server Account section to display the Windows NT Account dialog box, which resembles the one shown in Figure 3-6.
- Enter the new SQL account user name, and then enter and confirm a password. Click OK to save your changes, and then click OK again to close the Site Properties window.
TIP
If your working knowledge of how to create the SQL Server account falls short, you may want to attend a training class on SQL Server, as mentioned in Chapter 2.
The Security Tab
The Security tab, shown in Figure 3-9, displays the current security rights for the Site Properties object. Every object in the SMS database has both class and instance security that can be applied. Applying security to SMS objects is similar to creating an access control list (ACL) for Windows NT files, folders, or shares. To set object class security rights, click the New button in the Class Security Rights section to display the Object Class Security Rights Properties window. You can specify permissions such as Administer, Create, or Delete by checking the check boxes in the Permissions section. To set object instance security rights, click the New button in the Instance Security Rights section and follow the same procedure for setting the class security rights.
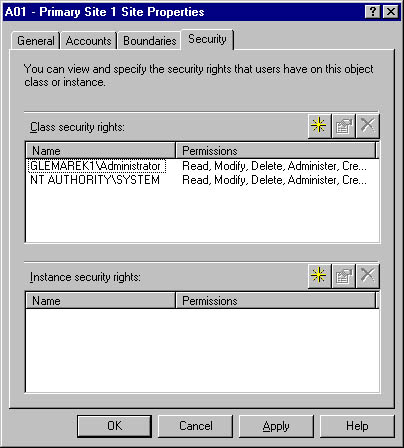
Figure 3-9. The Security tab of the Site Properties window, showing the two default accounts granted permissions to manage the Site Properties object class.
Class security rights indicate the access granted to all objects of this type. In the example displayed in Figure 3-9, the class security rights apply not only to this specific site, but also to any other site that may enter into a parent-child relationship with this site.
Instance security rights indicate the access granted to a specific instance of an object. In this example, the instance security right apply only to this particular site (A01 - Primary Site 1).
As another example, consider the Collections object. The class security rights indicate which users and groups have been granted specific permissions for working with all collections. Each individual collection, however, has an instance security right that identifies which users or groups have been granted specific permissions to that one collection.
By default, the administrative-level account that was used to perform the SMS site server installation as well as the local system account (Windows NT Authority\ System) are granted full class security rights for all SMS objects in the database. The list of permissions that are granted, or that can be granted, vary from object to object. Full permissions for the Site Properties class include Administer, Create, Delete, Modify, and Read. Full permissions for the Collections class include Administer, Advertise, Create, Delete, Delete Resource, Modify, Modify Resource, Read, Read Resource, Use Remote Tools, and View Collected Files.
So, permissions granted to a user for a class of object will apply to all objects of that class. Permissions granted to a user for a specific object in a class will apply to that object alone. If a user is a member of two or more groups, each with different permissions, permissions are cumulative for the user—that is, the least restrictive of the permissions will apply. For example, if the user is a member of a specific help desk group named FINHELP that has Read permission assigned to it and a member of a group named FINMGRS that has Full permissions assigned to it, the user's permissions are Full permissions. The least restrictive permission prevails. However, permissions at the instance level of an object will override the class permissions granted. For example, suppose you want the FINHELP group to be able to initiate Remote Tools sessions only with the clients in the Finance collection. You would grant FINHELP no permission for the Collection class, but Full permission for the Finance collection. This would not only restrict members of FINHELP to only the Finance collection, but also their SMS Administrator Consoles would display only the Finance collection. As you can see, class and instance security give the SMS administrator far more control over securing objects in the SMS database than in earlier versions of SMS. Chapter 16 explores class and instance security and other security options in more detail.
Site Settings
In SMS 1.2, the SMS administrator modified component attributes of the site such as inventory frequency, site addresses, logon servers, helper servers, and client components to be installed by opening the Site Properties window for the site. As we've seen, these other settings are not part of the Site Properties window for an SMS 2.0 site. The SMS 2.0 Site Properties window should be thought of as relating more to object properties than to component settings.
To access the component settings, expand the Site folder in the console and then expand the Site Settings folder. Under the Site Settings folder, you will find SMS 2.0 component settings similar to those you may have configured in SMS 1.2. Each of these site settings will be discussed in detail in later chapters. Remember that these site settings are integral and unique to each specific SMS site and can rightly be termed properties of the site.
EAN: 2147483647
Pages: 167