Additional Audio Features
| [ LiB ] |
Additional Audio Features
I believe I'd be doing a disservice to Avid Xpress Pro if I didn't mention some of the other audio features the software provides. The first is the AudioSuite tools. Need to reverse or slow down some audio? Need to normalize or change the pitch of a voiceover? The AudioSuite plug-ins can do all of this and much more.
The AudioSuite Tool
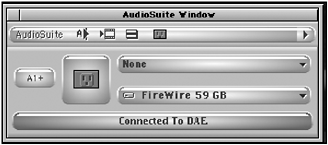
The Avid Xpress Pro software you installed on your computer came with plug-ins called Digidesign AudioSuite plug-ins. These plug-ins contain a set of filters or effects you can apply to your audio tracks. To open this tool, choose Tools and then AudioSuite. The AudioSuite window appears (see Figure 7.38).
Figure 7.38. The AudioSuite tool window.
To apply a plug-in, turn on the audio tracks you want to affect, and then follow these steps:
-
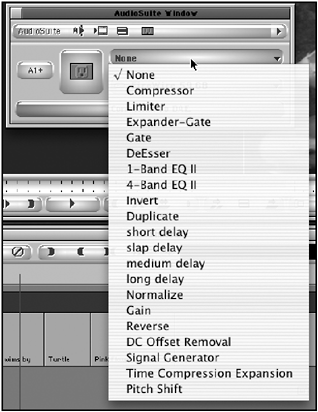
Click on the pull-down menu, which lists all the plug-ins available (see Figure 7.39).
Figure 7.39. A list of sweet AudioSuite plug-ins.
-
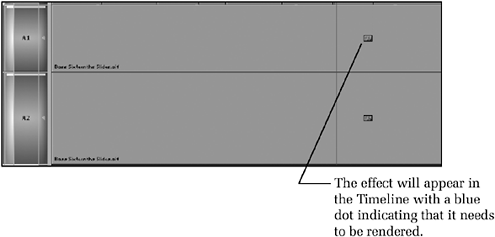
When you select a plug-in, an effect icon appears in the Timeline on the active audio track(s), as well as on the clip the Position Indicator is parked on (see Figure 7.40).
Figure 7.40. An added plug-in appears on track. The blue dot indicates it needs to be rendered.
-
To adjust the parameters of the plug-in, click on the large plug icon in the AudioSuite tool (see Figure 7.41). Doing so opens a dialog box with several adjustable options.
Figure 7.41. The Activate Current Plug-In button.

-
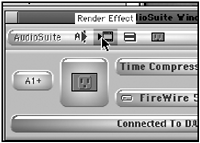
After making any adjustments, you'll need to render the effect to hear any changes. You can render the effect in two areas: Inside the dialog box you made changes to or by clicking on the Render Effect icon (see Figure 7.42).
Figure 7.42. The Render Effect icon.
NOTE
![]() NOTE
NOTE
You'll read about rendering in much more detail when the book covers effects (Chapter 8, "Introduction to Effects"). For now, just be aware that you're creating a new file that's stored on a hard drive.
So what do all these plug-ins do? Glad you asked; here's a brief description of some of the more widely used AudioSuite plug-ins:
-
Compressor Allows you to set an amount that reduces the dynamic range of an audio signal if it exceeds a certain threshold.
-
Limiter Allows you to select a level that audio levels cannot exceed, hence it "limits" the levels.
-
Expander-Gate Reduces noise as an audio signal lowers.
-
1-Band EQ II and 4-Band EQII Both of these plug-ins allow you to EQ your audio tracks.
-
Duplicate This option simply makes a new master clip from any IN and OUT points.
-
Delay Allows you to create time-delayed effects such as slap echoes and flanging.
-
Normalize This is one of the more frequently used plug-ins. It allows you to adjust high levels to a set maximum value. This is very useful if your clip's audio levels jump around.
-
Gain Used like Normalize, but allows you to adjust negative gain as well as peak values.
-
Reverse Plays the audio clip in reverse.
-
DC Offset Removal In digital files, it is common to hear "pops" or "clicks" between edits if the signal was poorly converted from analog to digital. This plug-in can remove such problems.
-
Signal Generator This plug-in generates test tones in different frequencies and amplitudes.
-
Time Compression Expansion Allows you to slow down or speed up an audio clip. This is very useful if you need audio to match a clip that has a motion effect applied to the video portion. A great feature with this plug-in is its capability to maintain pitch.
-
Pitch Shift Allows you to change the pitch of a clip but does not change the clip's duration. If an audio signal was captured and sounds very "deep," changing its pitch might help.
Experiment with these plug-ins. Each does a specific task. Some of the ones I use on a regular basis are the Time Compression Expansion to change the speed of an audio clip and the Normalize plug-in, which helps when I have audio levels all over the place from the same source.
Audio Mixdown
If you run out of audio tracks and need more, don't fear, Avid has answer. It's called Audio Mixdown. Click on the Clip menu and choose Audio Mixdown (see Figure 7.43).
Figure 7.43. The Audio Mixdown window is where you can select which tracks to mix together.
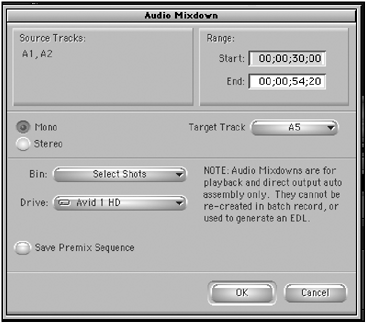
If you have audio on all several tracks and need more, you can mix the tracks to one or two, which will open up additional tracks. Don't use all 24 tracks, because you need some tracks to mix to.
NOTE
![]() CAUTION
CAUTION
Make sure these tracks are mixed and no longer have any valid timecode associated with them. They cannot be batch recorded. Mixed tracks also have the tendency to get a little louder. You might want to decrease the audio level of the new track by a few decibels.
You have several steps when performing an audio mixdown.
-
Select which tracks you want to mix together in the Timeline.
-
Open the Audio Mixdown window from the Special menu.
-
Determine a range or portion of your audio tracks you want mixed together.
-
Choose Mono or Stereo. This determines how many tracks will be created as part of the mixdown. It can be either mono (one track of audio) or stereo (a left and right track).
-
Select a target track. This is where the mixed audio is edited.
-
Select a bin and a hard drive to save the mixed clip to.
-
For protection, always save a Premix Sequence. That way you'll always have a sequence before you mix all the tracks together.
-
Click OK. The system will mix all the tracks together and place the mixed down version on the target track you selected.
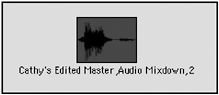
Notice in the following example the clip that was mixed down now has the name "Cathy's Edited Master, Audio Mixdown, 2" (see Figure 7.44).
Figure 7.44. A new track with a new clip name appears in your bin and your Timeline.
Sync Locks
One additional audio feature when using Avid Xpress Pro is the use of sync locks. If you're working with sync audio, these locks can be lifesavers. Sync locks allow you to lock an audio track or several audio tracks to video tracks. In your Timeline, these locks are found between your track selectors (see Figure 7.45).
Figure 7.45. This is where you can turn on sync locks. Click on the locks for the tracks you want to maintain sync in.

Sync locks prevent you from breaking sync. When these locks are on, any changes to one of the tracks will change the other regardless of whether it's selected. If your sequence contains dialogue, it's best to leave these locks on.
If you do break sync using Avid Xpress Pro, small indicators will appear in your Timeline indicating how many frames off the synced clips are. Using these numbers , you can simply make the adjustments either using Segment Mode buttons or trimming methods to return the clips back into sync.
| [ LiB ] |