The Media Tool
| [ LiB ] |
The Media Tool
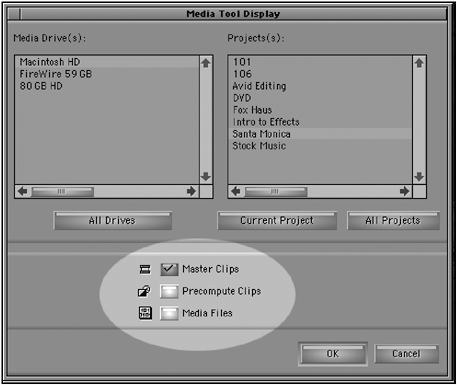
When it comes to managing your media, the Media tool is the place to begin. Its basic function is to identify media files related to Avid Projects. Although you could simply open up the OMFI Media Files folder on your hard drive to see all the Media Files on your system, you can't identify which files belong to which Avid projects. This is where the Media tool comes in. To view all the master clips, precomputes, and media files associated with a project, open the Media tool and select the project. Then, select the drives you want to search and select which files you want to be displayedthe master clips, precompute clips, or media files (see Figure 14.28).
Figure 14.28. Before the Media tool opens, you need to decide which files you want to display.
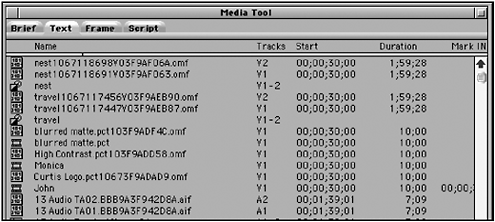
Once you selected all the information, click OK. The Media Tool bin will open and display all the items used for the project you selected (see Figure 14.29).
Figure 14.29. The Media tool looks very similar to a bin but it displays everything used for a project.
So why would you want to display all the items used for a project? Several reasons. First, if you need to delete a job from your Avid Xpress Pro, this is the best method to delete all the files used. You won't be deleting the master clips in the bins , just the material that is taking up space on your hard drive. Secondly, use this method if you need to identify any media files that are not being used in your finished sequence, and you want to remove them from a hard drive.
Deleting Unused Media and Precomputes
As you're working on Avid Xpress Pro, you might need to create more space on your hard drives to capture more material but, if your hard drives are full, you'll need to make space. This is where the Media tool comes to the rescue. By using the Media tool, you can identify which media files and precomputes you're actually using in a sequence and which ones you're not. Once you identify which media files and precomputes are not being used, you can use the Media tool to delete these files.
Another example of when to use the Media tool is when you're done with a job and want to keep only the media files and precomputes needed to play back the sequence.
To delete unused files using the Media tool, follow these steps:
-
Open the Media tool.
-
Select the project you're working on and the drives that have the media files.
-
Select all three itemsMaster Clips, Precompute Clips, and Media Files.
-
Click OK. The Media tool will display all the items you requested .
-
Highlight the sequence or sequences in the bin that you want to keep media attached to.
-
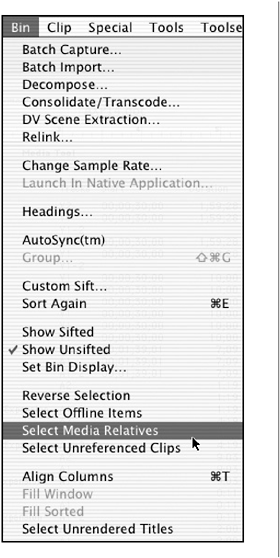
From the Bin menu, choose Select Media Relatives (see Figure 14.30).
Figure 14.30. Selecting media relatives highlights every clip, media file, and precompute associated with a sequence.
-
In the Media tool, all the items, or relatives, associated with the sequences you highlighted will be selected.
-
This is a very important step. From the Media tool's Fast Menu, choose Reverse Selection. This selects all the media that is not related to your sequences.
-
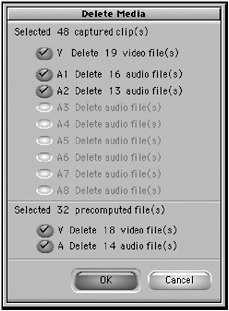
With the unrelated media highlighted, press the Delete key on the keyboard. A dialog box opens displaying how many files are going to be deleted (see Figure 14.31). Click OK.
Figure 14.31. This window displays the number of files that are going to be deleted.
-
A second dialog box will open. If you're sure you want to delete these files, choose Delete.
The Media tool is the best way to delete any files Avid Xpress Pro creates. When I've rendered several files and then made changes and re-rendered files, I like to use the Media tool to simply delete unused precomputes that fill up my hard drive. You can delete items straight from a bin, but without the Media tool you won't be able to view all the files associated with a project.
| [ LiB ] |