Using the Decompose Option
| [ LiB ] |
Using the Decompose Option
If you have created a sequence using the offline resolution of 15:1, which you should use if you're working on any long- term jobs or projects that require hundreds of media files, when it's time to change the sequence to a higher resolution, consider using the Decompose command.
The Decompose command has one huge advantage over the Batch Capture command. The clips needed for the sequence to be recaptured are created first. This might not seem like a huge advantage, but because the clips are created first, you can sort them by tape name and timecode and you'll have control over which clips are captured first. Another huge advantage is that you can simply recapture only the video elements. Because you've already mixed your audio, why recapture the audio along with the video?
If you choose to simply batch capture a sequence, the clips are created the same time the media files are created. Again, because Decompose breaks your sequence down into new clips first, you can see and control how the clips are recaptured at a higher resolution.
NOTE
 TIP
TIP
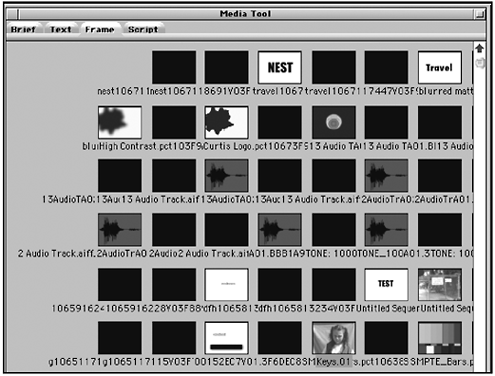
When you have the Media tool open , you can change views similar to bin views. If you want to see a clip or a precompute play, change the Media tool's view to Frame view, click on the clip, and then scroll through the clip using the same methods you use when viewing footage in a bin (see Figure 14.32).
From the Media tool, you can display items in Frame view.

To decompose a sequence while maintaining your finished audio, follow these steps:
-
Make a new bin. Duplicate the sequence you want to decompose and drag the copy into the new bin. We'll call this Sequence #1.
-
Make another duplicate of this sequence; called Sequence #2 in this example.
-
Open Sequence #2. Mark an IN point at the beginning of the sequence and an OUT point at the end of the sequence.
-
Select all the audio tracks and remove them using the Lift or Extract command. Now you have a duplicated sequence without any audio. This is the sequence that will be decomposed.
-
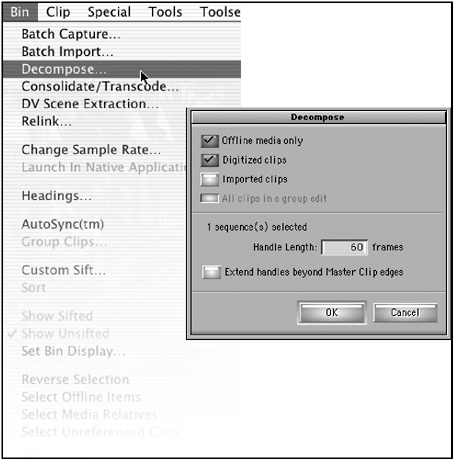
Highlight Sequence #2 and choose Decompose from the Bin menu. The Decompose window will open (see Figure 14.33).
Figure 14.33. The Decompose window allows you to choose which types of files you want to decompose.

-
Because you are decomposing the entire sequence, deselect Offline Media Only and Digitized Clips. Offline media in this case means media files, not low resolution. You also have the option to decompose imported files. If the files exist in the same folder you originally imported them from, choosing this option is fine. If the files were moved or you don't have them any more, deselect this option.
-
Add a handle length. Be careful here; this handle length will be added to the front and back of each clip. If you add 60 frames , you're going capture a lot of additional media.
-
Click OK. A warning will appear informing you that the selected sequence will now be linked to the new master clips that the Decompose command is going to create. Click OK again.
-
All the clips needed to create the sequence will appear in your bin. These clips are offline and ready to be recaptured.
-
Sort the bin by tape name and then select all the clips from the first tape. Open the capture tool, set the compression, and then choose Batch Capture from the Bin menu.
-
Once all the clips are captured, drag Sequence #1 into the source monitor and re-edit the audio onto Sequence #2.
Congratulations, you just decomposed a low-resolution sequence into a high-resolution sequence.
Re-Creating Your Title Media
Any titles that you created in using Avid Xpress Pro's Title tool can be changed to a higher resolution as well. Select the sequence that you've decomposed and mark an IN point at the beginning and an OUT point at the end. Turn on all the tracks that have titles on them and choose Re-Create Title Media from the Clip menu. Avid Xpress Pro will ask you in which bin you want to store the new titles.
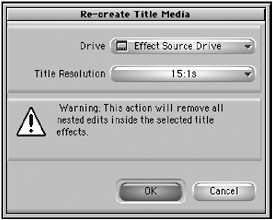
Once you select a bin, click OK. The Re-create Title Media window will open (see Figure 14.34).
Figure 14.34. From this window, you can change the resolution of your titles.

Here, you select a drive to store the new tiles on and determine which resolution you want the new titles to be. Also notice that Avid Xpress Pro will delete any media nested inside a title.
Change the Title resolution to a higher resolution and click OK. Avid Xpress Pro will search through your sequence and re-create any titles it finds.
| [ LiB ] |