Page #28 (Chapter 3 - Building ASP Applications)

Chapter 3 - Building ASP Applications

Visual Basic Developers Guide to ASP and IIS
A. Russell Jones
  Copyright 1999 SYBEX Inc.

A (Very) Brief Introduction to HTML and Forms
OK, I told you this book was not for beginners, but those of you who aren't experienced with HTML and forms will appreciate this (I promise) brief introduction before you move on to the other projects in this chapter.
Developers originally used HTML files for read-only display of information. Very quickly though, they realized that they needed a way for people to interact with the pages—specifically, to enter form data, such as names and e_mail addresses, in a way that they could be collected on the central server. It's important to realize that the display portion of a form requires nothing beyond standard HTML; however, to save the information generated by a form requires a program running on the server.
All HTML files begin with an <html> tag and end with an </html> tag. This tag is a containing or block tag—a tag that contains other tags. Following, or "inside" the HTML tag, you always have <head></head> tags. Any tags appearing between the <head> and </head> tags are in the head section. The head section contains browser directives, but most importantly, it contains the document title. The title of the document goes inside <title> and </title> tags. You should be seeing a pattern here. The </tag> form ends a tag begun with the <tag> form. Tags are not case sensitive in HTML, but they are in XML, SGML, and other markup languages, so you should work on making yourself write case-sensitive HTML right from the beginning. I'm afraid I'm guilty of mixing case in tags, so don't do as I do, do as I say.
After the head section comes the body section, which (you guessed it) is delimited by <body> and </body> tags. All the information displayed by the browser belongs in the body section except for the title, which is in the head section.
Believe it or not, you now have enough information to write a simple HTML file. Here's an example:
<html>
<head>
<title>
     Extremely Simple HTML
</title>
</head>
<body>
     Enter your name, then click the Submit button.
</body>
</html>
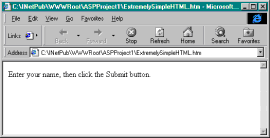
Figure 3.3 shows how this file looks in a browser. To run it, enter the preceding code listing into Notepad or an HTML editor. Save the file, then navigate to it in the browser. I recommend you create a virtual Web site rather than simply saving the file to disk and browsing to it, because you're going to write server-side code next, which requires the Web server.
Wait—there's no Submit button! To display a button using standard HTML, you need to create a form. (Sounds like VB, doesn't it?) An HTML form begins with a <form> tag and ends (like most containing HTML tags) with a </form> tag. The form tag can take several parameters; these are the most common:
Name  The name of the form. Although this parameter isn't required, it's good practice to name your forms so you can refer to them easily in client-side scripts.
Action  The URL to which the form will submit data. You may include additional URL-encoded variables in the value portion of the Action parameter (the part after the equals sign), but only if the Method parameter is Post. If you don't specify an action, the form will post itself to the originating filename (in other words, it posts to itself).
Method  You can use either the Post or the Get method. If you use the Get method, the browser will create a URL string that consists of the action URL (minus any explicit parameters) with URL-encoded form data appended. You'll see an example of this in a minute.
Here's a very simple form:
<form name="frmTest" METHOD="POST"
     action="testform.asp?submitted=true">
     <input type="text" name="Text1" value="">
     <input type="submit" name="Submit" value="Submit">
</form>
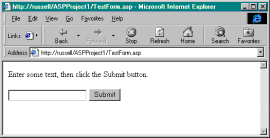
Copy the form code and insert it after the line that ends with click the Submit button. Save the file as TestForm.asp. Now navigate to the file in your browser. The page should now look similar to Figure 3.4.
Enter some text in the text field and click the Submit button. Nothing happens. That's because you need to write a program to make something happen. Let's do that. Go back into the TestForm.asp file you just saved and add the following code above the <html> tag. Be sure to enter the <% and %> code delimiters.
<%@ Language=VBScript %>
<%
if Request("Submitted") = "true" then
     Response.Write "Request(Text1) = " & _
          Request("Text1") & "<BR>"
     Response.End
end if
%>
Refresh the file, enter some text into the text box, and submit the form again. This time, the server should display the text you typed.
You've just written your first ASP program. If you're not familiar with ASP and forms, I encourage you to experiment with this form a little before moving on to the next project. Specifically, you should try these tasks:
  Change the form method from Post to Get. What happens? (Hint: Look at the address line of your browser.)
  The Action parameter is optional. What happens if you delete the Action parameter from the <form> tag? What if you enter just action=?submitted=true as the parameter?
  What values besides the Text value does the form submit to the server?


Visual Basic Developer[ap]s Guide to ASP and IIS
ISBN: 782125573
EAN: N/A
Year: 2005
Pages: 98

flylib.com © 2008-2017.
If you may any questions please contact us: flylib@qtcs.net