Making a Topic Icon
|
| While hardcore graphic design is a bit beyond the scope of this book, you'll find that you can make fairly decent topic icons without a lot of work. The first thing to remember is that topic icons should be no more than about 70 pixels in width or height, although they can be smaller and they don't need to be any specific size. In fact, different icons on your site can be slightly different sizes, although your site will look more consistent if they're all roughly the same size. To make an icon from scratch, you need a graphics tool. Microsoft Windows comes with a bare-bones tool called Paint, which you can access by opening the Start menu, selecting Run, typing mspaint, and clicking OK. Start by selecting Attributes from the Image menu and entering a width and height of 70. Make sure the Pixels radio button and the Colors radio button are selected. Use the drawing tools to make a basic icon, like the one shown in Figure 29.3 (no comments pleaseI'm a writer, not an artist). Figure 29.3. Making a simple icon in Windows Paint.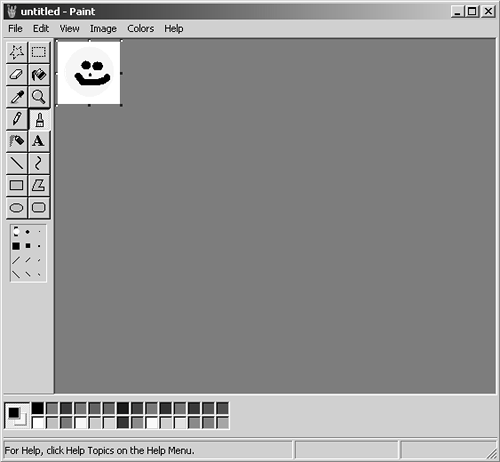 A variety of tools for drawing circles, squares, or brush strokes are on the left side of the Paint window; select colors from the palette below. Tool optionssuch as drawing an empty circle instead of a filled oneappear below the tool buttons themselves, once you've selected a tool. When you're finished with your masterpiece, save it using Save As from the File menu. Be sure to select GIF or JPEG from the Save As Type drop-down list when saving your file; those are the only two formats that Paint offers that PHP-Nuke will accept. GIF is far and away the better choice, as it creates smaller files, but you may need to select JPEG if your icon is a photo or something else with a lot of subtle color variations. You can also start with a larger picture or photo that you (legally) obtain from somewhere else. To do so, simply open an existing file in Paint (using Open from the "File menu). It starts out at whatever size the original image is supposed to be; you need to reduce it to topic icon size. Start by getting the image's current width and height by pressing Ctrl+E. Suppose, for example, that the original image is 2,048x1,536. That's big. Haul out a calculator (or open Windows Calculator). Divide your desired width and height (say, 70) by the current width and height. For example, 70÷2,048 is about .03, which is 3 percent. Then 70÷1,536 is about .04, or 4 percent. Take the smaller of those two values: 3 percent. Time to shrink the image. To do so in Paint, select Stretch/Skew from the Image menu (or press Ctrl+W). Enter your percentage, such as 3 in this example, for both Horizontal and Vertical. This ensures that your image shrinks evenly, without becoming vertically or horizontally squashed. The result, shown in Figure 29.4 for my original 2,048x1,536 image, is a 62x47 image that's the perfect size for a topic icon. Save it as a GIF or JPEG, and you're ready to go. Figure 29.4. The image reduced to a perfect icon size of 62x47.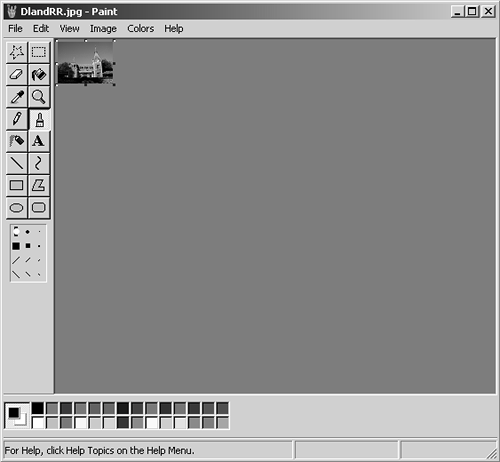 |
|