Hack16.Secure, Lightweight X Connections with FreeNX
Hack 16. Secure, Lightweight X Connections with FreeNX
The standard X Window System is very network-intensive. FreeNX compresses and optimizes X communications and is ideally suited for slow connections such as dialups. FreeNX is a free, GPL implementation of NoMachine's NX Server (http://www.nomachine.com). NoMachine has developed a compression technology that substantially reduces the size of X Window System communications and adds other performance improvements through caching and general protocol optimization. NoMachine provides several informative white papers about their technology and its performance at http://www.nomachine.com/documentation.php. If you're already a VNC fan, NX is definitely worth a look, for performance reasons as well as for the fact that it inherently uses SSH for secure communications between client and server. The free and commercial versions of the NX server differ in terms of capabilities (and, of course, cost). FreeNX provides all of the core capabilities of the commercial NX server for remote connection, but it does not currently include the SMB and printing (CUPS) support provided by the commercial NX server. At the moment, commercial server licenses for NoMachine's personal edition cost around 55 euros, which is cheap. They also offer small business and enterprise licenses, which you may be interested in if you want to have product support, get updates, and get SMB and CUPS support now, rather than waiting for them to appear and mature in FreeNX. Personally, though I use FreeNX, I bought a server license because it seemed like the right thing to do. I use the free NoMachine client everywhere, and I also feel that the NoMachine folks deserve my support for having come up with a great technology and released it as open source. This hack explains how to install and configure the open source versions of NoMachine's NX server, the FreeNX package, and the free commercial NX client from NoMachine. 2.8.1. Installing the FreeNX ServerThe FreeNX server consists of two packages: the nx package, which consists of binaries and libraries compiled from the open source packages from NoMachine; and the freenx package, which is a set of client scripts that invoke the NX binaries in the right ways. Depending on the Linux distribution that your server is running, you can obtain these packages from different locations:
If you're using a distribution that isn't listed in the previous section, or you have a policy of installing nothing on your server without having the source code, you can build the GPL version of the NoMachine NX server from scratch in several ways: retrieve the source code from http://www.nomachine.com/download/snapshot/nxsources using wget -r and then follow the instructions at http://fedoranews.org/contributors/rick_stout/freenx/freenx.txt, or download the source RPM from one of the distributions listed above (SUSE's SRPM for the open source NX server is at ftp://ftp.suse.com/pub/suse/i386/supplementary/X/NX/NX-1.4.0-12.1.nosrc.rpm), install it using rpm or extract its contents into a tarball using alien, and then follow the instructions in the nx.spec file to see how to build it yourself. I prefer the latter approach, since the source includes any mandatory patches to build the official RPMs for SUSE, which is my desktop/server distribution of choice. As good open source citizens, NoMachine provides a document about building the open source portions of the NX products in the Documentation center at http://www.nomachine.com/documentation/pdf/building-components.pdf. If you manually downloaded RPMs, install them in the standard fashion, as in the following example (from a Red Hat 9 system): # rpm -Uvvh nx-1.4.0-4.1.rh9.at.i386.rpm # rpm -Uvvh freenx-0.3.1-0.1.rh9.at.noarch.rpm Next, use the nxsetup application to do the initial configuration of your NX server by specifying the --install option, as shown below: # /usr/bin/nxsetup --install Setting up /etc/nxserver …done Setting up /var/lib/nxserver/db …done Setting up /var/log/nxserver.log …done Setting up known_hosts and authorized_keys2 …done Setting up permissions …done Ok, nxserver is ready. PAM authentication enabled: All users will be able to login with their normal passwords. PAM authentication will be done through SSH. Please ensure that SSHD on localhost accepts password authentication. You can change this behaviour in the file. Have Fun! This step creates the nx user in the server's /etc/passwd file and sets up the files, directories, and keys used by FreeNX. Next, add any users that you want to be able to use the NX server to its user database and set their passwords, as in the following example: # nxserver --adduser wvh NX> 100 NXSERVER - Version 1.4.0-03 OS (GPL) NX> 1000 NXNODE - Version 1.4.0-03 OS (GPL) NX> 716 Public key added to /home/wvh/.ssh/authorized_keys2 NX> 1001 Bye. NX> 999 Bye # nxserver --passwd wvh NX> 100 NXSERVER - Version 1.4.0-03 OS (GPL) New password: Password changed. NX> 999 Bye Now you're ready to install and configure the NX client on any systems from which you want to access the FreeNX server. 2.8.2. Installing the NX ClientNoMachine's free NX clients for various Linux distributions, various flavors of Microsoft Windows, Apple's Mac OS X, and even Sun's Solaris are available from http://www.nomachine.com/download.php. The name of the NoMachine client binary is, surprisingly enough, nxclient. Though a free NX client for the KDE environment (called knx) is actively under development, the NoMachine NX clients are nicely done, work fine, and are free. You'll have to put up with seeing NoMachine's logo each time you start one up, but that's a small price to payand it's a cool logo!
If you've downloaded the RPM for the NoMachine NX client, you can install it using a standard RPM invocation such as: # rpm Uvvh rh9-nxclient-1.4.0-91.i386.rpm Note that the version of the file that you've downloaded, and therefore its name, may have changed by the time you read this. After downloading and installing the client on a desktop system, you'll need to copy the FreeNX server's key to your client installation. This key is located in the file /var/lib/nxserver/home/.ssh/client.id_dsa.key on a Linux FreeNX server, and it should be copied to the file /usr/NX/share/client.id_dsa.key on any Linux system where you've installed the NoMachine client. You must also make this file readable by mere mortals, so chmod it to 644. Windows client users should copy this file to the directory C:\Program Files\NX Client for Windows\share. 2.8.3. Configuring and Starting Your NX ClientNX client and server applications are installed in /usr/bin, which is probably already in your path, so no path munging is required to start an NX client. NoMachine's NX client enables you to create configuration files that specify parameters with which the nxclient application can be invoked. To create a configuration file, execute the following command: $ nxclient --wizard A friendly but content-free dialog displays. Click Next, and the dialog shown in Figure 2-16 displays. Enter a logical name for the connection in the Session text box, and specify the hostname or IP address of the NX server in the Host text box. You can then modify the slider settings to specify the type of network/Internet connection you're using, so that the NX client will select appropriate compression and optimization settings for your connection speed. Figure 2-16. The initial NX Client configuration dialog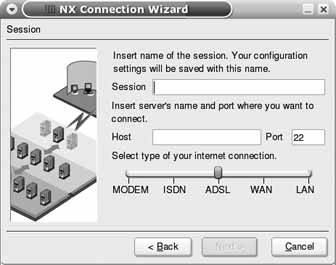 When you click Next, the dialog shown in Figure 2-17 displays. For standard X connections to a remote Linux or Unix server, leave the system type set to Unix, and click the KDE drop-down to select the type of desktop that you'd like the NX server to start for you. Next, click the Available Area drop-down and select the size of the remote desktop that you'd like to create. I tend to select 1024 x 768 because that's always smaller than the size of my desktop machine's monitor. Using the default Available Area setting is a better choice if you're using the NX client on a laptop that may or may not be connected to an external monitor. Figure 2-17. Specifying NX Client protocols and size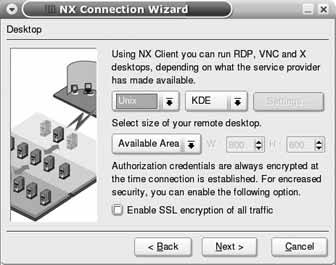 This dialog also enables you to provide an additional level of security by enabling SSL encryption. This encrypts all traffic between the client and the server, including your initial password exchange.
When you click Next, a final dialog displays that enables you to create a desktop shortcut or open the Advanced Configuration dialog, shown in Figure 2-18. The tabs in this dialog enable you to further optimize connections between your client and the FreeNX server, customize the paths to various files on your system, and so on. Once you've created a configuration, the standard NX Client dialog displays. Enter your password for the NX server, and the fun begins. The NX client authenticates to the remote NX server, negotiates connection parameters, and then displays a window in which a remote desktop session starts. You also get to see the NoMachine logo for a few seconds, which reminds you who should be thanked for this way-cool technology! Figure 2-19 shows a remote Linux desktop connection to a Red Hat 9 system running the GNOME desktop Figure 2-18. The optional NX Client Advanced configuration dialog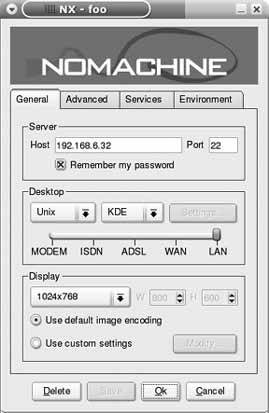 To terminate your NX client session, simply close the window as you would any other application. Like VNC connections, NX client connections can be suspended rather than simply terminated, so you'll see a dialog that asks if you want to suspend the session, terminate the session, or cancel the termination request. If you select Suspend, your existing connection to the remote NX server will be renewed the next time you start NX Client with the current configuration. 2.8.4. See Also
Figure 2-19. A remote FreeNX desktop shown in nxclient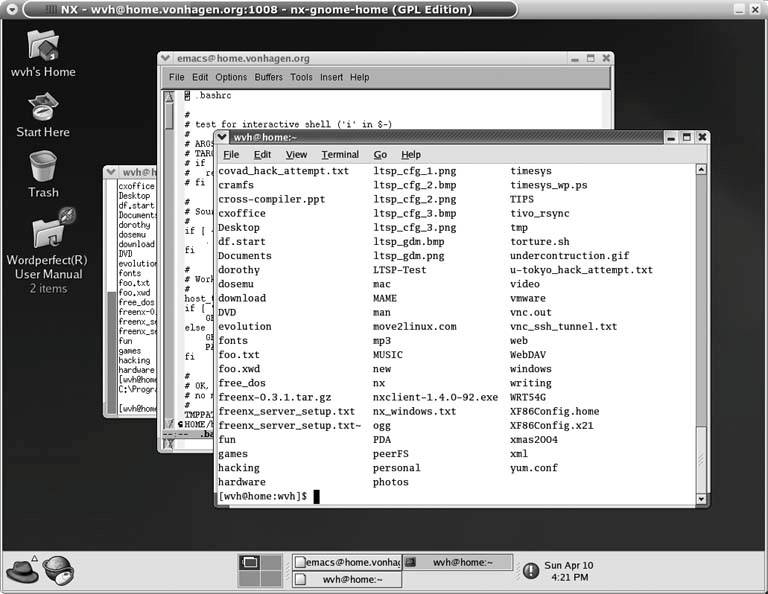 |

EAN: 2147483647
Pages: 162