Hack14.Put Your Desktops on a Thin Client Diet
Hack 14. Put Your Desktops on a Thin Client Diet
Centralize administration by using the Linux Terminal Server Project and existing or inexpensive desktop systems to give your users the computing power they need at a price you can afford. Though the cost of hardware is constantly decreasing, it is still greater than zero. Putting a high-powered workstation on everyone's desk is a nice idea, but not everyone needs a dual-processor Mac or Linux box to get their work done. The key requirement for most users is access to the applications and data they're working on and enough memory to work with them. The Linux Terminal Server Project (LTSP; http://www.ltsp.org) lets you boot desktop systems from a remote server, gives users access to their applications and data when they log in, and provides a graphical, X Window System working environment that is functionally identical to booting from a local disk. This can provide substantial cost savings by enabling you to deploy or reuse less-expensive hardware on your users' desktops, since it reduces the amount of local storage and other hardware that any desktop system requires. A processor that is too slow to keep up with the demands of today's applications can still function quite nicely when its sole function is to update a display and respond to mouse and keyboard input. Centralizing system resources on high-powered servers also provides substantial benefits to system administrators by eliminating the need to individually maintain and upgrade desktop operating systems and application software. All the software that a desktop system requires beyond a boot floppy or network boot information is stored on the server. The LTSP also provides a great alternative to deploying and maintaining dual-boot systems throughout your enterprise or installing X Window System software on every Windows box if users only need to run Linux software occasionally. Give the users LTSP boot disks configured for their desktop systems and have them reboot using these disks. Problem solved! They have Linux systems on their desktops until they reboot.
2.6.1. Understanding the LTSP Client Boot ProcessIn case the notion of systems booting and getting all their software over a network is new to you, this section provides an overview of the boot process for an LTSP client system. Being able to visualize how LTSP clients and servers interact will minimize configuration problems and will also be useful if you need to diagnose performance or connectivity problems in the future. LTSP client and servers interact in the following way when you boot an LTSP client:
Once you log in, you are logged in on the LTSP server system. The client system is running only the X Window System software necessary to manage network connections, run an X Window System server, and so on.
2.6.2. Downloading and Installing the LTSP SoftwareYou can download the LTSP administrative and configuration utilities as a tarball with an installer (http://www.ltsp.org/ltsp-utils-0.11.tgz) or as an RPM (http://www.ltsp.org/ltsp-utils-0.11-0.noarch.rpm). You can also download the latest LTSP software by following the download link from its Sourceforge project site at http://sourceforge.net/projects/lts/. As part of the initial configuration process, the LTSP administration utility downloads additional packages that the LTSP server(s) and clients require. These additional packages provide the kernel, X Window System utilities, and other components of the root filesystem used when LTSP clients boot from the server in order to start their X sessions. During the LTSP configuration process, you can either download these additional packages over the network or load them from a local CD-ROM or directory that provides them. To save time during the installation process and simplify installation in general, you should download an ISO image of a CD-ROM that contains all of these packages from http://ltsp.mirrors.tds.net/pub/ltsp/isos/ltsp-4.1-1.iso. If you've downloaded a tarball of the LTSP utilities, unpack it and execute the install.sh script to install the utilities on the system that you want to be your LTSP server. If you've downloaded the RPM, simply install it with your favorite RPM invocation. Mine is: # rpm -Uvvh ltsp-utils-0.11-0.noarch.rpm If you've download the ISO of the packages required by the LTSP server, burn it to a CD-ROM and mount the CD-ROM (or mount the ISO using a loopback device if you're in a hurry or don't have a CD burner handy). Now the real fun begins! 2.6.3. Configuring and Starting the LTSP ServerTo actually install the packages that an LTSP server needs and create your default LTSP configuration file, su to root (use su - to provide a pristine root environment) and execute the ltspadmin command. This command provides a terminal-oriented interface that enables you to install the packages and configure the system services required by required by an LTSP server. Figure 2-8 shows the ltspadmin utility's initial screen in an xterm. Figure 2-8. The initial screen of the ltspadmin utility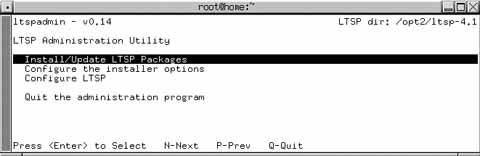 The first step in configuring an LTSP server is to configure the installer itself. Use the arrow keys to select the "Configure the installer options" menu option. The installer prompts you for the location from which to retrieve the packages required by the installer, providing a network source by default. If you've installed them locally, supply the pathname to the directory containing the packages in the form of a URL that begins with file://, followed by the full pathname. (This means that your URL must begin with three slashes: two for the protocol specification and one for the beginning of the path to the directory containing the packages. For example, if you burned a CD-ROM and mounted it as /mnt/cdrom, your URL would be file:///mnt/cdrom.) Next, you'll be prompted for the directory in which you want to install these packages on your server. You'll need to have about 350 MB free on the partition where this directory is located in order to do a complete install of all the LTSP software. Finally, identify any HTTP or FTP proxies you want to use (or specify none), and then enter y to accept the values that you've entered. The screen shown in Figure 2-8 will be displayed again. The next step is to select the Install/Update LTSP Packages option, which displays the screen shown in Figure 2-9. Figure 2-9. The ltspadmin utility's Select Packages screen Press A to select all the packages listed, and press Q to exit this screen and begin installing those packages. You'll have to answer y to an "are you really, really sure" prompt, and then package installation to the specified directory will begin. Once all the packages are installed, press Enter and select the Configure LTSP option. This starts the ltspcfg utility and begins LTSP configuration. ltspcfg first checks and summarizes the status of all the services that LTSP requires on your server. Press Enter to continue, and you'll see two options: S to summarize the status of required services of your LTSP server, and C to actually configure them. Figure 2-10 shows the summary screen. Figure 2-10. The ltspcfg utility's Summary screen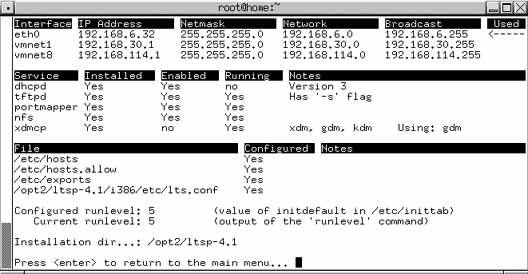 Selecting C displays the screen shown in Figure 2-11, which lists the various aspects of the LTSP server that have to be configured for the terminal server. Figure 2-11. The ltspcfg utility's Configuration screen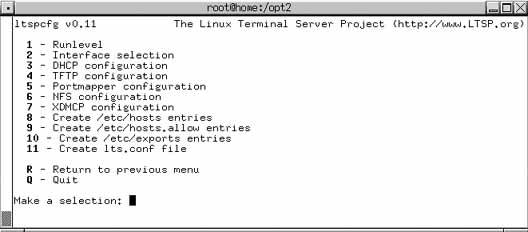 An LTSP server must provide or have access to the following services in order to function correctly:
We're all sysadmins here, so rather than walking through each step and listing each keypress, I'll just highlight the services that you have to activate and the types of values that you need to enter:
option routers 192.168.6.32; option domain-name-servers 192.168.6.32; option domain-name "vonhagen.org"; option root-path "192.168.6.32:/opt2/ltsp-4.1/i386"; subnet 192.168.6.0 netmask 255.255.255.0 { use-host-decl-names on; option log-servers 192.168.6.32; range 192.168.6.100 192.168.6.120; filename "/lts/vmlinuz-2.4.26-ltsp-2"; } "Quick and Easy DHCP Setup" [Hack #20] has more detailed information about setting up DHCP and all the entries in the /etc/dhcpd.conf file.
At this point, you should reboot your LTSP server and verify that all the mandatory services have started automatically (DHCP, portmapper, NFS, and an X display manager) and that other mandatory services such as TFTP are enabled. Almost there! 2.6.4. Preparing LTSP Client Boot MediaOnce the LTSP server is configured, the next step is to figure out how you want to boot your clients. There are a variety of ways of booting LTSP clients:
Of these, the most common and easiest to start with is booting from floppy. You simply write the customized Etherboot image to a floppy and then ensure that the client system is configured to boot from its floppy disk drive first. The client boots the image on the floppy, which initializes your client's network interface, then sends out a DHCP request and uses the boot-file and root-path images to download the kernel and boot using the specified root filesystem. Creating an Etherboot image customized for your client's network card would be completely outside the scope of this hack if it weren't for the amazing ROM-O-Matic web site (http://www.rom-o-matic.net)simply identify your network card, and the web site will generate a boot image for you and download it to your system. It doesn't get much easier than that! To create the right ROM image, you need to know the exact PCI ID of your network card. If you're not sure which card you have, the easiest thing to do is to boot your client using a rescue disk [Hack #90] or other bootable CD (the Knoppix Live CD included with Knoppix Hacks, also from O'Reilly, is a personal favorite). After logging in, you can run the lspci command to identify your Ethernet card and then run the lspci -n command to display the PCI identifiers (two four-digit, colon-separated numbers) for your card. You can then match these against the versions of your card listed on the ROM-O-Matic site, click Get ROM, and save the ROM image to your system. You can then write it to a floppy disk using a command like the following (as root): # cat ROM-filename > /dev/fd0 You're now seconds away from turning an old PC into a useful X terminal. 2.6.5. Booting an LTSP ClientBefore booting your LTSP client, make sure that all the services required by the LTSP server are running on the server, and that the client is configured to boot from its floppy disk first. Drumroll, please! Insert the floppy disk in the client's floppy drive and power on the system. After the generic POST messages, you should see a message about loading the ROM image, followed by some Ethernet configuration information and the message "(N)etwork Boot or (Q)uit." Press N, and your system will download and boot the Linux kernel from your LTSP server. After the standard Linux boot messages, you will see a screen that displays the login dialog shown in Figure 2-12. Figure 2-12. An LTSP client's GDM login dialog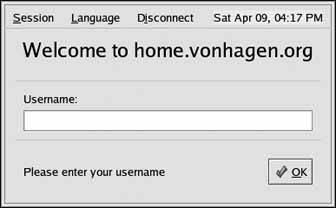 Congratulationsyour doorstop is now a useful X terminal! Once you have an LTSP server configured and set up, the only thing you have to do to create additional client systems is to generate ROM images for the appropriate Ethernet cards, put each on a floppy, and boot the new client with an appropriate boot floppy. This is especially easy if you tend to buy your PCs in batches or from a single vendorchances are that many of them will have the same Ethernet cards and can use the same boot floppies. 2.6.6. See Also
|

EAN: 2147483647
Pages: 162
- Challenging the Unpredictable: Changeable Order Management Systems
- Context Management of ERP Processes in Virtual Communities
- Distributed Data Warehouse for Geo-spatial Services
- A Hybrid Clustering Technique to Improve Patient Data Quality
- Relevance and Micro-Relevance for the Professional as Determinants of IT-Diffusion and IT-Use in Healthcare