Hack13.Autostart VNC Servers on Demand
Hack 13. Autostart VNC Servers on Demand
Eliminate the need to manually start VNC servers on remote machines. In this age of enlightenment and whizzy graphical devices, most Unix servers have graphical consoles instead of the VT100s or LA123s of days gone by. This is certainly true of most Linux servers, though most machine rooms save space by installing a single monitor and using a KVM to switch between the systems that are actually using it at the moment. As explained in "Access Systems Remotely with VNC" [Hack #10], the traditional mode of operation for VNC is to SSH/telnet/whatever to a remote system, manually start a VNC server, and then nip back to the system you're actually using and start the VNC viewer there. It's easy enoughbut isn't the whole "SSH there, stand on one leg, start this, pop back here, start that here" business irritating? This hack explains how to avoid all that by integrating the VNC X Window System server directly into your graphical X Window System login environment. The basic idea is that you configure your machine to use your system's Internet daemon (xinetd or inetd) to start the Xvnc server whenever an incoming VNC connection is sensed on one or more ports. You also configure your system to use the X Display Manager Control Protocol (XDMCP) to manage any new X displays, such as the Xvnc server. When the Xvnc server starts in response to an incoming port request, it displays an XDMCP login screen, you log in, and voilà! 2.5.1. Integrating Xvnc with inetd or xinetdThe modern Linux Internet daemon xinetd (like its predecessor inetd, which may still be used somewhere) initiates the daemons associated with various servers in response to incoming requests on different ports, as defined in the file /etc/services. Throughout the rest of this hack, I'll refer to xinetd and inetd together as x/inetd, using their specific names whenever necessary to differentiate between them. The x/inetd daemon is often referred to as a "super server," because its job is to manage other server processes. Using x/inetd lowers the load on your systems, because the daemons for these services don't have to be running all the timex/inetd starts them as needed when an incoming request is detected. Using x/inetd also heightens security on your systems by providing what are commonly known as TCP wrappersa central mechanism for enabling or denying TCP access to a number of services through entries in the files /etc/hosts.allow and /etc/hosts.deny, respectively. The first step in integrating VNC with x/inetd is to create an appropriate entry for VNC in the text file /etc/services. On new systems that I set up, I decided that automatic VNC sessions would start on port 5908choosing a value higher than 5900 will prevent collisions when a user manually starts a VNC session on the server using a lower port number. An appropriate /etc/services entry for automatically starting VNC in response to incoming requests on port 5908 is the following: vnc 5908/tcp # Xvnc Once you've created this entry in /etc/services, you must next define what happens in response to an incoming request on this port. If you're using xinetd, you must create the file /etc/xinetd.d/vnc, which contains various settings for how xinetd should respond to incoming requests, which application it should start, and so on. Here's a sample /etc/xinetd.d/vnc file: # default: on # description: The vnc server provides remote desktop connections # service vnc { disable = no socket_type = stream protocol = tcp wait = no user = nobody server = /usr/bin/Xvnc server_args = :8 -inetd -once -query localhost -depth 24 \ -geometry 1280x1024 -securitytypes=none } The server_args entry should be on a single line, but I've broken it into two in this example for readability. The arguments that you specify to the Xvnc server are highly dependent on the version and source of the Xvnc server that you're running. The arguments shown in the previous example mean the following:
Depending on the version of Xvnc that's installed on your system, you may need other or additional options:
If you're still using inetd, the equivalent of the /etc/xinetd.d/vnc file is a single entry in the file /etc/inetd.conf. Here's an example entry that matches the previous xinetd example: vnc stream tcp nowait nobody /usr/sbin/tcpd /usr/bin/Xvnc :8 -inetd \ -once -query localhost -depth 24 -geometry 1280x1024 \ -securitytypes=none As with the server_args enTRy in the xinetd example, this should all appear on a single line in your /etc/inetd.conf fileI've only broken it across multiple lines here for readability. The same caveats about possible alternate/extra arguments apply to an /etc/inetd.conf entry. 2.5.2. Activating XDMCPXDMCP is a network protocol used for initiating login sessions on X Window System display devices. Originally developed in 1989, XDMCP is primarily associated with X terminals [Hack #14]), but it can be used with any X Window System devicesuch as, in this case, the X server started by Xvnc. Most systems that come up in graphics mode use an X Window System display manager to provide a graphical login and subsequently start the window manager or desktop environment of your choice. Graphics mode is usually runlevel 5 for most Linux systems, or any of runlevels 2 through 5 if you're a Debian or Ubuntu fan. By default, the X display manager manages the X Window System device associated with the console, but it is optionally responsible for responding to XDMCP requests and initiating the appropriate X Window System login sessions on new X Window System devices. XDMCP support is a configuration option for all X display managers, but it is usually disabled by default since most display managers only need to support X login sessions on their consoles. How you activate XDMCP support depends on which display manager you're using, which is usually determined by the default desktop system used on your Linux system. GNOME uses a display manager called gdm, usually found in /usr/bin/gdm (which calls /usr/bin/gdm-binary) or in /opt/gnome/bin/gdm on KDE-based systems such as SUSE. KDE uses one called kdm, usually found in /opt/kde3/bin/kdm. The classic X Window display manager, often used on systems where neither GNOME nor KDE is installed, is xdm, and it is usually found in /usr/X11R6/bin/xdm. If you are running Red Hat Linux, you can check the script /etc/X11/prefdm to see how your system selects its default display manager and which one it is. You can also figure out which display manager your system is actually running by looking for the string dm in a system process listing, as in the following example: $ ps -ef | grep dm root 5137 1 0 May25 ? 00:00:00 /opt/kde3/bin/kdm root 5167 5137 65 May25 ? 3-01:52:35 /usr/X11R6/bin/X \ -br vt7 -auth /var/lib/xdm/authdir/authfiles/A:0-K7ItZv wvh 29664 24116 0 13:42 pts/11 00:00:00 grep -i dm In this case, the system is running kdm as its display manager, so you'll have to correctly configure kdm to support XDMCP. Needless to say, each of these X Window System display managers has its own configuration file, in which you must enable XDMCP so that when Xvnc queries the localhost, the local display manager will initiate an X login session. If the system on which you are configuring Xvnc runs gdm, the GNOME desktop provides a convenient application called gdmsetup for configuring gdm. Start gdmsetup as root or by using sudo, select the XDMCP tab, and select Enable XDMCP to activate XDMCP support in gdm the next time you restart the X Window System. Figure 2-5 shows this tab selected in gdmsetup, with XDMCP enabled. Figure 2-5. XDMCP activation in gdmsetup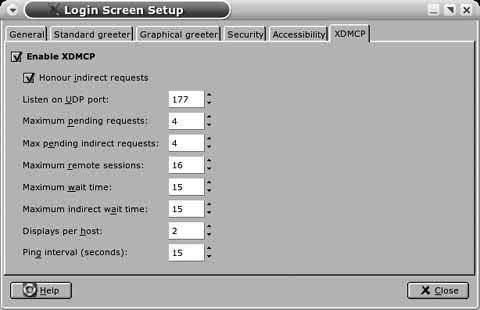 You can also manually modify the gdm configuration file as an alternative to running gdmsetup. On many Linux systems, this configuration file is /etc/X11/gdm/gdm.conf. If the system on which you are configuring Xvnc runs kdm, you can either use the administrative utilities provided by your system or manually modify the kdm and system configuration files that control its behavior. For example, on SUSE systems, you can use the YaST administrative modules from the Control Center (Control Center If you'd prefer to tweak the configuration files yourself, you can modify the primary kdm configuration file (/opt/kde3/share/config/kdm/kdmrc) with a text editor, changing the Enable enTRy in the [xdmcp] section to true and making sure that the Port=177 entry is not commented out. You will also have to modify the file /etc/sysconfig/displaymanager, setting the DISPLAYMANAGER_REMOTE_ACCESS variable to yes. You can then run /sbin/SuSEconfig to cause SUSE to perform the correct internal updates. Figure 2-6. XDCMP configuration in SUSE's YaST utility Once you have modified your display manager to support XDMCP, you will need to restart the display manager with the correct settings. The easiest way to ensure a complete restart is to reboot your system, but if you are running critical services on that system, you can also use the telinit or init commands to take your system to a nongraphical runlevel (telinit number-of-runlevel or init number-of-runlevel) and then return to a graphical runlevel, such as runlevel 2 for Debian-based distributions or runlevel 3 for most others. You can then use telinit to return to runlevel 5. Some flavors of Linux provide scripts (such as SUSE's rcxdm restart command) that will automatically terminate the X Window System and restart the display manager for you without switching runlevels.
2.5.3. Starting the ViewerOnce you've set up your system to initiate Xvnc in response to incoming requests and have configured your display manager to respond to XDMCP requests, go to another system and start your favorite VNC viewer application, pointing to a port that you specified in /etc/xinet.d/vnc. After a few moments, you should see something like Figure 2-7. Congratulationsinitiating VNC sessions to your host(s) is now easier than ever before, and you no longer have to start VNC manually on those systems like an electronic catcher's mitt to service incoming VNC requests! Figure 2-7. A successful Xvnc connection using XDMCP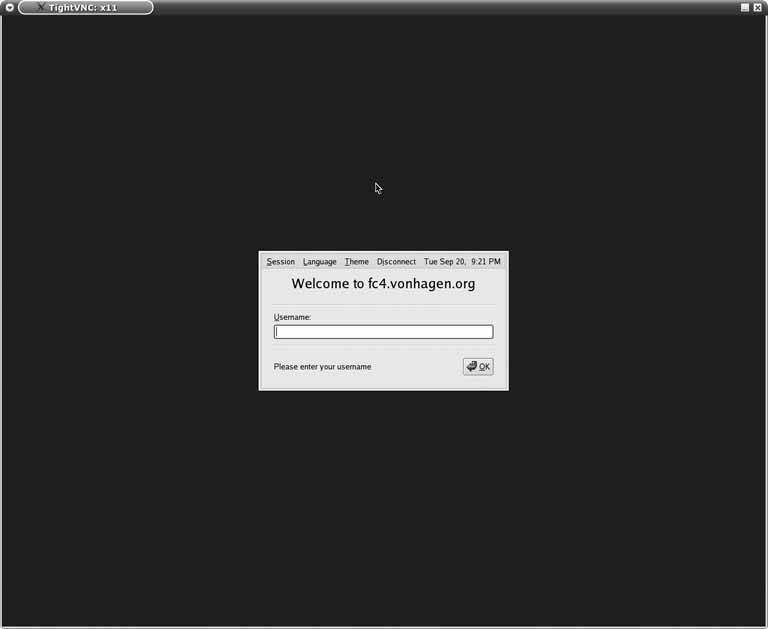
2.5.4. Troubleshooting Xvnc StartupIf you're lucky, you're already looking at Figure 2-7 and thinking "problems what problems?" However, if your vncviewer simply hangs or terminates with information-packed messages such as "vncviewer: ConnectToTcpAddr: connect: Connection refused" or "Unable to connect to VNC server," don't despair. These problems are easily resolved. If your vncviewer connection to the remote machine simply hangsi.e., you press Return and nothing happenschances are that the ports associated with your VNC setup are being firewalled on the remote machine, the local machine, or somewhere in between. Check to make sure that whatever ports you put in /etc/services on the remote system are actually available and that a process is listening on the XDMCP port. An easy way to do this is by executing the netstat -an command and filtering its output for port 177, the port used by XDMCP, as in the following example: $ netstat -an | grep 177 udp 0 0 :::177 :::* If you do not see any output from this command, make sure you have correctly configured XDMCP support in your display manager and that the Xvnc entries in /etc/xinetd.d/vnc are not disabled. Worst-case, you can reboot your system to make sure everything starts up correctly. If you still can't establish a VNC connection to your system, make sure no firewall rules are blocking any of the ports used by XDMCP or Xvnc. An easy (but completely insecure) way to do this is to temporarily terminate your firewalls or punt all your active rules using a command such as iptables -F. First try this on the system that you are trying to connect to; then, if you still can't connect, try it on the system you are trying to connect from. If you can connect successfully after disabling the firewall, review your system's firewall configuration and relax the appropriate rules to enable remote VNC connections. Remember to reactivate your firewalls after reconfiguring themyou don't want the entire seventh-grade class of PS150 in Seoul to be able to try getting graphical logins on your machine! 2.5.5. See Also
|
 YaST2 modules

EAN: 2147483647
Pages: 162