Creating Constraints
|
Data dictionaries support three types of constraint definitions: field-level, record-level, and referential integrity. While there are some similarities between these various types of constraints, the steps you take to implement them are quite different. As a result, the creation of each constraint type is described in its own section.
Defining Field-Level Constraints
You define field-level constraints using a table’s Fields dialog box. Figure 5-1 shows the Fields dialog box for the CUSTOMER table in the DemoDictionary project.
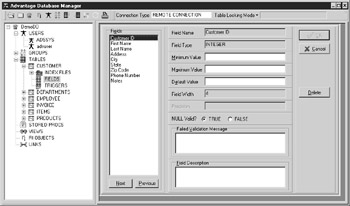
Figure 5-1: The Fields dialog box for the CUSTOMER table in the DemoDictionary data dictionary
| Note | The steps for creating the DemoDictionary data dictionary are explained in Chapter 4. If you did not create this data dictionary, and want to follow along with the examples in this chapter, you should return to Chapter 4 and create this data dictionary before continuing. |
The Fields dialog box serves several purposes. First, it displays a list of the fields of the associated table, ordered by the table’s structure. When you select one of the fields from this list, you can view its metadata, including its name, its type, its width (in bytes), and its precision (where applicable).
The second purpose that this dialog box serves is that it permits you to set a default value for fields. When a new record is being inserted, fields that have not been assigned a value will be assigned the default value. If no default value is specified, fields that are not assigned a value when the record is being inserted will contain the value of NULL.
Imagine, for instance, that you have a sales rep table, and that one of the fields of the sales rep table is the code for the office to which the employee is assigned. You may define that the default value for the office field is a value, say 100, that indicates that no office has yet been assigned. In a situation like this one, this default value would be a valid key field in the related table that contains information about offices.
A third feature of this dialog box is that it permits you to assign a description to each field in the table. This feature is especially useful when the purpose of a field cannot be easily determined by its field name. It can also be useful for validation. The following SQL statement can be used to retrieve this description:
SELECT * FROM system.columns
The final feature offered by this dialog box is the assignment of field-level constraints. The three field-level constraints are minimum value, maximum value, and required (NULL valid).
These field-level constraints are pretty self-explanatory. The minimum and maximum values define the acceptable range for data. Fields containing data that exceed either of these limits are rejected. If no minimum or maximum value is set, the data type of the field will define the field’s limits.
The NULL valid radio buttons permit you to define whether or not it is acceptable to post a record where the associated field does not contain data. The default value is True, meaning NULLs are acceptable values for the field. If you set Null Valid to False, posting a record where the associated field has not been assigned a value will produce an error, and the record will be rejected.
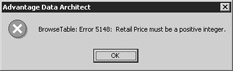
When a record cannot be posted because at least one field’s field-level constraints is violated, ADS generates an error that includes the ADS error code as well as a description of the error. For example, if you set a minimum value of 0 for a field named Retail Price, and then a client application attempts to post a record where the Retail Price value is a negative number, ADS will generate an error message similar to the one shown here:

When you configure at least one of the field-level constraints for a particular field, you have the option of providing a custom error message that will be displayed in place of the descriptive text that ADS would have added to the error message. For example, if you assign the text Retail Price must be a positive integer to the Failed Validation Message field, attempting to post a record with a negative retail price will produce this error message:
How Field-Level Constraints Are Applied
From the Fields dialog box, the Advantage Database Manager keeps track of each field to which you define one or more field-level constraints. After you are through setting field-level constraints for one or more fields in your table, and you click the OK button on the Fields dialog box, the Advantage Database Manager will apply the constraints to the table.
These constraints are applied one field at a time, using the order in which you first defined the constraints. For example, if you are applying at least one field-level constraint to three different fields, there will be three independent operations on the table, with the first operation applying all of the constraints you defined for the first field you set constraints for, the second operation applying constraints to the second field you set at least one constraint for, followed by the third operation on the last field to which you defined constraints.
The Advantage Database Manager permits you to define how the constraints are applied to each field individually. For example, if you applied at least one field-level constraint for three different fields, you must decide how each of those fields will be validated. For some fields you might want to remove invalid records from the table, for others you might want to ignore invalid data, and for another you might want to abort the application of the constraints if even one record contains data in that field that does not pass the constraints.
You make the decision on how to validate a particular field once you are done setting one or more constraints for it. Specifically, the Advantage Database Manager displays the Validation Method dialog box for a particular field if you have changed one or more constraints when you select another field to set constraints for, or you click OK to begin applying your constraints. You must select from this Validation Method dialog box before you can set constraints to another field, or save your work and begin applying the constraints.
Using the Validation Method dialog box to apply your constraints is discussed later in this section.
Field-Level Constraint Example
The following steps demonstrate how to add field-level constraints to a table. Begin by opening the DemoDictionary data dictionary in the Advantage Data Architect:
-
Select the PRODUCTS node under the TABLES node in the Database Tree View, and expand it.
-
Select the FIELDS node to display the Fields dialog box.
-
Select the Product Code field in the Fields list, and then set NULL Valid to FALSE.
-
Select the Retail Price field in the Fields list. At this point, the Validation Method dialog box is displayed so that you can define what the Advantage Database Manager should do if one or more records contain data in the Product Code field that does not pass the newly selected constraints. Select VALIDATION WITH ERROR from the dropdown list and click OK. You are now shown the current constraints for the Retail Price field.
-
Set NULL Valid to FALSE, and set the Minimum Value field to 0.
-
Finally, set Failed Validation Message to Retail Price must be a positive integer. Your screen should look similar to that shown in Figure 5-2.
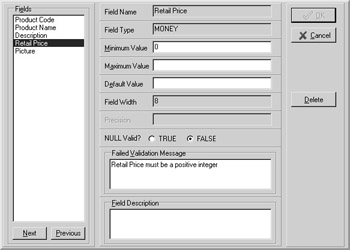
Figure 5-2: The Fields dialog box for the PRODUCTS table -
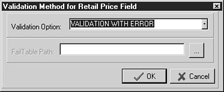
Click OK. The Advantage Data Architect now displays the Validation Method dialog box once more, permitting you to define how to apply these constraints to the Retail Price field. Set Validation Option to VALIDATION WITH ERROR, and then click OK, as shown here:
The Validation Method Dialog Box
Constraints are formal declarations of what constitutes bad data. If you apply one or more constraints to an existing table, there is a real possibility that some of the existing data is inconsistent with the constraints. You use the Validation Method dialog box to instruct the Advantage Database Manager how to handle invalid data if it is encountered when you first define the constraint.
You select from five options on the Validation Method dialog box: NO VALIDATION, VALIDATION WITH APPEND TO FAIL TABLE, VALIDATION WITH FAIL TABLE CREATE, VALIDATION WITHOUT RECORD SAVE, and VALIDATION WITH ERROR.
Set Validation Option to NO VALIDATION if you want the Advantage Data Architect to ignore invalid data that currently exists in the table. Any records whose data violates any of the constraints you are applying will remain in the table.
That constraint-violating records may remain in the table when you choose NO VALIDATION makes this option very unattractive in most cases. Imagine what would happen if one of these invalid records needed to be modified. Unless the modification fixed the validation problem, it would be impossible to post those changes. This may place the end user in the unfortunate position of having to fix a problem that they did not cause. In fact, if the user doesn’t have field-level access rights to the field where the constraint violation exists, they would not be able to correct this problem.
Three of the Validation Method dialog box options provide for the removal of any records that would otherwise violate the constraints you are adding to the table. Two of these, VALIDATION WITH APPEND TO FAIL TABLE and VALIDATION WITH FAIL TABLE CREATE, save the offending records to an ADT table called the fail table.
The VALIDATION WITH APPEND TO FAIL TABLE option adds the offending records to an existing fail table, although a fail table will be created if an existing fail table does not exist when the first offending record is encountered. The second option, VALIDATION WITH FAIL TABLE CREATE, should only be used when you want to create a new fail table, overwriting any previous fail table with the same name. Do not select VALIDATION WITH FAIL TABLE CREATE if you are setting constraints on more than one field, since a second fail table creation will cause the loss of records saved in a previous creation.
If you select either of these fail table–creating options, examine the fail table to see if records were placed there once the constraints have been applied. If one or more constraint-violating records were removed to the fail table, you can edit these records, correcting whatever problem they have, and then add them back to the original table.
The next option that removes constraint-violating records from your table is VALIDATION WITHOUT RECORD SAVE. When you select this option, records that violate one or more of the constraints that you are applying are deleted from the table, and are permanently lost. Use this option only if you are certain that you don’t want any records that violate your constraints.
The final option is VALIDATION WITH ERROR. If you select this option, and your table contains at least one record that contains invalid data in a field to which constraints are being applied, the process halts. Specifically, constraints are not applied to this field, nor are they applied to any remaining field to which constraints have not yet been applied. Furthermore, an error message is displayed, indicating which field caused the error. Under these circumstances, it is possible that some, but not all, of your constraints may have been applied.
What some developers do when applying constraints is to always choose VALIDATION WITH ERROR. If the Fields dialog box reports that the constraints could not be applied, they then examine the data to locate and fix the errors, after which they attempt to apply the constraints again. Occasionally during this examination, the developer concludes that an adjustment needs to be made to one or more of the constraints, and not the table’s data.
If you really want to have control, use VALIDATION WITH ERROR, but apply constraints to only one field at a time, clicking OK to initiate the application of the constraints on only that field before attempting to apply constraints to the next field. Using this technique, you will get your constraints applied in an all or none fashion.
Defining Record-Level Constraints
Record-level constraints are defined using a Boolean expression. This expression can include field references, constants, and comparison operators, as well as any of the functions associated with the Advantage expression engine. This expression is evaluated each time a record is being posted to a table. If the filter expression evaluates to a Boolean False, an error is generated and the record is rejected.
You define a table’s record-level constraint from the table’s properties dialog box. Right-click the table’s node and select Properties to display this dialog box. The CUSTOMER table’s properties dialog box is shown in Figure 5-3.
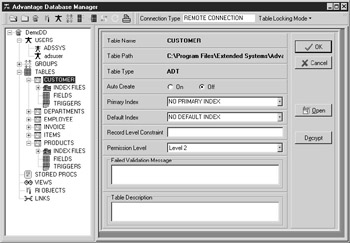
Figure 5-3: The properties dialog box for the CUSTOMER table
Like the Fields dialog box, a table’s properties dialog box permits you to configure a number of characteristics of a table. For example, the Auto Create radio buttons permit you to define this table as an auto-create table.
When Auto Create is set to On, the data dictionary uses information it stores about the table’s metadata and indexes to re-create the table and all of its indexes at runtime if the table is not found when a client application attempts to open the table. This is a particularly useful feature for developers who distribute empty databases. For these developers, they can deploy only the data dictionary, permitting the tables and indexes to be created on-the-fly when needed.
In addition, if a table exists, but its index files do not, setting Auto Create to On causes index files to be auto-created when that table is opened by the client application as long as the indexes were previously included in the data dictionary definition.
| Note | ADS writes an error 5168 to the error log file whenever a table or index is auto-created. The client application never sees an error message, however, since this is not a true error and is only written to the log file to let the developer know that auto-creation has occurred. |
The table properties dialog box also permits you to designate primary and default indexes. The primary index definition is used by the Advantage Database Manager to create referential integrity constraints. A primary index must be a unique index. More will be said about primary indexes later in this chapter.
A default index, when accessed using the Advantage TDataSet Descendant or the Advantage OLE DB provider (when using ADO and opening a table directly using adCmdTableDirect), is the index order that a table will make active by default. In other words, if you have not specifically set an active index, the default index order, if designated, will be used. If you do not select a default index, a table that has no active index is displayed in its natural order.
Two additional features that you can set from the table properties dialog box are the table’s permissions level and description. Permissions Level is associated with field-level access privileges. Field-level access privileges and permissions levels are discussed in Chapter 4. You use the Table Description to document the purpose of the table.
The final feature that you can configure on the table properties dialog box is the record-level constraint. You enter your record-level constraint in the Record Level Constraint field. You can also supply a custom error message in the Failed Validation Message field.
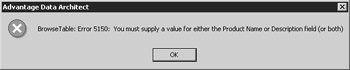
Once the record-level constraint has been applied, if you attempt to post a record that violates a record-level constraint to the table, ADS will generate a 5150 error that will look something like the following:

This particular error is the one that is generated if you do not specify a failed validation message. If you do specify a failed validation message, your custom message appears in the error along with the error code. For example, if your failed validation message is “You must supply a value for either the Product Name or Description field (or both),” the error will look like the following:
Record-Level Constraint Example
Use the following steps to add a record-level constraint to the PRODUCTS table:
-
Right-click the PRODUCTS table node in the Advantage Database Manager tree view and select Properties.
-
Set Record Level Constraint to the following value:
NOT ((Product Name=NULL) AND (Description=NULL))
-
Set Failed Validation Message to You must supply a value for either the Product Name or Description field (or both).
-
Click OK. Similar to field-level constraints, the Advantage Data Architect now displays a Validation Option dialog box.
-
Set Validation Option to VALIDATION WITH ERROR and click OK.
The Validation Option dialog box options are identical to those that apply to field-level constraints. Refer to the preceding section for a discussion of these options.
|
EAN: 2147483647
Pages: 129