Adding Tables to a Data Dictionary
|
While a data dictionary provides you with access to a number of different types of objects, these aren’t very useful unless you have tables for them to work with. As a result, adding tables to a newly created data dictionary is often one of your first tasks.
You can add any of the ADS-supported table types to a data dictionary, but it is nearly always preferable to use ADT tables. Not only do ADT tables have superior characteristics, compared to DBF tables, but when used with data dictionaries, the definitions for that table that you save to your data dictionary will always be respected. This is because when an ADT table is added to a data dictionary, information stored in the table’s header prevents it from being accessed as a free table (unless you later free that table from the data dictionary).
The same cannot be said about DBF tables. Specifically, while you can add one or more DBFs to a data dictionary, there is nothing to prevent applications from accessing those tables directly, without using the data dictionary. Obviously, when accessed without the data dictionary, it is possible to perform tasks that a data dictionary would have otherwise prevented.
For example, imagine that you have configured a data dictionary to prevent a particular user from accessing a specific DBF table. So long as the user is working with a client application that uses the data dictionary, access will be prevented. However, if another application uses the DBF table directly, it is entirely possible that the user would then be given access to the table.
There are a number of different ways that tables can be added to a data dictionary. You can right-click the TABLES node in the Advantage Database Manager tree view and select Create New Table. Doing so displays the Creating Table dialog box described in Chapter 2. You use this dialog box to define the structure of the new table you want created. When you click Execute from this dialog box, the new table is created as a database table.
Alternatively, you can add existing free tables to the data dictionary. This second approach is the one that you are going to use in the following section.
Opening a Data Dictionary
Before we add tables to a data dictionary, it makes sense to learn how to open a data dictionary in the Advantage Database.
-
If the DemoDictionary is still open in the Advantage Database Manager, click the Close icon in the upper-right corner of the Advantage Database Manager to close this window.
-
Now, select Database | Open Database from the Advantage Data Architect main menu. The Advantage Data Architect displays the Select a Database dialog box:
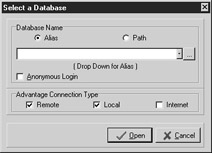
Note ADS uses a remote connection as shown in the Advantage Connection Type option of the Select a Database dialog box. If you are using ALS, you would select Local for the Advantage Connection Type option. If you have both options checked, the Advantage Data Architect will first attempt to connect to ADS, and then attempt to connect to ALS if ADS is not available.
-
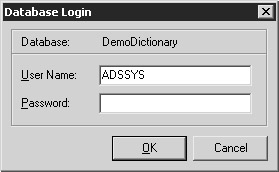
Select the Alias radio button. Next, select DemoDD from the Database Name dropdown list and then click Open. The Advantage Data Architect displays the Database Login dialog box:
-
Set User Name to ADSSYS and Password to password. Click OK. Assuming that you entered the user name and password correctly, DemoDictionary.ADD (with alias DemoDD) will be opened in the Advantage Database Manager.
Adding Existing Tables to a Data Dictionary
Adding existing tables to a data dictionary is easy. The following steps show you how:
-
With the DemoDictionary data dictionary open in the Advantage Database Manager, right-click the TABLES node in the Advantage Database Manager tree view, and select Add Existing Table(s). The Open dialog box is displayed.
-
Use the Open dialog box to navigate to the directory into which you copied the sample ADT tables, as described in Appendix B (this is the same directory in which DemoDictionary.ADD is stored).
-
Select the CUSTOMER.ADT and the EMPLOYEE.ADT tables. To do this, hold down the CTRL key and click on CUSTOMER.ADT and on EMPLOYEE.ADT. With both tables selected, click the Open button. The two newly added tables should now appear as nodes beneath the TABLES node, as shown in Figure 4-3.
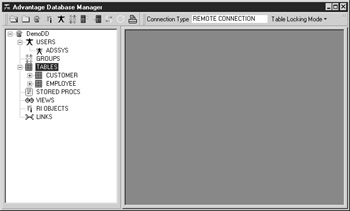
Figure 4-3: The CUSTOMER and EMPLOYEE tables have been bound to the DemoDictionary data dictionary.
Removing a Table from a Data Dictionary
You remove a table from a data dictionary using the Advantage Database Manager. To remove a table, right-click the desired table node in the tree view of the Advantage Database Manager and select Remove.
| Caution | There is also a utility called FREEADT.EXE that can be used to free tables from a data dictionary. However, there are few occasions when it should be used since tables you free using this utility still remain in the data dictionary definition even though they are freed. To remove tables from the data dictionary definition, you will most likely use the Advantage Database Manager, although you can also remove tables programmatically using the ACE API, or using the SQL DROP TABLE command (which both deletes the table and removes the table from the data dictionary definition). |
|
EAN: 2147483647
Pages: 129