Installing Red Hat Linux, Step by Step
Now that you ve checked your CDs, you re ready to start installing Red Hat Linux 9 on your computer. The actual installation process does not have to be nearly as complex as I ll portray in this chapter ”I m just trying to give you a feel for everything that Anaconda can do for you. I ve divided this process into several sections:
-
Selecting Installation Prompt Options describes what you can do at the first installation boot: prompt.
-
Configuring Basic Parameters allows you to examine your choices with your keyboard and mouse, as well as the language used by Anaconda during the installation process.
-
Setting Up Hard Drives takes a detailed look at how you can configure different types of partitions in different formats using Disk Druid.
-
Configuring Installation Details permits you to examine the nitty-gritty configuration details of the Red Hat Linux installation.
-
Selecting Package Groups takes a look at the various package groups that you can install with Red Hat Linux as well as the individual package options.
-
Managing Post-Installation Steps helps you configure the X Window and create a custom boot disk for your new system.
These steps assume that you re installing Red Hat Linux from the installation CDs. If you would rather install Red Hat Linux over a network connection, read Chapter 04 .
This section assumes you ve already changed the BIOS per Chapter 02 to boot from the first Red Hat installation CD. If you haven t, make sure your BIOS at least boots first from your floppy drive, or create a boot disk. Also keep in mind that this installation is based on a desktop computer with Microsoft Windows 98 currently installed. I ve applied fips to the hard drive per Chapter 02 to create an empty partition with approximately 6GB of free space.
| Note | It s possible to start the graphical installation process over an NFS (Network File System) connection. For more information on setting up an NFS-based network installation, see Chapter 04 , and then return here for the graphical installation steps. |
Selecting Installation Prompt Options
You can start the installation process by booting your computer from one of two sources: the first Red Hat installation CD, or a boot disk. Either media will get you to the same start screen, shown in Figure 3.7. When you see this screen, press F2 within 60 seconds. Otherwise , Red Hat Linux starts graphical-mode installation automatically.
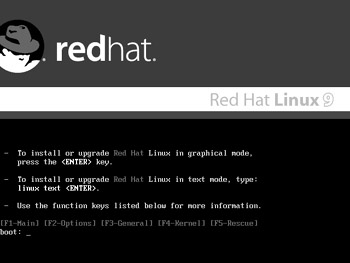
Figure 3.7: The installation prompt
As you can see, several menus are available. We ll examine the different installation screens. The selections on the first screen are basic: you can choose to install Red Hat Linux in graphical or text mode. We examine graphical mode in this chapter and text mode in Chapter 04 . When you press F5, Anaconda takes you to the Rescue Mode Help screen, which is unrelated to installation and is covered in Chapter 11 .
When you re ready, you can press Enter to start graphical-mode installation, or type text and press Enter to start text-mode installation. In most cases, those are the best options.
However, if you have problems during installation, you may want to start again and try something else. Therefore, proceed to the Installer Boot Options section to examine the variety of commands that you can run at the boot: prompt.
Installer Boot Options
From the installation prompt screen in Figure 3.7, press F2. This takes you to the Installer Boot Options menu shown in Figure 3.8. Different options from this menu are briefly described in Table 3.4.
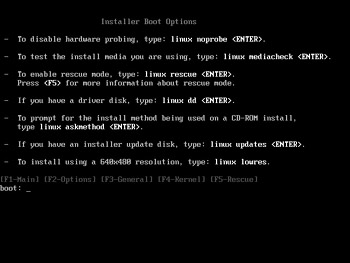
Figure 3.8: Installer Boot Options
| Option | Description |
|---|---|
| linux noprobe | Starts the installation process without automatic hardware detection; you ll need to select the drivers for any SCSI hard disks and network cards from a list. |
| linux mediacheck | Begins the installation process with the text-mode prompts that allow you to check the integrity of the Red Hat installation CDs; by default, continues in graphical mode. |
| linux rescue | Boots a basic Linux system in rescue mode that tries to detect a current Linux installation. See Chapter 11 for more information. |
| linux dd | Starts the installation process with a prompt for a driver disk; useful for third-party drivers. |
| linux askmethod | Begins the installation process; allows you to select the language and keyboard, and then allows you to select from local or network installation options. |
| linux updates | Supports an upgrade using a custom installer update disk. |
| linux lowres | Starts the installation in low-resolution graphics mode, 640 400; also known as VGA (Video Graphics Adapter). |
You can run any of these installation options in text mode; just substitute text for linux .
General Boot/Kernel Parameter Help
Press F3 in the Red Hat Linux installation start screen. This takes you to the General Boot Help menu, shown in Figure 3.9. This does not include any formal specific options; however, there is a lot more that you can do at the boot: prompt.
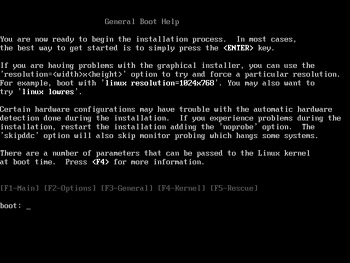
Figure 3.9: General Boot Help
There are additional arguments that you can add after linux or text at the boot prompt. For example, the linux upgradeany command searches for and offers to upgrade any computer where Linux is detected , independent of what might be found in the /etc/redhat-release file. Several other arguments not covered in Table 3.4 are described in Table 3.5.
| Argument | Description |
|---|---|
| apm=off | Disables Advanced Power Management (APM) during the installation process. |
| display= ip_addr :0 | Forwards the installation display to a computer with an IP address of ip_addr . To make this work, be sure the receiving computer allows remote X Window access; see Chapter 15 on the xhost command for more information. |
| expert | Prompts for a driver disk; supports partitioning of removable drives. If you re installing on a SCSI hard drive, you ll need to supply at least the associated driver disk. |
| ide=nodma | Disables DMA (Direct Memory Access) addressing on IDE (Integrated Drive Electronics) devices such as hard drives. |
| isa | Prompts you to confirm that Anaconda has detected the correct ISA (Industry Standard Architecture) drives or similar devices. |
| mem= xyz M | Assigns a specific amount of memory; on some older computers, you may need to limit the RAM available to Anaconda to 128MB. On computers where RAM is shared with the video card, you may have to specify the available memory. |
| nmi_watchdog=1 | Adds kernel debugging messages in one of the message screens described later. |
| nopcmcia | Avoids installing PCMCIA controllers; if you re installing Red Hat Linux from a CD that s not controlled through a PCMCIA connection, you don t need Anaconda to look for the PCMCIA controller. |
| nousb | Keeps Anaconda from installing USB support. |
| reboot=b | Modifies the kernel reboot method; some installations may otherwise hang just before the final step. |
| resolution= a x b | Specifies an installation video mode such as 640 480 or 1024 768. |
| serial | Starts serial console support during installation. |
| skipddc | Avoids the ddcprobe command, which is otherwise used to detect the monitor and graphics card. See Chapter 15 for more information on ddcprobe . |
| upgradeany | Looks for Linux installations to upgrade, independent of the contents of /etc/redhat-release . |
| Note | The apic argument that supported installation on computers with the Intel 440GX chipset BIOS is no longer available or required; support is now set up automatically. |
When you press F4, Anaconda takes you to the Kernel Parameter Help menu, shown in Figure 3.10. It includes information similar to the General Boot Help menu; Tables 3.4 and 3.5 include several arguments that you can pass to the kernel. Some are direct, such as mem=128M; others, such as noprobe , work indirectly by allowing you to specify the hardware address of key components of your PC.
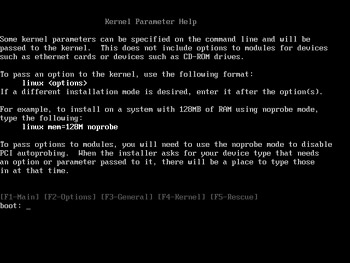
Figure 3.10: Kernel Parameter Help
Configuring Basic Parameters
Now we re actually ready to start the installation. Unless you have specific issues addressed by the previous section, just press Enter at the installation boot: prompt to start the Red Hat Linux installation process in graphical mode.
| Note | If you ve started the installation by entering linux mediacheck at the boot prompt, or you are starting from a CD created from a downloaded .iso file, Anaconda prompts you to check the integrity of your CDs, as described earlier. |
Anaconda probes your system to see if it meets the requirements for a graphical installation. As described in the REALEASE-NOTES file on the first installation CD, this requires at least 128MB of RAM. I tried a graphical installation with 64MB of RAM. It is allowed, but painfully slow, and I gave up early in the process. Anaconda automatically defaults to a text-mode installation if you have less than 64MB of RAM.
Next , it checks your system for the other requirements associated with a graphical installation: a video card, monitor, and mouse. You should see messages similar to the following:
Running anaconda, the Red Hat Linux system installer - please wait... Probing for video card: Intel 810 Probing for monitor type: S/M 955DF Probing for mouse type: Generic - Wheel Mouse (PS/2) Attempting to start native X Server Waiting for X server to start...log located in /tmp/X.log 1...2...3...4...5.... X server started successfully.
The messages you see list the hardware detected by Anaconda. If you have problems, note the location of the log file: /tmp/X.log . This message is a little unusual; the file actually disappears once Red Hat Linux is installed. We ll take a look at this file shortly.
If the hardware on your system passes the test, you ll see the first Anaconda installation screen, shown in Figure 3.11.
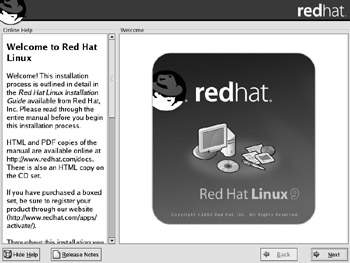
Figure 3.11: The graphical installation begins.
The basic graphical installation screen includes some help notes in the left-hand pane. If you click Release Notes, this opens the Release Notes window, shown in Figure 3.12. This includes the test from the RELEASE-NOTES file on the first Red Hat Linux installation CD.
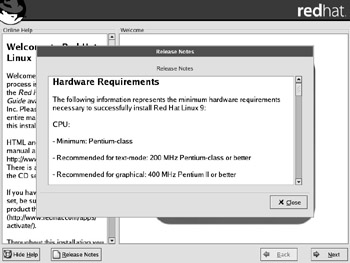
Figure 3.12: Release Notes
Read the Release Notes. They can help you learn more about Red Hat 9. When you ve finished, click close to exit the release notes, and then click Next to continue. Anaconda takes you to the Language Selection screen, shown in Figure 3.13, which lets you select from 20 languages or dialects for the remainder of the installation process. This does not determine the languages that are loaded or used once Red Hat Linux is installed; we ll look at that step later. The rest of this chapter assumes that you re proceeding in English. Click Next to continue.
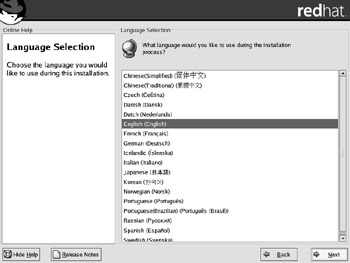
Figure 3.13: Selecting an installation language
Now we ll look at the Keyboard Configuration screen shown in Figure 3.14, which lets you select from 55 types of keyboards for your system. If Anaconda detected your keyboard, it should be highlighted. Your selection determines the default keyboard once Red Hat Linux is installed. You can change the default keyboard after installation by using the redhat-config-keyboard utility described in Chapter 19 . Select the keyboard that most closely matches your system and click Next to continue.
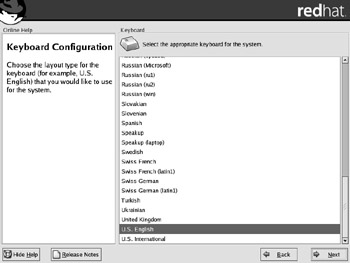
Figure 3.14: Choosing a keyboard
Next, we examine the Mouse Configuration screen, shown in Figure 3.15. This screen title is misleading; you can configure several different types of pointing devices with Anaconda.
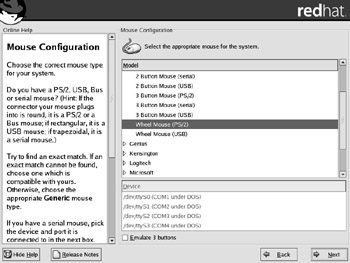
Figure 3.15: Selecting a pointing device
A pointing device can be a mouse, a touchpad, a trackball , or even a tablet. Red Hat Linux can even work with pointing devices connected through a USB (Universal Serial Bus) port. If you re configuring a pointing device that is connected to a serial port, the Device text box is active, and you can select the appropriate serial port device.
If you have a two-button mouse, you should activate the Emulate 3 Buttons option. This allows you to simulate the functionality of a middle mouse button by pressing both buttons together. However, if you have a mouse wheel, try pressing on it. If it clicks, Red Hat may already recognize it as a third button.
If Anaconda detected your pointing device, it should be highlighted on your screen. You can change the default pointing device after Red Hat Linux is installed with the redhat-config-mouse utility described in Chapter 19 . Select the pointing device that most closely matches your system and click Next to continue.
If you re installing on a computer that includes a previous version of Red Hat Linux, you may see an Upgrade Examine screen. Upgrades are covered near the end of this chapter. If you see the screen shown in Figure 3.16, select Perform A New Red Hat Linux Installation and click Next to continue.
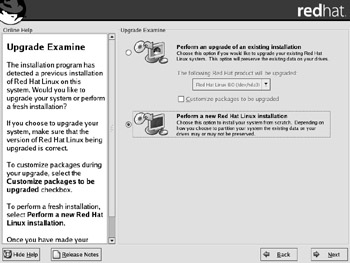
Figure 3.16: Installing, not upgrading
Selecting an Installation Type
Four basic types of installations are available, as shown in Figure 3.17. Each option supports a different kind of computer, and they are associated with different software package groups. The basic features of each installation type are summarized in Table 3.6.
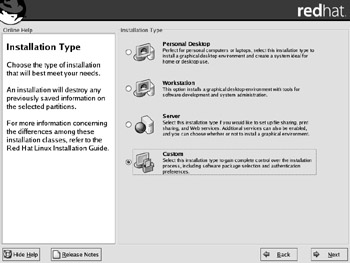
Figure 3.17: Selecting an installation type
| Option | Description |
|---|---|
| Personal Desktop | Configures a graphical desktop environment for PC desktop or laptop use. The default configuration installs nearly 1700MB of files. |
| Workstation | Configures a graphical desktop environment with software development and system administration tools. The default configuration requires about 2100MB of space for files. |
| Server | Configures a text-based desktop environment for a PC used as a server. The default configuration requires about 850MB of space for files. |
| Custom | Sets up an installation process that is completely customizable. The default configuration installs nearly 1500MB of files. |
| Note | The size requirements are bigger than the requirements that you might see during the installation process. Additional files are installed based on dependencies, which are explained in detail in Web Chapter 5. |
The sizes listed are defaults. They do not include space for a swap partition or any additional personal or third-party files or applications. However, you can further customize the packages to be installed, which can change the required disk space. Select the installation type suited for your needs. For the purpose of this chapter, we ll explore the Custom installation type. The other installation types use most of the same steps. After you select Custom, click Next to continue.
Setting Up Hard Drives
In the next several steps, we ll set up partitions on selected hard drives connected to your computer and recognized by Linux. Once you ve selected an installation type, you get to choose whether to let Anaconda set up partitions for you or to proceed directly to Disk Druid. This screen is shown in Figure 3.18.
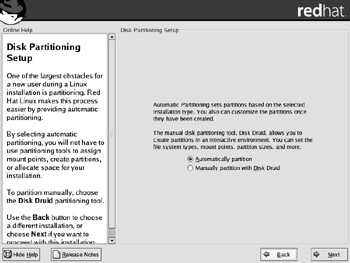
Figure 3.18: Choosing automatic or manual partitions
We ll select automatic partitioning and then continue on to Disk Druid to illustrate what Anaconda can do for you. If you select Manually Partition With Disk Druid, Anaconda skips the next step. Make your selection and click Next to continue.
Anaconda asks for your input as to where it should apply automatic partitions. As you can see in Figure 3.19, you have several options, which are explained in Table 3.7.
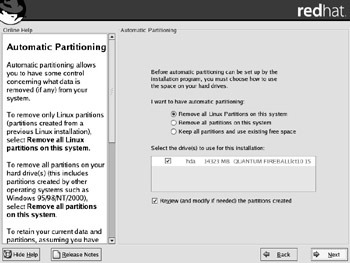
Figure 3.19: Configuring automatic partitioning
| Option | Description |
|---|---|
| Remove All Linux Partitions On This System | Deletes all currently configured partitions that are formatted to Linux filesystems. Applied to all selected hard drives. |
| Remove All Partitions On This System | Deletes all partitions on the selected hard drives. If you have another operating system such as Microsoft Windows, this action deletes that operating system. |
| Keep All Partitions And Use Existing Free Space | Does not delete any partitions. Attempts to configure partitions for Red Hat Linux in any hard drive space that is not allocated to a partition. |
| Select the Drive(s) To Use For This Installation | Lists the recognized hard drives on your computer. Automatic partitioning applies only to the drives that you select. Device names such as hda are explained in Chapter 02 . |
| Review (And Modify If Needed) The Partitions Created | If checked, the next installation step illustrates Anaconda s proposed partition configuration in Disk Druid. |
| Warning | If you re installing Red Hat Linux as a server and want to dual-boot with another operating system such as Microsoft Windows, pay attention! Anaconda defaults to the Remove All Partitions On This System option, which would delete all Microsoft Windows partitions on your computer. |
For the purpose of this installation, we proceed by selecting Remove All Linux Partitions On This System. We also select the option Review (And Modify If Needed) The Partitions Created. (If you don t select this option, Anaconda skips the upcoming Disk Druid menu.) Make your selections and click Next to continue.
Before Anaconda removes any partitions, it sends you a warning message. If you ve directed Anaconda to delete Linux partitions, the message is shown in Figure 3.20.
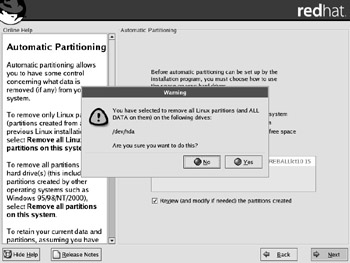
Figure 3.20: You ll see this warning before Anaconda removes partitions.
If you ve directed Anaconda to delete all partitions, you should get a similar warning. Make sure you re actually ready to delete the noted partitions. If you are, click Yes to continue.
| Note | You may also get a warning about a /boot partition. If you already have another operating system, such as Microsoft Windows, on your computer, Anaconda probably can t install the /boot partition in the most desirable area of your hard drive, below the 1024th cylinder. The BIOS on some older computers won t be able to find your Linux boot files if the /boot partition is located above this cylinder on your hard drive. Even if your computer is affected, there are at least two ways to work around this issue. You can boot Linux from a boot floppy, or you can install a third-party bootloader such as Partition Magic or System Commander. |
Setting Up Partitions with Disk Druid
Disk Druid is Anaconda s semi-automated disk-partitioning utility. The results of Disk Druid s automatic partitioning on this desktop computer are shown in Figure 3.21.
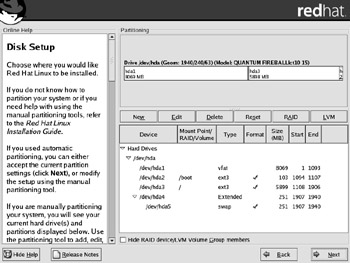
Figure 3.21: Disk Druid at work
As you might guess, this is a dual-boot installation; /dev/hda1 happens to be a partition formatted to Microsoft s FAT32 filesystem. The swap partition, configured on /dev/hda5 , is twice the size of the RAM on this desktop computer.
| Note | If you have Microsoft Windows on the computer where you re installing Red Hat Linux, Anaconda shows both FAT16 and FAT32 partitions as type vfat. |
The Disk Druid screen is organized into sections. The top includes a map of current partitions as configured on recognized hard drives on your computer. It s followed by a series of command buttons that we ll explore momentarily. The bottom of the screen includes data on each drive and partition, as explained in Table 3.8.
| Column | Description |
|---|---|
| Device | Lists the device file for each hard drive and partition |
| Mount Point/RAID/Volume | Specifies the directory mounted on the partition |
| Type | Notes the filesystem of the partition |
| Format | Specifies drives to be formatted (if checked). |
| Size | Lists the size of the partition, in megabytes |
| Start | Notes the starting cylinder of the partition |
| End | Notes the ending cylinder of the partition |
At the bottom of the screen, you can choose to Hide RAID Device/LVM Group Members. If you activate this option, the partitions in a RAID (Redundant Array of Inexpensive or Independent Disks) array or a Logical Volume Group are not shown. For more information on RAID, see Chapter 14 ; for more information on LVM, see Chapter 07 .
Now let s examine each of the command options shown in Figure 3.21. We ll use the configuration shown in the following sections to illustrate our discussion. Since there is currently no room on the hard drive shown, we ll start by deleting a partition.
Deleting a Partition
To delete a partition, highlight it and click Delete. In the example shown in Figure 3.21, we ve highlighted /dev/hda3 and clicked Delete. Before Disk Druid deletes the partition, it asks for confirmation, as shown in Figure 3.22.
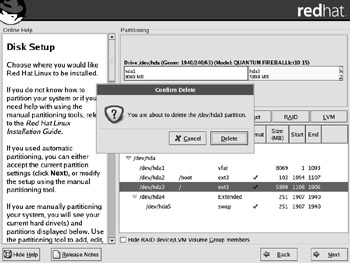
Figure 3.22: Confirming a deleted partition
Now we have free space available from the deleted partition.
Adding a Partition
You need free space on the available hard drives before you can add a partition. If you have free space on your hard drive, click New. This opens the Add Partition dialog box, shown in Figure 3.23. Each item in the figure is explained in Table 3.9.
Figure 3.23: Adding a partition
| Option | Description |
|---|---|
| Mount Point | Specifies the directory to be mounted on the partition; for mountable directories, consult the discussion on the Filesystem Hierarchy Standard in Chapter 07 . This is not applicable if the filesystem type is LVM, RAID, or swap. |
| File System Type | Sets the format for the partition; you re allowed to select form the Linux ext2 or ext3 standard, the Linux swap format, a Logical Volume Manager (LVM) physical volume, a software RAID volume, or a Microsoft Windows “style vfat format. |
| Allowable Drives | Notes the hard drive device associated with the partition. |
| Size (MB) | Specifies the size of the partition, in megabytes. |
| Fixed Size | Sets the partition size as specified. |
| Fill All Space Up To (MB) | If there is free space on your hard drive, the size of this partition grows up to the specified limit. |
| Fill To Maximum Allowable Size | Fills any remaining free space on the hard drive. |
| Force To Be A Primary Partition | Generally , you ll want the partition with the /boot directory to be on a primary partition below cylinder 1024. |
| Check For Bad Blocks | Sets up a physical check of the partition for unreadable sectors. |
| Tip | When you set up partitions on a hard drive, remember the limit of 16 partitions on an IDE hard drive and 15 partitions on a SCSI hard drive. If you exceed this limit, you won t find the problem until after it looks as if installation is complete. |
For the purpose of this chapter, I ve added four LVM partitions, four software RAID partitions, and a root ( / ) directory partition in the remaining space. You ll see how this works when we demonstrate what you can do when you click the RAID and LVM buttons.
Editing a Partition
Editing a partition is very similar to adding a partition. For example, Figure 3.24 illustrates what happens when I highlight and edit the partition with my root ( / ) directory. The screen contains information identical to that in Figure 3.23. Please refer back to Table 3.9 for details on the Edit Partition window.
Figure 3.24: Editing an existing partition
| Warning | Anaconda will not install Red Hat Linux 9 on hard drives with bad blocks. |
Resetting the Partition Table
Any changes that you make aren t written until the partitions are formatted. If you want to return to the original partition table on your hard disk, click Reset. You ll get a chance to confirm your intent. Once you do, the partition table reverts to the configuration when you started Disk Druid.
Making RAID
Once you ve configured software RAID partitions, you can create a RAID array. Ideally, the software partitions in a RAID array should be on different physical hard drives. Then the failure of one hard drive does not destroy your data in a RAID 1 or RAID 5 array. For more information, see Chapter 14 .
Click RAID. Disk Druid takes you to the RAID options screen shown in Figure 3.25. As you can see, this window contains three options, which are described in Table 3.10.
Figure 3.25: Disk Druid software RAID options
| Option | Description |
|---|---|
| Create A Software RAID Partition | Opens the Add Partition window with a software RAID filesystem type. |
| Create A RAID Device | Opens the Make RAID Device window, where you can assign software RAID formatted partitions to a RAID device. |
| Clone A Drive To Create A RAID Device | If you have two different physical hard drives, you can clone a RAID device from one drive to the other. |
You already learned how to create a software RAID partition in the Adding a Partition section. If you have more than one hard drive on your computer and want to get serious about RAID, I recommend that you read one of the hardware RAID HOWTOs at www.tldp.org .
For the purpose of this installation, I ve selected the Create A RAID Device option. After I click OK, Disk Druid takes me to the Make RAID Device window, shown in Figure 3.26.
Figure 3.26: Making a RAID device
As shown in the figure, I ve created a RAID device for the /home/mj directory. This is a RAID 5 device, formatted to the Linux ext3 filesystem. Since RAID 5 requires a minimum of three member partitions, it s possible to set this up with one spare partition. If one partition goes bad, RAID 5 will rebuild the required data on the spare partition automatically.
Making LVM
Once you ve configured LVM physical volumes, you can create a LVM volume group. LVM is more practical on a single hard drive. As you can add and delete LVM physical volumes from a group, you can grow or compress the size of a partition assigned to a directory such as /usr . For more information, see Chapter 07 .
Click LVM. Disk Druid takes you to the Make LVM Volume Group screen, shown in Figure 3.27.
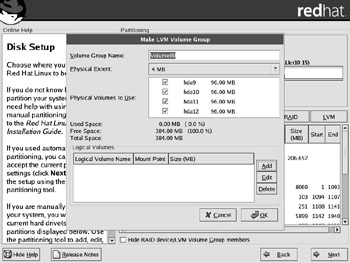
Figure 3.27: Making a LVM volume group
Each configurable option in the figure is explained in Table 3.11.
| Option | Description |
|---|---|
| Volume Group Name | Sets the name of the LVM volume group |
| Physical Extent | Specifies the chunk of disk space associated with this volume group |
| Physical Volumes To Use | Lists LVM-formatted physical volumes (PV) |
Make sure the physical volumes that you want to use for this volume group (VG) are checked. Name the volume group, and then click Add. This opens the Make Logical Volume window, shown in Figure 3.28; the options are described in Table 3.12.
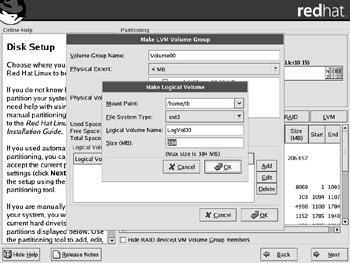
Figure 3.28: Making a logical volume
| Option | Description |
|---|---|
| Mount Point | The directory to be mounted on the logical volume (LV) |
| File System Type | The format associated with the LV |
| Logical Volume Name | An arbitrary name for the LV |
| Size (MB) | The size to be allocated to the LV, which includes the PVs that you ve added to the LV |
Once you ve created the LV, click OK. This returns you to the Make LVM Volume Group window. You ll note that the amount of free space is reduced by the PVs that you ve allocated to the new LV. When you ve finished creating LVs, click OK to return to the main Disk Druid window.
Leaving Disk Druid
The final result is shown in Disk Druid, which includes your new partitions, RAID device arrays, and LVM volume groups, as shown in Figure 3.29. When you re ready, click Next to move beyond Disk Druid.
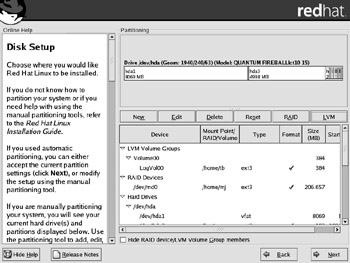
Figure 3.29: Disk Druid displays the revised partition table.
Configuring Installation Details
Now we ll explore the details of the Red Hat Linux installation process between Disk Druid and package group selection. The topics are wide and varied, starting with bootloader configuration and ending with authentication configuration.
Bootloader Configuration
After you finish going through Disk Druid, it s time to configure the bootloader, which is what you see when you first boot your computer. Anaconda takes you to the Boot Loader Configuration screen, shown in Figure 3.30.
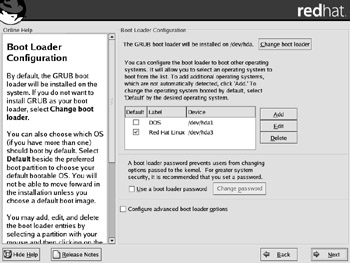
Figure 3.30: The Boot Loader Configuration screen
The default is GRUB, the Grand Unified Bootloader. The message at the top of the screen tells us that GRUB will be installed on the Master Boot Record (MBR) of the first IDE hard drive ( /dev/hda ). If you have a reason to use a different bootloader, click Change Boot Loader to open the Change Boot Loader window, shown in Figure 3.31.
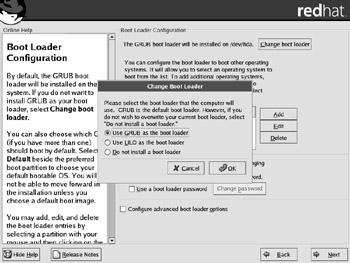
Figure 3.31: Selecting a bootloader
| Note | The terms bootloader and boot loader are used interchangeably in Red Hat Linux. |
With Red Hat Linux, you can install the GRUB or LILO (Linux Loader) as your bootloader. If you already have a bootloader installed that you don t want to overwrite, select the Do Not Install A Boot Loader option. Make your choice and click OK, or click Cancel to retain the default bootloader. This returns you to the main Boot Loader Configuration screen.
| Note | You can use GRUB or LILO in concert with another boot loader, such as Partition Magic, System Commander, or Microsoft Windows NTLDR. Choose to install a boot loader, select Configure Advanced Boot Loader Options, and install GRUB or LILO on the partition with the /boot directory, as described in the next section. |
In the middle of the screen, you can see that Anaconda is installing Red Hat Linux in a dual-boot configuration. There is a Microsoft Windows operating system installed on partition device /dev/hda1 labeled DOS, and the main Red Hat Linux files are installed on the partition labeled /dev/hda3 . Red Hat Linux is the default, which in the default GRUB configuration means that GRUB starts Linux automatically if you don t make a selection in the GRUB menu within 10 seconds.
You can change a setting associated with DOS or Red Hat Linux by highlighting the setting and selecting Edit. This opens the Image window, shown in Figure 3.32, where you can edit the label, change the partition device, and set the associated operating system as the default. Make any desired changes and click OK to return to the Boot Loader Configuration screen.
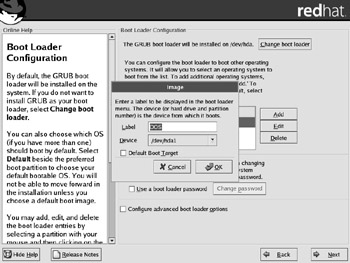
Figure 3.32: Bootloader image properties
You can protect your bootloader with a password. If you want to set a password, click the Use A Boot Loader Password option. This opens the Enter Boot Loader Password window shown in Figure 3.33, which prompts you to enter a desired password twice. This password keeps others from changing your bootloader configuration file when your computer restarts.
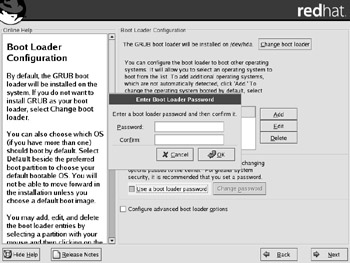
Figure 3.33: Enter a Boot Loader Password
Finally, activate the Configure Advanced Boot Loader Options at the bottom of the screen, and click Next to continue.
Advanced Boot Loader Configuration
If you activated Advanced Boot Loader Options, you ll now see the Advanced Boot Loader Configuration screen, shown in Figure 3.34. It allows you to configure several more things associated with your bootloader, as described in Table 3.13. Make any desired changes and click Next to continue.
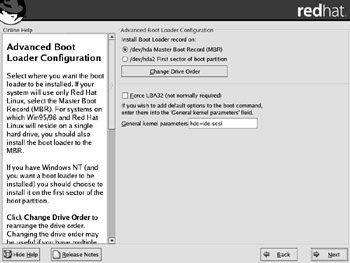
Figure 3.34: The Advanced Boot Loader Configuration window
| Option | Description |
|---|---|
| Install Boot Loader Record On | You can configure the bootloader on the MBR of a hard drive, which will run when the BIOS points to that drive. If you have another bootloader on the MBR, you can load the bootloader on the first sector of the boot partition. |
| Change Drive Order | If you have more than two physical hard drives, you may need to rearrange the drive order to make sure that your BIOS looks in the right drive for your bootloader. You can read more about this BIOS hard drive limitation in Chapter 02 . |
| Force LBA32 (Not Normally Required) | If you had to mount the /boot directory on a partition above the 1024th cylinder on your hard drive, this may help your BIOS find your Linux boot files. This generally isn t required on newer hard drives. |
| General Kernel Parameters | If you need to pass parameters to the Linux kernel during the boot process, this is a good place to specify them. In the example shown in Figure 3.34, Anaconda added the SCSI emulation module for my CD writer automatically. |
Network Configuration
Now you can configure any network cards detected by Anaconda. By default, network cards are set to automatically get their network parameters from a Dynamic Host Configuration Protocol (DHCP) server. If you have a DHCP server on your network, it can assign a hostname and give your computer the IP addresses of your network gateway and DNS servers.
Even if you have a home network, you may already have a DHCP server. Many high-speed Internet routers/cable modems/DSL adapters are equipped with a DHCP server. Consult your hardware documentation for information.
We show the Network Configuration screen in Figure 3.35 and explain the basic options in Table 3.14. The two network devices shown in this figure are Ethernet network adapters, eth0 and eth1 .

Figure 3.35: The Network Configuration window
| Option | Description |
|---|---|
| Active On Boot | Activates the associated network device during the boot process, if there s a checkmark. |
| Edit | Starts the Edit Interface Device window for the highlighted device, where you can configure your network cards manually with a static IP address. |
| Hostname | Allows you to assign a hostname to this computer; otherwise, the DHCP server on your network performs this task. |
| Gateway | Notes the gateway IP address for messages outside your network. You can set it if you ve configured your network cards manually. |
| Primary DNS | Lists the IP address of a DNS server for your network. You can set it if you ve configured your network cards manually. |
| Secondary DNS | Lists the IP address of another DNS server for your network. |
| Tertiary DNS | Lists the IP address of another DNS server for your network. |
If you prefer to assign static IP addresses to your network card, highlight the desired device and click Edit. This opens the Edit Interface Device window, shown in Figure 3.36.
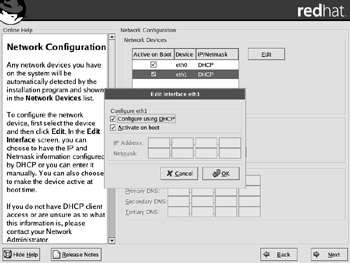
Figure 3.36: Changing IP address information for a network device
To set a static IP address, deselect the Configure Using DHCP option. You can then enter the IP address and netmask of your choice. For guidance on IP addresses on private networks, read Chapter 20 . Make any desired changes and click OK to return to the Network Configuration screen.
If you change your mind after Red Hat Linux is installed, you can edit your configuration with the redhat-config-network utility described in Chapter 19 .
When you ve finished, click Next to continue.
Firewall Configuration
Now you re ready to configure a firewall for Red Hat Linux. This is especially important on a gateway computer, which may provide the link between your LAN and the Internet. In that situation, the gateway computer is the best place for a firewall to protect your LAN from the potential ravages of the Internet. For Red Hat Linux 9, this creates an iptables -based firewall in /etc/sysconfig/iptables . One possible configuration for a gateway computer is shown in Figure 3.37; configuration options are explained below.
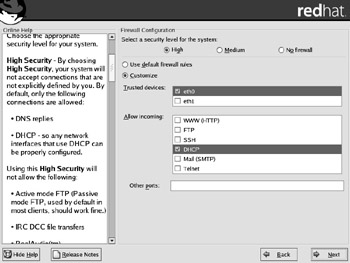
Figure 3.37: Configuring a firewall
High Configures a high security firewall that blocks almost all incoming traffic. The exception is messages from an external DNS server, which supports connections to the Internet.
Medium Sets up a medium security firewall that blocks traffic on TCP/IP ports 0 through 1023. It also blocks traffic on the ports that allow access to an NFS server, the local X Window Server, and the X Font Server.
No Firewall Disables all iptables firewall commands on this computer.
Use Default Firewall Rules Applies the default High or Medium security firewalls without modification to all network cards on this computer.
Customize Allows you to specify different rules for one or more network cards on this computer.
Trusted Devices Lists the network devices on this computer, in this case, eth0 and eth1 . It s common to turn off a firewall on the Ethernet card that s connected to the LAN as opposed to one connected to the Internet; in this case, eth0 is a trusted device.
Allow Incoming If you have a server on your computer, you may want to allow incoming traffic from other networks. For example, if you have a web server on your computer, you may want to allow incoming data through the TCP/IP port associated with WWW (HTTP) traffic (see Chapter 30 ). The other options relate to the File Transfer Protocol (FTP) (see Chapter 27 ), Secure Shell (SSH) (see Chapter 22 ), a Mail server such as sendmail (see Chapter 26 ), or Telnet (see Chapter 23 ).
By default, even the high security firewall allows incoming traffic associated with DNS (Domain Name Service) servers to help you navigate the Internet and DHCP (Dynamic Host Configuration Protocol) servers, which allows you to get IP addressing information from outside your LAN. For more information on both these services, see Chapter 24 .
Other Ports If you want to allow access through your firewall to a different server, you should enter the associated ports and protocols in the associated text box. For example, if you want to allow connections to a secure web server using the HTTPS protocol, you could enter the following in the Other Ports text box:
https:tcp,https:udp
You can change your firewall settings after Red Hat Linux is installed by using the GNOME Lokkit wizard described in Chapter 16 , redhat-config-securitylevel in Chapter 19 , or the iptables commands described in Chapter 22 . Make any desired changes and click Next to continue.
| Note | This does not affect any firewalls associated with the xinetd service explained in Chapter 23 or individual network services discussed throughout the book. |
Additional Language Support
In the installation screen shown in Figure 3.38, you can set the default language for Red Hat Linux after installation. As you can see, some of the languages include a wide variety of national dialects.
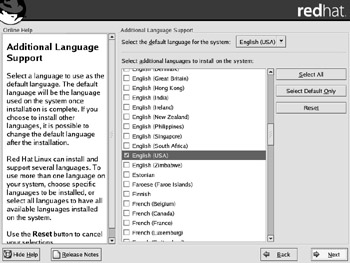
Figure 3.38: Selecting languages
If you need different or additional languages for your installation, select them accordingly . If you ve configured Anaconda to install more than one language, you can choose the default from these languages by clicking the drop-down arrow adjacent to the Select The Default Language For The System box. You can change the default language after Red Hat Linux is installed by using redhat-config-language , which is described in Chapter 19 . Make any desired changes and click Next to continue.
Selecting a Time Zone
In this installation screen, you can configure the basic time settings for your computer. After installation, you can go further. If you go through the firstboot utility described later in this chapter or redhat-config-time in Chapter 19 , you can set this computer to synchronize its clock with a central time server.
The Time Zone Selection screen includes two tabs. The Location tab is shown in Figure 3.39.
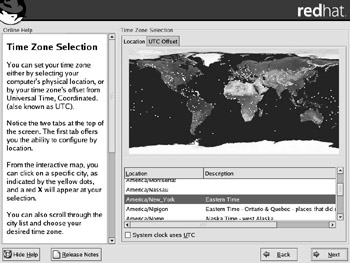
Figure 3.39: Setting a time zone location
You can select the time zone associated with your location by clicking on the map, or by selecting the location from the scroll window. Unless your computer is in a dual-boot configuration with another operating system such as Microsoft Windows, you should activate the System Clock Uses UTC option. Make your selections and click the UTC Offset tab, shown in Figure 3.40. UTC is a French acronym that corresponds to Greenwich Mean Time.

Figure 3.40: The UTC Offset tab
On the UTC Offset tab, select the offset that matches your time zone; for example, the U.S. West Coast is 8 hours behind Greenwich Mean Time, which corresponds to UTC-8. For the United States, you can then activate the Use Daylight Saving Time (US Only) option. Make your choices and click Next to continue.
Setting a Root Password
The root user is also known as the superuser; the root user can do anything on your Linux computer. In the Root Password installation screen shown in Figure 3.41, type your desired root password twice. Red Hat requires the root password that you enter during this process to be at least 6 alphanumeric characters .
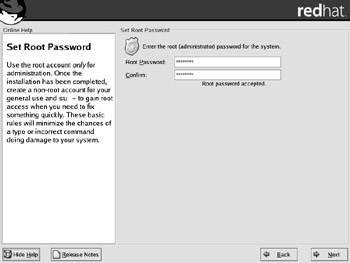
Figure 3.41: Setting a root password
The best passwords include a combination of numbers and upper- and lowercase letters ; it can take days or even weeks for a PC-based cracking program to find that kind of password. Such passwords need not be difficult to remember; I like to create passwords as acronyms for a favorite sentence . For example, Ieic3teM could stand for "I eat ice cream 3 times every Monday."
Enter your desired root password and click Next to continue.
| |
If you selected a Personal Desktop, Workstation, or Server installation type, Anaconda now moves to a couple of different installation screens. First, all of these installation types skip the Configure Authentication screen discussed in the next section.
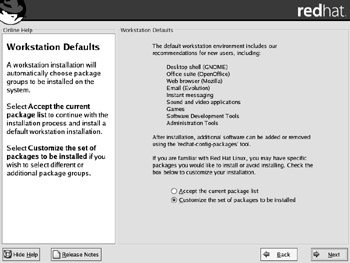
If you selected a Personal Desktop or Workstation installation, Anaconda now gives you a Personal Desktop or Workstation Defaults screen. It lists some of the software that Anaconda will install by default with Red Hat Linux. The Workstation Defaults screen is shown below. The look and feel of the Personal Desktop Defaults screen is nearly identical. If you ve selected either of these installations, you can accept the current package list; in this case, you ll proceed directly to the Ready To Install screen (see the section Ready to Install ). Otherwise, select the Customize The Set Of Packages To Be Installed option; in that case, you ll proceed to the first Package Group Selection screen (see the section Selecting Package Groups ).
| |
Configuring Authentication
Now that you re in password mode, Anaconda takes you to the next step of authentication. The Authentication Configuration screen is where you configure how Red Hat Linux checks the credentials of a user. The installation screen, shown in Figure 3.42, includes four tabs: NIS, LDAP, Kerberos 5, and SMB. The options associated with each tab are described in Table 3.15.
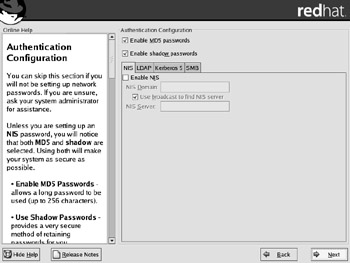
Figure 3.42: The Authentication Configuration window
| Option | Description | Tab |
|---|---|---|
| Shadow Passwords | Enables the Shadow Password Suite, with passwords protected in /etc/shadow . | N/A |
| MD5 | Allows the MD5 form of password encryption. | N/A |
| Enable NIS | Triggers use of the Network Information Service (NIS), which provides a common database of usernames and passwords for a LAN; for more information, see Chapter 28 . | NIS |
| NIS Domain | Enter the name of the NIS domain in this text box. | NIS |
| Use Broadcast To Find NIS Server | Select this option to send a broadcast message to other computers on your network to identify the NIS server. | NIS |
| NIS Server | Sets the name of the NIS server for your network, if you disable the broadcast option. | NIS |
| Enable LDAP | Enables use of a Lightweight Directory Assistance Protocol (LDAP) server for authentication and related LAN databases. | LDAP |
| LDAP Server | Sets the name of the server with the LDAP database. | LDAP |
| LDAP Base DN | Allows you to look up account information with the LDAP Distinguished Name (DN). | LDAP |
| Use TLS Lookups | Lets your computer use Transport Layer Security (TLS) to send encrypted usernames and passwords to an LDAP server. | LDAP |
| Enable Kerberos | Allows the use of the Kerberos 5 system, developed at MIT; supports strong encryption of usernames and passwords. | Kerberos 5 |
| Realm | Permits you to access a Kerberos-enabled network. | Kerberos 5 |
| KDC | Lets you access a Key Distribution Center (KDC) server, which issues Kerberos authentication tickets. | Kerberos 5 |
| Admin Server | Allows you to access a Kerberos server using the kadmind utility. | Kerberos 5 |
| Enable SMB Authentication | Allows you to use an SMB (Samba) server, such as a Microsoft Windows server operating system, for authentication. | SMB |
| SMB Server | Lets you specify the name of the SMB server with username and password information. | SMB |
| SMB Workgroup | Permits you to specify the workgroup or domain associated with the SMB authentication server. | SMB |
Unless you have a network with special needs for one of these other services, the default configuration should be sufficient. For example, Figure 3.43 illustrates how you could connect your system to the username and password database on a Samba Server named Master1 on a domain or workgroup named Group1.
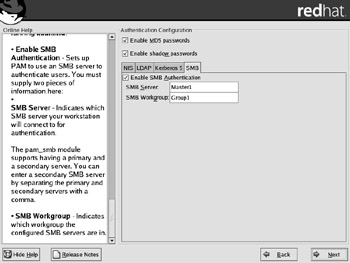
Figure 3.43: Configuring Samba Authentication
Make any desired changes and click Next to continue.
Selecting Package Groups
Finally, it s time to select what you re going to install with Red Hat Linux. You ve configured everything else except your graphics system. You should now be looking at the Package Group Selection installation screen, shown in Figure 3.44.
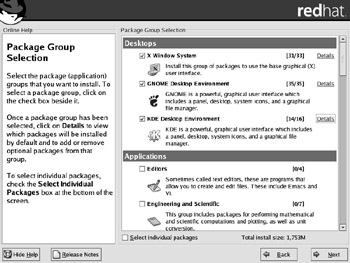
Figure 3.44: Selecting package groups
| |
If you re unfamiliar with Linux, let s step back a moment. Red Hat organizes software into a package known as an RPM (Red Hat Package Manager). There are nearly 1500 RPMs on the Red Hat installation CDs. Many of these RPMs depend on each other; for example, you can t use most of the packages associated with the GNOME desktop unless you ve also installed the Linux X Window Server.
When you install Red Hat Linux, even experienced users do not normally want to pick and choose between 1500 packages during the installation process. That s one reason why Red Hat has organized the RPMs into package groups displayed in the Package Group Selection installation window.
In other words, an RPM is also known as a package, and Red Hat bundles common RPMs together into package groups.
The Red Hat package groups correspond to the comps .xml configuration file on the first Red Hat Linux installation CD, in the /RedHat/base directory. Web Chapter 5, which can be found on the Sybex website at www.sybex.com , examines this file in detail.
| |
Select the package groups of your choice. If you don t want to install a package group such as Games and Entertainment, you can deselect it to save space for other purposes. If you need more details about the packages in each package group, see Web Chapter 5.
The Anaconda graphical installation organizes package groups into five different categories. There are three desktop groups, as shown in Figure 3.44; Table 3.16 summarizes these groups.
| Package Group | Description |
|---|---|
| X Window System | Installs the basic XFree86 Server, fonts, and several GUI configuration files |
| GNOME Desktop Environment | Adds the packages required to use the GNOME Desktop |
| KDE Desktop Environment | Includes the packages required to use the KDE Desktop |
Take a look at the numbers to the right of each package group. For example, in Figure 3.44, look at the numbers associated with the KDE Desktop Environment package group. That tells you that 14 of 16 packages in this package group will be installed. To the right of this number, click Details. This opens the Details For ˜KDE Desktop Environment window, shown in Figure 3.45.
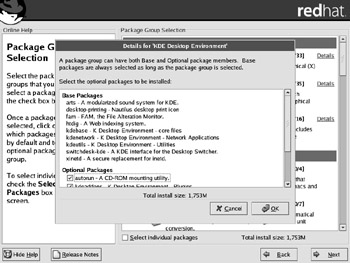
Figure 3.45: KDE Desktop Environment package group details
In the Details For ˜KDE Desktop Environment window, packages are organized in two categories: Base and Optional. Base packages are required for the KDE desktop to work. Optional packages add features.
The next category of package groups is Applications; part of the list is shown in Figure 3.46. Applications range from basic text editors to Internet connection utilities to games. The package groups in this category are summarized in Table 3.17.
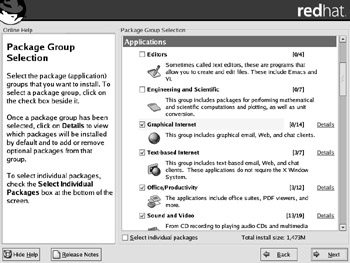
Figure 3.46: Applications package groups
| Package Group | Description |
|---|---|
| Editors | Includes the packages for enhanced vi and Emacs |
| Engineering and Scientific | Adds programs for mathematical calculations and graphs |
| Graphical Internet | Installs a variety of graphical network communication tools |
| Text-based Internet | Incorporates network communication tools that you can use at the command line |
| Office/Productivity | Allows you to add a variety of office applications and suites |
| Sound and Video | Adds a series of multimedia packages, viewers , and configuration tools |
| Authoring and Publishing | Supports the packages that allow you to create DocBook packages |
| Graphics | Installs a number of graphical programs and support libraries |
| Games and Entertainment | Adds various video and board games |
One important category for Linux administrators is Servers. Different servers can help you provide services for websites , e-mail, file services, databases, newsgroups, and more. Part of the list is shown in Figure 3.47. Each package group in this category is summarized in Table 3.18.
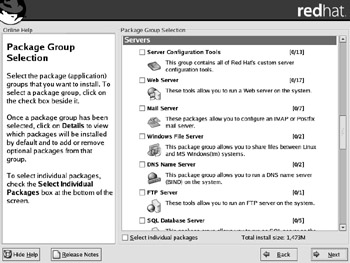
Figure 3.47: Servers package groups
| Package Group | Description |
|---|---|
| Server Configuration Tools | Installs several Red Hat graphical configuration tools |
| Web Server | Adds Apache and related packages for serving web pages to browsers on other computers |
| Mail Server | Incorporates various e-mail servers and utilities |
| Windows File Server | Allows you to connect your computer to a Microsoft Windows network as a client and as a server |
| DNS Name Server | Includes the software required to set up a Domain Name Service (DNS) server or a related caching nameserver |
| FTP Server | Adds the vsFTP file server, which also supports anonymous access |
| SQL Database Server | Installs packages that allow you to configure the PostgreSQL and MySQL server databases |
| News Server | Adds the InterNet News package, which supports a Usenet-style newsgroup system |
| Network Servers | Installs a variety of network servers, including DHCP, NIS, and Telnet |
There are several Linux development package groups. Even if you re not a developer, you may eventually use many of the packages in these groups. For example, to compile the Linux kernel, you need packages from the Kernel Development and Development Tools package groups. The list of Development package groups is shown in Figure 3.48; Table 3.19 describes each package group in this category.
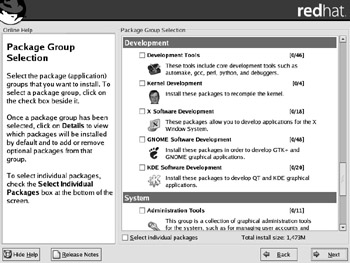
Figure 3.48: Development package groups
| Package Group | Description |
|---|---|
| Development Tools | Includes package tools, language libraries, and more |
| Kernel Development | Installs headers and kernel source code |
| X Software Development | Adds development libraries, headers, and documentation associated with the Linux XFree86 graphics system |
| GNOME Software Development | Incorporates development libraries, headers, include files, and more associated with the GNOME Desktop Environment |
| KDE Software Development | Incorporates development libraries, headers, include files, and more associated with the KDE Desktop Environment |
System is the final category of package groups. This category includes administrative, system, and printing tools. The list is shown in Figure 3.49; Table 3.20 summarizes each of the package groups.
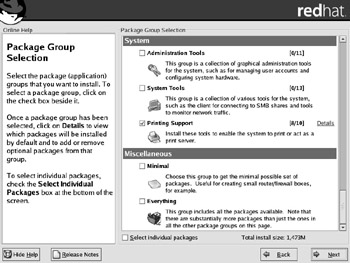
Figure 3.49: System package groups
| Package Group | Description |
|---|---|
| Administration Tools | Installs graphical utilities that allow you to administer passwords, packages, kernel parameters, and more |
| System Tools | Allows you to administer a variety of applications, such as amanda-client for backups and gnome-lokkit for firewalls |
| Printing Support | Includes the packages required to install the Common Unix Print System (CUPS) |
Finally, at the bottom of the Package Group Selection list, also shown in Figure 3.49, are two final Miscellaneous options:
Minimal Deselects all package groups. After Red Hat Linux is installed, you can then install just the packages that you need. This is one option that can promote security; in general, if it isn t installed on your computer, it can t serve as a security hole.
Everything Selects all package groups and requires about 5GB of space just for files.
For the purpose of this chapter, we ve activated the Select Individual Packages option. Click Next to continue.
Selecting Individual Packages
You can customize your installation even further: by individual RPM. This is not as daunting a task as it may seem; once you ve selected package groups, the corresponding RPM in the Individual Package Selection screen shown in Figure 3.50 is also installed.
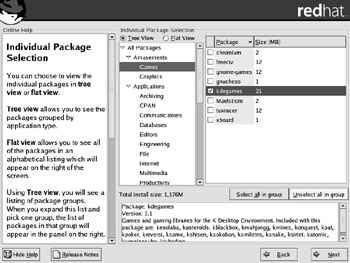
Figure 3.50: Selecting individual RPM packages
As you can see in the figure, the kdegames RPM package is slated for installation. As of this writing, this happens by default when we choose to install the KDE Desktop Environment package group. The other games packages shown would be checked if we also selected the Games and Entertainment package group. You can find out more about a package; when you highlight it, a description appears in the bottom right pane.
Assume you re working for a company that does not allow games on its PCs. Therefore, you want to remove the kdegames RPM. Deselect it. Feel free to browse some of the other package categories shown. When you re ready, click Next to continue.
You may see the following message flash across your screen:
checking dependencies in packages selected for installation...
A dependency is where one package won t work without another. For example, Linux applications such as the Mozilla web browser, the XFree86 X Window Server, and the OpenOffice suite won t work unless you install the Perl programming language.
If there are dependencies in your selected RPM packages, you ll see an Unresolved Dependencies screen similar to the one shown in Figure 3.51.
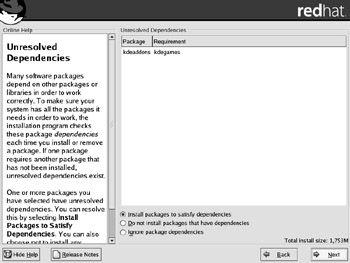
Figure 3.51: Unresolved Dependencies
We deselected the kdegames RPM package. Now we see the reason it was selected in the first place: the kdeaddons RPM won t work without it. (The kdegames RPM includes some language libraries required for kdeaddons .) In addition, the kdeaddons RPM package adds to the functionality of Konqueror (the KDE web browser), noatun (a KDE media player), and Kate (a KDE text editor).
Now you have to make a choice. Do you violate company policy and install the kdegames RPM on this computer? Or do you accept the partial loss in functionality of the noted KDE applications? This choice is reflected in the three options shown in Figure 3.51:
Install Packages To Satisfy Dependencies Installs all packages listed in the Unresolved Dependencies window.
Do Not Install Packages That Have Dependencies Does not install any of the packages listed in the Unresolved Dependencies window.
Ignore Package Dependencies Retains your original choices. However, you now know that the software installed with the kdeaddons RPM may not work.
The choice you make depends in this case on the software needs and policies of your company or organization. Do you sacrifice functionality, or would you rather convince your management to make an exception to the no games policy? Make your selection and click Next to continue.
Ready to Install
Finally, we re ready to let Anaconda install Linux on a computer! Anaconda includes the partitions we ve defined, the package groups that we ve selected, and the other settings that we ve chosen . As you can see in Figure 3.52, when you click Next, Anaconda begins installing Red Hat Linux 9 to your specifications.

Figure 3.52: Ready to install
Make a note of the listed files. Once installation is complete, you ll be able to review the installed RPMs in /root/install.log . The /root/anaconda-ks.cfg file can help you duplicate this installation on other computers, using the Kickstart system described in Chapter 05 .
When you re ready, click Next to continue.
Anaconda Installs Red Hat Linux
Finally, Anaconda begins the installation process. First, you ll see a series of messages such as:
Formatting / file system . . . Formatting /boot file system . . . Transferring install image to hard drive Setting up RPM transaction Starting install process, this may take several minutes Preparing to install . . .
This is where Anaconda formats the partitions with the selected file system directories. Next, it transfers the basic installation template as an image, to your hard drive. It sets up the list of RPMs to be installed, and then starts to transfer data from the installation source ”in this case, the Red Hat installation CDs to your hard drive. Then you ll see a screen like the one in Figure 3.53, which constantly updates the progress of the installation.
There are three Red Hat Linux installation CDs. (Please read the disclaimer about the Publisher s Edition two-CD set at the beginning of this chapter and in the introduction to the book.) As the installation progresses, Anaconda may require access to the second and third CDs. Installation stops with a message similar to the one shown in Figure 3.54. Follow the instructions and click OK to continue.
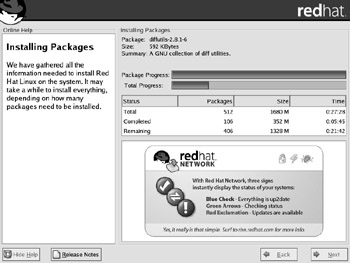
Figure 3.53: The installation in progress
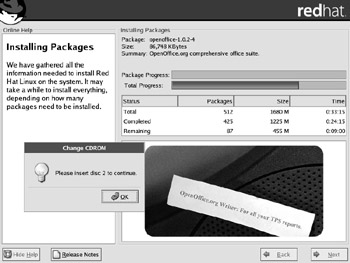
Figure 3.54: Time for another CD
This is a good chance to examine what the installation process is doing to your system. Go to the second virtual console. Press Ctrl+Alt+F2. At the command prompt, check for disk usage:
-/bin/sh-2.05b# df Filesystem 1K-blocks Used Available Use% Mounted on rootfs 6120 3594 2176 63% / /dev/root.old 6120 3594 2176 63% / /tmp/cdrom 653312 653312 0 100% /mnt/source /tmp/hda3 5037736 1648884 3132948 35% /mnt/sysimage /tmp/hda2 102486 8608 88586 9% /mnt/sysimage/boot
This output tells us that Anaconda has mounted the root ( / ) directory partition on the /mnt/ sysimage directory. It has also mounted the partition with the /boot directory on /mnt/sysimage/boot .
You can use bash shell commands (described in Chapters 6 , 7 , and 8 ) to navigate these directories to see what Anaconda has installed so far. In fact, if there is a problem, examine the contents of /mnt/sysimage/root/install.log . This log identifies the current RPM that Anaconda is attempting to install on your system. If your installation freezes , there may be a problem with that particular RPM on your CD.
Once all desired RPM packages are installed, you ll see the following messages, which get Anaconda ready for the next steps in the process and installs the bootloader on your MBR. At this time , you can also find the bootloader configuration file in the second virtual console in the /mnt/sysimage/etc directory. Once you ve completed your installation, you can find the file in the expected location, in the /etc directory. If you re using GRUB, it s in the grub.conf file.
Performing post install configuration Installing bootloader
Managing Post-Installation Steps
Anaconda has installed Red Hat Linux on your computer. But your work is not done. You still need to create a boot disk for your system and configure graphics. The next screen you should see is shown in Figure 3.55.
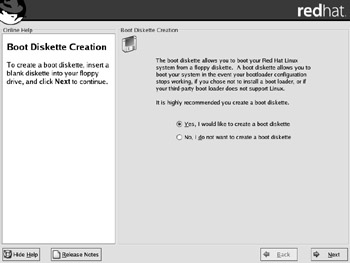
Figure 3.55: Creating a Boot Disk
Creating a Boot Disk
It s a good idea to create a boot disk. It is the best rescue disk available, customized for your system.
If you have a floppy drive, select Yes in the Boot Disk Creation screen and click Next. You ll be prompted to insert a floppy disk, with a warning that all data on that disk will be erased. Follow the instructions and click Make Boot Disk. This action runs the mkbootdisk command described in Chapter 11 .
Configuring a Video Card
If you ve installed X Window software, Anaconda now prompts you to configure your graphics system, as shown in Figure 3.56. You can skip this process and configure it later with the redhat-config-xfree86 utility described in Chapter 15 .
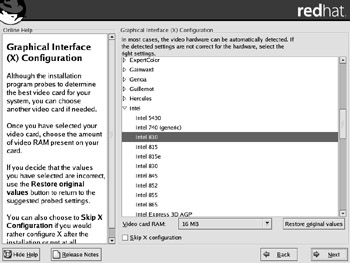
Figure 3.56: Configuring the Linux Graphical Interface
If Anaconda detected your hardware at the start of this process, it highlights the graphics card that it detected, along with the amount of RAM on that card. The options in the Graphical Interface (X) Configuration screen are detailed here:
Video Card Select the video card that most closely matches your hardware. Anaconda may have selected one for you. Cards are organized by manufacturer. If you don t see your card, it may be under the manufacturer labeled Other at the top of the list. Alternatively, almost all newer video cards can be configured as a generic video card.
This section includes three generic cards: Generic VGA Compatible; Unsupported VGA Compatible; and VESA Driver (Generic), which is equivalent to SVGA.
| Note | The Video Graphics Adapter (VGA) standard is a standard associated with older graphics cards and a monitor resolution of 640 X 480. SVGA stands for Super VGA, and is associated with a resolution of 800 X 600. These standards are maintained by the Video Electronics Standards Association (VESA); the standard VESA driver is associated with SVGA video cards. Many unrecognized high-performance cards such as those that conform to XGA and SXGA standards can use VESA mode. Video Card RAM Set the RAM to the capacity of your video card. If your video card shares regular RAM, make sure this matches the associated setting in your BIOS. Anaconda allows you to set your video RAM in increments between 256KB and 128MB. Restore Original Values If you ve made a number of changes and want to return to the original detected configuration, click this button. Skip X Configuration If you do not want to configure your graphics system at this time, enable this option and click Next. You can still configure your graphics system later with redhat-config-xfree86 . |
In most cases, you won t need to make any changes. Make any desired changes and click Next to continue.
Configuring a Monitor
If you still want to configure the X Window system on your computer, the next thing you ll see should be similar to the Monitor Configuration screen shown in Figure 3.57.
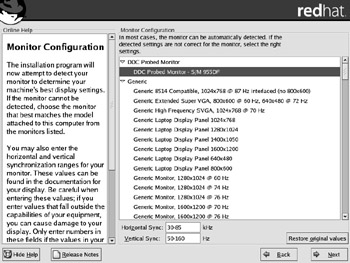
Figure 3.57: Monitor Configuration
When Anaconda probed your system, it may have detected a monitor. If it did, you ll see it highlighted here under the DDC Probed Monitor section. If this is the wrong monitor, select your monitor from the list, which is classified by manufacturer and model. If you don t see your monitor on the list, you can select from a wide variety of generic monitors .
Every monitor has a horizontal sync and vertical sync rate. Check the documentation for your monitor carefully ! If the numbers you set here exceed the capabilities of your monitor, the signals from your video card could blow out your monitor s circuitry .
If you experiment and would rather return to the values detected by Anaconda, click Restore Original Values. In most cases, you won t need to make any changes. Make any desired changes and click Next to continue.
Customizing Graphics
We ve arrived at the last step! Now you get to put together the configuration settings for your video card and monitor. Figure 3.58 shows the Customizing Graphics Configuration screen.
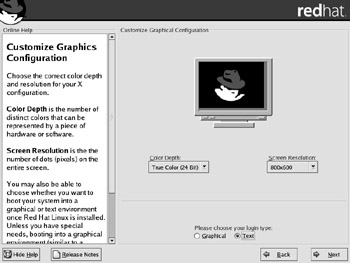
Figure 3.58: Customizing your graphics configuration
The options in this screen are:
Color Depth Specifies the number of bits of color associated with each pixel. For example, 24 bits is true color because it supports rendering of up to 2 24 = 16,777,216 different colors. Depending on the capabilities of your video card and monitor, you may be able to set 8 bit (256 colors) or 16 bit (65,536 colors) for each pixel.
Screen Resolution Sets the number of pixels to be displayed on your monitor. The screen resolution is set in a horizontal x vertical format. For example, 800 X 600 resolution represents 800 pixels in the horizontal dimension and 600 pixels in the vertical dimension on your monitor. Available resolutions depend on the size of the monitor and the RAM associated with your video card.
Please Choose Your Login Type Configures the Linux boot sequence; this affects the id variable in /etc/inittab , which you can change as described in Chapter 11 . If you select Graphical, Linux boots into a graphical login screen; if you select Text, Linux allows you to log in at a text-based virtual console. These options are not available if you ve selected a Personal Desktop or Workstation installation; both default to a graphical login interface.
Make your selections and click Next to continue. Finally, the installation is complete, as shown in Figure 3.59. Click Exit to reboot your computer.
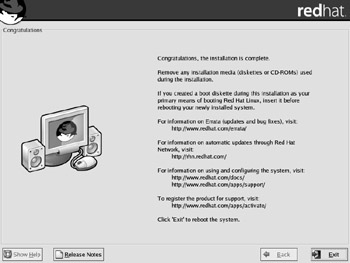
Figure 3.59: Installation is complete!
EAN: 2147483647
Pages: 220