Understanding the Configuration Files
Several important configuration files and executable programs are related to the Linux X Window. Most of you know the command that starts the X Window from a command-line interface:
# startx
This program refers to other configuration files and programs, in the /etc/X11/xinit and /usr/X11R6/ bin directories. The /etc files can be customized for individual users, as hidden files in their home directories.
By far, the most important X Window configuration file is /etc/X11/XF86Config; we ll discuss that file in some detail later in this section.
startx
There are three basic ways to get into the Linux GUI. You can edit the id variable in /etc/inittab to start in runlevel 5 when you boot Linux, or you can go into runlevel 5 from the text console with the init 5 command. (More information on /etc/inittab and init are available in Chapter 11 .) Either of these methods brings you to one of the graphical login interfaces described earlier.
A third method is to run the startx command. This is actually an executable file in the /usr/X11R6/ bin directory. You can open startx in any text editor. The start of this file is shown in Figure 15.18.
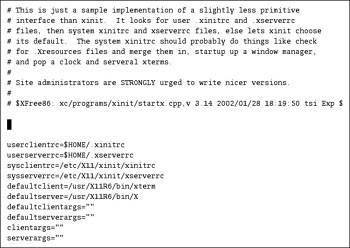
Figure 15.18: The startx file
As you can see, this script includes several variables . It first looks for .xinitrc and .xserverrc files in the home directory of the requesting user . If these files aren t available, it uses defaults in the /etc/X11/xinit directory.
| Note | The /etc/X11/xinit/xserverrc file does not exist by default on Red Hat Linux systems; instead, the startx command starts the X Server in the first available graphical console, with the X :0 command. |
The defaultclient and defaultserver are the default X Client and the default X Server; the default xterm client is used if you use switchdesk to make twm your default desktop. The other variables are intentionally left empty; if you re comfortable with programming code, you ll be able to see how these variables are assigned.
| |
It s possible to run different X Windows, locally and remotely. As described in Chapter 03 , the X Window gets its own virtual console. If you re in a text screen and the GUI is running, you can access it with the Ctrl+Alt+F7 command.
If you have enough memory, you can run a second X Window in your local computer. The startx -- :1 command opens a second GUI, which you can access with the Ctrl+Alt+F8 command.
If you want to try a GUI application from another computer, set that computer to accept X commands from the remote computer. Disable your firewall, and let the remote computer in with the xhost + computername or xhost + remoteipaddr command. ( remoteipaddr represents the IP address of the remote computer.) Then you can log into the remote computer and start a command such as gimp --display youripaddr :0.0 or xclock -display youripaddr :0.0 .
The display switch is not consistent; with some commands such as xclock , it requires only one dash ( -display ); other commands such as gimp require a double-dash ( --display ). If in doubt, run the command with the -h switch such as xclock -h or gimp -h .
| |
/etc/X11
The /etc/X11 directory contains a number of important configuration files and directories. Table 15.1 describes each of the files and subdirectories.
| File or Directory | Description |
|---|---|
| applink | A directory with links to applications that appear in a GUI Start menu |
| desktop- menus | A directory with settings for various default GUI menus |
| fs | A directory with the Font Server configuration |
| gdm | A directory with GNOME Display Manager configuration files |
| lbxproxy | A directory for remote clients that want to use the low-bandwidth extension to the X Server (LBX) |
| prefdm | A file that selects the preferred display manager |
| proxymngr | A directory with configuration for use with proxy managers |
| rstart | A directory with a remote start client; based on rsh |
| serverconfig | A directory for X Server configuration settings |
| starthere | A directory with basic X desktop settings |
| sysconfig | A directory with a gnome-lokkit configuration file |
| twm | A directory with the twm configuration file, system.twmrc |
| X | A file linked to the X Server application |
| xdm | A directory with X Display Manager configuration files |
| XF86Config | The main X Server configuration file |
| xinit | A directory with default X configuration files called by startx; used if equivalent files are not available in the applicable home directory |
| xkb | A directory for keyboard configuration |
| Xmodmap | A default configuration file for keyboards |
| Xresources | A configuration file that calls fonts for the login screen |
| xserver | A directory with a SecurityPolicy configuration file |
| xsm | A directory that configures the X session manager |
Local Configuration Files
You can set up X Window configuration files in users home directories. As you ve seen earlier, startx looks for two of them for settings to start the Linux X Window: ~/.xinitrc and ~/.xserverrc . The dot hides these filenames in your home directory.
| Note | As described in Chapter 06 , you can view the hidden files in any directory with the ls -a command. |
As described earlier, Red Hat does not use the xserverrc file. Thus, the key configuration file is ~/.xinitrc , which also calls several other files in the home directory.
| Note | Remember, the tilde (~) represents the current user s home directory. |
The other key files are ~/.Xclients and ~/.Xclients-default , which switchdesk modifies so startx knows the desktop you want. If you re interested in how these files work, read them for yourself. Use the switchdesk command as described earlier to set a different default desktop and see what that does to ~/.Xclients-default .
xinitrc
When the startx command starts your X Server, it needs to call up fonts, keyboard settings, and default X Clients.
The xinitrc file is an executable shell script. You can use the default in the /etc/X11/xinit directory, or you can customize it, change its name to .xinitrc , and store it in your own home directory. The following is a detailed analysis of the default xinitrc file:
#!/bin/sh # 1999-2003 Red Hat, Inc. userresources=$HOME/.Xresources usermodmap=$HOME/.Xmodmap userxkbmap=$HOME/.Xkbmap sysresources=/etc/X11/Xresources sysmodmap=/etc/X11/Xmodmap sysxkbmap=/etc/X11/Xkbmap
These first lines represent the other configuration files needed through the rest of the script. You ll see in a moment that if the user* variable files aren t available, xinitrc uses just the sys* files.
# merge in defaults if [ -f "$sysresources" ]; then xrdb -merge "$sysresources" fi if [ -f "$userresources" ]; then xrdb -merge "$userresources" fi
These lines start by applying the $sysresources file, /etc/X11/Xresources . If there s a valid $userresources file ( ~/.Xresources ), the settings from each file are combined.
# merge in keymaps if [ -f "$sysxkbmap" ]; then setxkbmap `cat "$sysxkbmap"` XKB_IN_USE=yes fi if [ -f "$userxkbmap" ]; then setxkbmap `cat "$userxkbmap"` XKB_IN_USE=yes fi
These lines serve the same purpose as the previous stanzas, except they apply to the noted Keyboard Map files, based in Xkbmap . However, that file doesn t normally exist in Red Hat Linux and are therefore ignored. In xinitrc , this is followed by a stanza related to a Sun Microsystems X Server, which Red Hat does not use and therefore also ignores. This is followed by:
# xkb and xmodmap dont play nice together if [ -z "$XKB_IN_USE" ]; then if [ -f "$sysmodmap" ]; then xmodmap "$sysmodmap" fi if [ -f "$usermodmap" ]; then xmodmap "$usermodmap" fi fi unset XKB_IN_USE
This stanza checks for an Xmodmap file in /etc/X11/xinit , or a hidden version in your home directory. If it exists, it s used in place of the aforementioned Xkbdmap file. But remember, that file doesn t normally exist in Red Hat Linux.
# run all system xinitrc shell scripts. for i in /etc/X11/xinit/xinitrc.d/* ; do if [ -x "$i" ]; then . "$i" fi done
This stanza runs basic shell scripts in the noted directory, /etc/X11/xinit/xinitrc.d . These scripts can include files such as xinput and xmbind , which are described later.
if [ -f $HOME/.Xclients ]; then [ -x /usr/bin/ssh-agent -a -z "$SSH_AGENT_PID" ] && \ exec ssh-agent $HOME/.Xclients \ exec $HOME/.Xclients elif [ -f /etc/X11/xinit/Xclients ]; then [ -x /usr/bin/ssh-agent -a -z "$SSH_AGENT_PID" ] && \ exec ssh-agent /etc/X11/xinit/Xclients \ exec /etc/X11/xinit/Xclients else
These commands check for default clients in the Xclients file. They also set up an authentication agent for SSH, if previously configured. See Chapter 23 for more information.
xclock -geometry 100x100-5+5 & xterm -geometry 80x50-50+150 & if [ -x /usr/bin/netscape -a -f /usr/share/doc/HTML/index.html ]; then netscape /usr/share/doc/HTML/index.html & fi if [ -x /usr/X11R6/bin/fvwm2 ]; then exec fvwm2 else exec twm fi fi
These commands set up default clients if no Xclients file is available. You might note that this stanza includes Netscape, which is no longer included with the Red Hat Linux CDs. This stanza also uses xclock , a generic Linux GUI clock, and xterm , a generic command-line interface window.
You can also create your own .xinitrc file in your home directory. Make sure to use the appropriate chmod command to make that file executable. For example, you could add the following information to .xinitrc :
#!/bin/bash xclock & xterm & gimp & exec twm
This file starts with #!/bin/bash , which assumes that the commands that follow are based on the bash shell. The remaining commands start the standard Linux graphical clock ( xclock ), a basic terminal command-line interface ( xterm ), and The GIMP ( gimp ), the GNU Image Manipulation Program. Finally, the code starts a simple window manager interface known as twm ( twm ). The result starts the programs with twm, as shown in Figure 15.19.
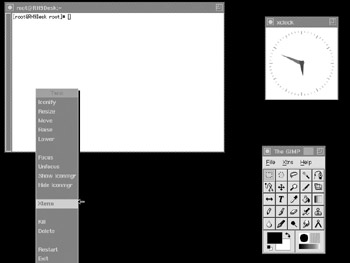
Figure 15.19: What you can do with .xinitrc
Xresources
There is normally an .Xresources file in users home directories, as well as a default Xresources in /etc/X11 . The default file goes through a series of steps to find your preferred desktop. Generally, if GNOME or KDE is not available, Xresources looks for a .wm_style file in your home directory that might call for an older window manager.
But these are details; the standard .Xresources file in your home directory sets a color scheme for basic X Clients in your GUI.
XF86Config
The /etc/X11/XF86Config file contains the main configuration settings for the X Server. Whenever you start a Linux GUI, the basic settings for resolution, pitch, graphics drivers, monitors , keyboards, and mice or other pointing devices are configured through this file. This file includes several major sections described here.
The first line in a file tells you if XF86Config was created through Anaconda:
# XFree86 4 configuration created by pyxf86config
or redhat-config-xfree86
# XFree86 4 configuration created by redhat-config-xfree86
| Note | Prior to Red Hat Linux 8.0, the default X Server configuration file was /etc/X11/XF86Config-4 . The -4 was added because Red Hat accommodated two different major versions of the XFree86 Server, 3.a.b and 4.x.y. Since Red Hat has now dropped version 3.a.b, it has also dropped the -4 suffix. The XFree86 version 4.x.y server now includes data for all but the oldest graphics cards. |
Many of the directives in XF86Config are listed in Table 15.2. The following subsections correspond to the typical sections that you might see in your XF86Config file.
| Directive | Description |
|---|---|
| BoardName | Specifies the name assigned to the device, such as a video card |
| BusID | Notes the location of a PCI or AGP video card, if Linux doesn t detect it |
| DefaultDepth | Specifies the default number of color bits per pixel; normally 1, 4, 8, 16, 24, or 32 |
| DisplaySize | Lists the horizontal and vertical size of the screen, in millimeters |
| Driver | Names a specific driver for the component |
| EndSection | Indicates the end of a group of commands |
| EndSubSection | Indicates the end of a SubSection group of commands |
| FontPath | Notes where X fonts can be found; may cite a specific file, or the TCP/IP port of the local font server, usually with unix/:7100 |
| HorizSync | Shows the range of allowable horizontal synchronization rates for the monitor |
| Identifier | Allows interaction between command groups |
| InputDevice | May refer to keyboards or pointing devices such as a mouse or a touchpad |
| Load | Adds the specified module |
| Model Name | Represents the name of a specific model; goes with VendorName |
| Modes | Specifies the allowable monitor resolution(s) |
| Module | Lists servers and font modules to be loaded with your X Server |
| Monitor | Notes the monitor Identifier associated with a Screen |
| Option | Indicates one of the many options available for different hardware components |
| RgbPath | Notes a database file, in text format, which specifies the level of Red, Green, and Blue for different colors |
| Section | Indicates the beginning of a group of commands; should be labeled, and goes with EndSection |
| SubSection | Indicates the beginning of a group of commands inside a Section |
| VendorName | Specifies the name of a manufacturer |
| VertRefresh | Shows the range of allowable vertical refresh rates for the monitor |
| VideoRam | Indicates the amount of available Video RAM memory |
ServerLayout
The ServerLayout section binds various InputDevice (s) and the Screen , which includes the combined configuration for the monitor and video card. The example shown here is in effect a summary of the configuration on my computer:
Section "ServerLayout" Identifier "Default Layout" Screen 0 "Screen0" 0 0 InputDevice "Mouse0" "CorePointer" InputDevice "Keyboard0" "CoreKeyboard" InputDevice "DevInputMice" "AlwaysCore" EndSection
In other words, this particular ServerLayout section combines the settings of Screen0 , Mouse0 , DevInputMice , and Keyboard0 , as configured through Anaconda, the Red Hat Linux installation program.
Files
The Files needed by your X Server relate to colors and fonts. The example here is taken from my computer:
Section "Files" RgbPath "/usr/X11R6/lib/X11/rgb" FontPath "unix/:7100" EndSection
To translate, this Files section notes the location of RGB style colors for display. It also lists the standard TCP/IP port for the X Font Server, xfs . RGB (Red Green Blue) is the traditional standard for color graphics.
| Note | RGB is not good enough for many artists and graphic designers. There is an alternative. Some Linux applications support the CMYK (Cyan, Magenta, Yellow, and Black) standard. This is good enough for several major movie studios , including DreamWorks and Disney. A couple of Linux CMYK programs are Houdini ( www.sidefx.com ) and Maya ( www.aliaswavefront.com ). |
Module
The module commands load font and server extension modules. The font modules shown below are straightforward; they load the Freetype (True Type clone) and Type1 fonts. A full list of available modules is shown in the /usr/X11R6/lib/modules directory.
Section "Module" Load "dbe" Load "extmod" Load "fbdevhw" Load "dri" Load "glx" Load "record" Load "freetype" Load "type1" EndSection
InputDevice
An InputDevice is anything that a user directly touches to send information to a computer. Also known as a Human Interface Device (HID), these devices are primarily keyboards and mice, but can include trackballs, touchpads , and more. As you can see below, there s a separate InputDevice section for each component.
Section "InputDevice" Identifier "Keyboard0" Driver "keyboard" Option "XkbRules" "xfree86" Option "XkbModel" "pc105" Option "XkbLayout" "us" EndSection
This first InputDevice specifies your keyboard, using the driver by the same name. The basic keyboard rules specify a layout, which conforms to those associated with the XFree86 Server. The model is associated with a standard 105-key keyboard, in a standard U.S. layout.
Section "InputDevice" Identifier "Mouse0" Driver "mouse" Option "Protocol" "IMPS/2" Option "Device" "/dev/psaux" Option "ZAxisMapping" "4 5" Option "Emulate3Buttons" "no" EndSection
The next InputDevice specifies a mouse, using a PS/2 connection. The device driver file is /dev/psaux , which is often linked to /dev/mouse . ZAxisMapping represents the up and down motion of a mouse wheel, which in this case corresponds to standard mouse buttons 4 and 5. These buttons aren t available on all mice. Button 4 corresponds to a scroll wheel on a three-button mouse. Button 5 corresponds to a button on the side of the mouse. If you have more than one mouse or pointing device, there may be another InputDevice section.
Monitor
The Monitor section summarizes the basic settings associated with your monitor. The following settings from my computer are fairly straightforward; they identify the monitor model, the DisplaySize in millimeters, and the horizontal sync and vertical refresh rates. The dpms option represents the power-saving settings standard.
Section "Monitor" Identifier "Monitor0" VendorName "Monitor Vendor" ModelName "S/M 955DF" DisplaySize 360 270 HorizSync 30.0 - 85.0 VertRefresh 50.0 - 160.0 Option "dpms" EndSection
It s possible to configure two different monitors; each monitor gets its own section with customized settings. The monitor and video card together gets its own Screen section, as we describe later in this chapter.
Device
The main device that supports any GUI is the video card. The following section identifies a specific card, with driver, and associated video RAM.
Section "Device" Identifier "Videocard0" Driver "i810" VendorName "Videocard vendor" BoardName "Intel 810" VideoRam 16384 EndSection
If you have more than one video card, each card gets its own separate section in your XF86Config file.
Screen
The Screen section combines the applicable video card ( Device ) and monitor settings from their respective sections. The name associated with the Device and Monitor lines is taken from their Identifier variables.
Section "Screen" Identifier "Screen0" Device "Videocard0" Monitor "Monitor0" DefaultDepth 24 SubSection "Display" Depth 16 Modes "1024x768" "800x600" "640x480" EndSubSection SubSection "Display" Depth 24 Modes "800x600" "640x480" EndSubSection EndSection
It s the combined video card and monitor that gets a dot pitch ( Depth ) and resolution ( Modes ). The following section configures two different SubSection "Display" stanzas. Note that each stanza has one Depth and possibly overlapping Modes .
DRI
The Direct Rendering Interface (DRI) takes advantage of the 3D acceleration available with higher-end video cards. It s associated with games as well as the higher-end graphics required for movies and computer-aided design models. The following DRI section is simple:
Section "DRI" Mode 0666 EndSection
The 0666 is associated with read and write file permissions, for all users. If you specify a group in /etc/group , you can limit 3D rendering access. For example, if there is a galley group in /etc/ group , you could limit access with the following stanza:
Section "DRI" Group "galley" Mode 0666 EndSection
EAN: 2147483647
Pages: 220