57.
Changing Multiple Properties at OnceThe FormatCurrency macro changes a single property (the number format) of a single object (the currently selected cells). Assigning a value to the property changes the object. Many macro statements assign a value to a property of an object. Sometimes when you record an action, the macro changes multiple properties of one object at the same time. Merge Text Vertically with a Command Excel has a toolbar button that can merge and center several cells in a horizontal row: the Merge And Center button. But sometimes you might want to merge cells vertically along the edge of a report. Excel doesn't have a toolbar button that merges cells in a vertical column, but you can record a macro that does. To better understand what's required, first walk through the steps to create this format using menu commands.
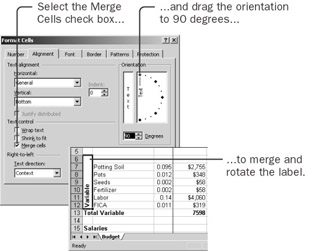
Putting a label to the side of a block of cells is extremely powerful. You can make it easy to do by recording a macro. Record a Macro to Merge Cells Vertically
The new macro in the Module1 window looks like this: Sub MergeVertical() ‘ ‘ MergeVertical Macro ‘ Merge cells vertically ‘ ‘ Keyboard Shortcut: Ctrl+Shift+M ‘ With Selection .HorizontalAlignment = xlGeneral .VerticalAlignment = xlBottom .WrapText = False .Orientation = 90 .AddIndent = False .IndentLevel = 0 .ShrinkToFit = False .ReadingOrder = xlContext .MergeCells = True End With End Sub The macro shows nine different properties that relate to cell alignment. Each property name is followed by an equal sign. These properties correspond to the controls you saw on the Alignment tab of the Format Cells dialog box. All these properties pertain to the same object-the currently selected cells, as does the NumberFormat property in the FormatCurrency macro. In the FormatCurrency macro, however, the object directly precedes the property, separated only by a period. In this MergeVertical macro, however, each property name just hangs there, preceded only by a dangling period. The object for all these properties appears in a statement that begins with the word With. The group of statements from With to End With is called a With structure. Whenever a property inside a With structure is preceded by a dangling period with no object, you simply pretend that the object from the With statement is there. With structures make the code easier to read because you can tell instantly that all the properties relate to the same object-the current selection in this case. You'll often see With structures in macros that you record. Eliminate Unnecessary Lines from the Macro In many dialog boxes, the macro recorder records all the possible properties, even though you might change the values of only one or two of them. You can make your macro easier to understand if you eliminate unnecessary property assignments. In the MergeVertical macro, you need to change the values of only the Orientation and MergeCells properties. You can therefore delete the other statements from the With structure.
Now you've not only recorded a macro, but you've also deleted parts of it-and it still works. Next you'll record a macro and make additions to it. | ||||||||||||||||||||||||||||||

EAN: 2147483647
Pages: 122
- Integration Strategies and Tactics for Information Technology Governance
- Measuring ROI in E-Commerce Applications: Analysis to Action
- Technical Issues Related to IT Governance Tactics: Product Metrics, Measurements and Process Control
- Governing Information Technology Through COBIT
- Governance in IT Outsourcing Partnerships