Creating a Graphical Interface A graphical interface, such as a map, can be an effective way of presenting choices. Instead of selecting the name of a state from a list, the user can simply click within the state boundary. Insert a Map First you need to create a map on the worksheet. You can import pictures from Excel's clip art gallery or from a file in Windows. For this example, you'll import the picture from a file. -
Select Sheet3 in the Chapter12 workbook. Rename the sheet as Main. -
Press Ctrl+A to select all the cells, click the Fill Color button, and then change the color to Green (the fourth color on the second row in the color menu). -
Select cell D3, and on the Insert menu, point to the Picture submenu and click From File. -
Change to the folder containing the practice files for this book, select the  Map.wmf file, and click Insert. Map.wmf file, and click Insert. -
From the Format menu, click Picture, click the Size tab, set the height to 3.5 inches, and then click OK. -
If necessary, click the Drawing button to activate the Drawing toolbar. Click the Draw menu on the Drawing toolbar, click the Ungroup command, and click Yes to convert the picture to a Microsoft Office drawing object. -
Once again, click the Draw menu on the Drawing toolbar, and click the Ungroup command again. This converts the group into separate objects, one for each state, plus a background. 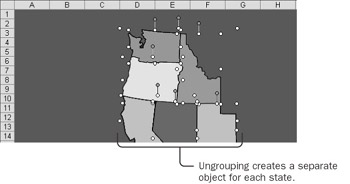 -
Press Esc to deselect the group. Then click in the vicinity of cell F4 to select the background shape, and press Delete. -
Save the Chapter12 workbook. The map is ready. You could have the user simply click on the state background, but adding the two-letter codes for the states will make things easier for people who get the states confused. Add State Codes to the Map You could use command buttons to add the state codes to the map, but buttons have limited formatting capabilities. Instead, try using WordArt text so that you can make the state codes look attractive. Because you will need to add a state code for each of seven states, you can record and modify a simple macro to make the task easier. -
Select the map for Washington state. -
On the Visual Basic toolbar, click the Record Macro button. Type NameState as the macro name, and click OK. -
Click in the Name Box to the left of the formula bar, type mapWA, and press Enter. Later you'll assign a macro to run when you click the state name. If you include the state code at the end of the name of each graphical object, you'll be able to use a single macro for all the states. -
Click the arrow next to the Fill Color button, and click Fill Effects. Select One Color as the Colors option, select From Center as the Shading Styles option, and click OK. This gives a shaded, 3-D effect to the background of the state. 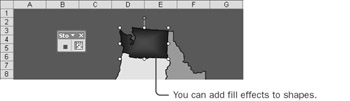 WordArt  -
On the Drawing toolbar, click the Insert WordArt button. Select the silver text fourth style on the second row, and click OK. 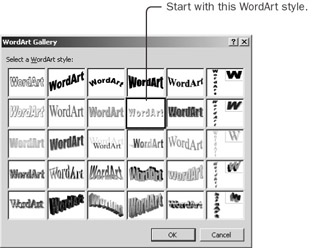 -
In the Edit WordArt Text dialog box, type WA as the text, and click OK. 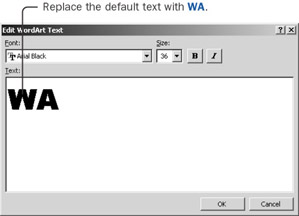 -
Click in the Name Box, type lblWA, and press Enter. -
From the Format menu, choose Word Art. On the Size tab, specify 0.35 inch as the Height, 0.5 inch as the Width, and click OK. -
Turn off the recorder, and then drag the label into the middle of the Washington state map. (If you accidentally drag the map for Utah instead of the label, you can press Ctrl+Z to put it back.) 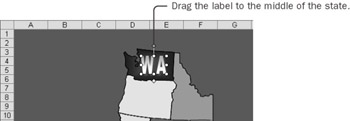 -
Click the Run Macro button, select NameState, and click Edit. The recorded macro should look like this: Sub NameState() Selection.Name = "mapWA" Selection.ShapeRange.Fill.ForeColor.RGB = RGB(1, 128, 4) Selection.ShapeRange.Fill.Transparency = 0# Selection.ShapeRange.Fill.OneColorGradient _ msoGradientFromCenter, 1, 0.23 ActiveSheet.Shapes.AddTextEffect(msoTextEffect10, _ "WA", "Arial Black", 36#, _ msoFalse, msoFalse, 228.75, 134.25).Select Selection.Name = "lblWA" Selection.ShapeRange.LockAspectRatio = msoFalse Selection.ShapeRange.Height = 25.5 Selection.ShapeRange.Width = 36# Selection.ShapeRange.Rotation = 0# End Sub The text string WA appears three times in the macro. Changing the state code to use an argument will make it easy to add the other six labels. -
Between the parentheses, type StateCode. Replace 'mapWA' with 'map' & StateCode, replace 'WA' with StateCode, and replace 'lblWA' with 'lbl' & StateCode. The modified macro should look like this: Sub NameState(StateCode) Selection.Name = "map" & StateCode Selection.ShapeRange.Fill.ForeColor.RGB = RGB(1, 128, 4) Selection.ShapeRange.Fill.Transparency = 0# Selection.ShapeRange.Fill.OneColorGradient _ msoGradientFromCenter, 1, 0.23 ActiveSheet.Shapes.AddTextEffect(msoTextEffect10, _ StateCode, "Arial Black", 36#, _ msoFalse, msoFalse, 228.75, 134.25).Select Selection.Name = "lbl" & StateCode Selection.ShapeRange.LockAspectRatio = msoFalse Selection.ShapeRange.Height = 25.5 Selection.ShapeRange.Width = 36# Selection.ShapeRange.Rotation = 0# End Sub -
In Excel, select the map for Oregon. In the Visual Basic Immediate window, type NameState 'OR' and press Enter. In Excel, drag the new OR label to the middle of the Oregon state map. -
Repeat for each of the remaining states using the appropriate state codes (ID, CA, NV, UT, and AZ). When you've finished, each object will have the state code as the last two letters of the name. 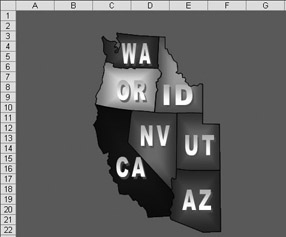 -
Save the Chapter12 workbook. By assigning names ending in the two-letter state code to both the WordArt object and the map for each state, you can streamline the macro that enables a user to click either the letters or the background to run the macro. Link a Macro to the Graphical Objects Earlier in the chapter, you created a SetPivot macro. That macro can display any state, provided that you pass it the appropriate state code. Coincidentally, the state code is the last two letters of the name of each object for each state. You therefore need to create a macro that can retrieve the name from the object and extract the code for whichever state the user clicks. In a macro, the Excel Application object has a property named Caller. The Caller property gives you the name of the object that the user clicked to run the macro. Visual Basic has a function named Right that extracts letters from the right side of a word. You can use the Right function to extract the state code from the name that the Caller property returns. Even if you group the states, the Caller property still returns the name of the specific item that you click. Select Objects  -
On the Drawing toolbar, click the Select Objects button. Then drag a rectangle around the entire map. You should see sizing handles around each of the seven states. -
On the Drawing toolbar, click the Draw menu and then click Group. This creates a single group out of all the selected objects. -
Click in the Name Box, type shpMap as the name of the group, and press Enter. Then click the Select Objects button to turn it off. -
Right-click on the map, and choose the Assign Macro command. When you assign a macro to a grouped object, you actually assign the macro to each object within the group. -
In the Assign Macro dialog box, type ShowMe as the macro name, and click New. -
Enter these statements as the body of the ShowMe macro: Dim myName As String Dim myCode As String myName = Application.Caller myCode = Right(myName, 2) SetPivot myCode -
Save the Chapter12 workbook, and click anywhere inside the border of Nevada. The Data sheet should appear and display the orders for Nevada. The Application.Caller property is a convenient tool for making a single macro handle any of several objects. | Tip | When you use the Control Toolbox to add an object such as a command button, you create an ActiveX control. Multiple ActiveX controls can't share a single macro because they use event handler procedures, and an event handler can link to only one object. | Add a Background Logo You can also use WordArt to add an attractive logo for the EIS application. Later in the chapter, you'll animate the logo. Insert WordArt  -
Activate the Main worksheet, and click the Drawing toolbar's Insert WordArt button. -
Select the silver text (the fourth style on the second row), and click OK. Type Garden and press the Enter key, type The and press the Enter key again, type Company, and then click OK. 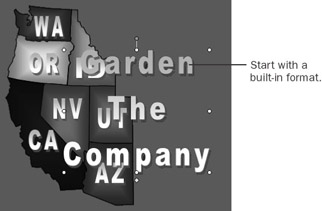 WordArt Shape -
The new WordArt object has the appropriate colors, but it has a strange shape. You can easily adjust the shape. On the WordArt toolbar, click the WordArt Shape button and select the Button (Pour) shape (the rightmost shape on the second row).  WordArt Same Letter Heights  -
On the WordArt toolbar, click the WordArt Same Letter Heights button. Then click the WordArt Alignment button, and choose the Stretch Justify option. -
Drag the upper left sizing handle to the upper left corner of cell C3, and drag the lower right sizing handle to the middle of the bottom of cell H22. Then center the map within the new WordArt shape. WordArt Alignment  Many shapes have an adjustment marker that allows you to modify the shape. It appears as a yellow diamond to the left of center in the WordArt object. Later in the chapter, you'll see how a macro can change the adjustment. -
Select the WordArt shape, and drag the adjustment marker to the left until it's about a quarter of an inch from the outside circle. 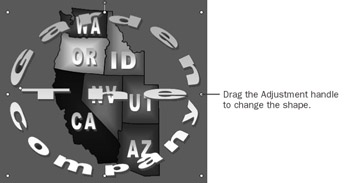 -
Click in the Name Box, type shpLogo, and press Enter. -
Turn off the row and column headings. (From the Tools menu, click Options, click the View tab, and then clear the Row And Column Headers check box.) -
Press the Esc key to deselect the logo, and then save the Chapter12 workbook. The logo looks good, but you can make it even more attractive by animating it. Animate the Logo Animating a WordArt object is easy. You use a macro that simply makes many small changes to the adjustment values that are available. When you adjust shapes in a macro, however, Windows doesn't refresh the screen until the macro has completed. In many cases, you'll be glad that Windows doesn't refresh the screen because your macro runs faster that way. When you're animating a shape, however, you want the screen to refresh each time the macro adjusts the shape. As part of the animation, you can initially hide the map and then gradually display it. -
On the Drawing toolbar, click the Rectangle button, and drag a rectangle large enough to completely cover the map. -
Click the Draw menu on the Drawing toolbar. Click Order, and click Send Backward. This moves the rectangle behind the logo, but leaves it in front of the map. The rectangle serves as a mask to hide the map. -
Click in the Name Box, type shpMask, and press Enter. -
Click the arrow next to the Line Color box, and select No Line. -
Click the arrow next to the Fill Color box, and select Green (the fourth color on the second row-the same color as the worksheet background). -
Click the arrow next to the Fill Color box, and select More Fill Colors. At the bottom of the dialog box, drag the Transparency slider to show approximately 50%. Then click OK. The animation macro will gradually increase the transparency of the mask to reveal the map. 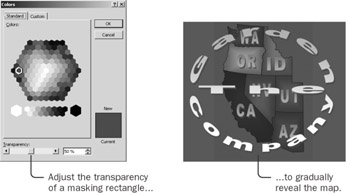 -
Activate the Visual Basic Editor, and click at the bottom of the module. From the Insert menu, click File, change to the folder containing the practice files for this book, and double-click the Code12b file. This StartUpAnimation macro appears in the module: Sub StartUpAnimation() Dim myLogo As Shape Dim myMap As Shape Dim myMask As Shape Dim i As Double Set myLogo = Worksheets("Main").Shapes("shpLogo") Set myMap = Worksheets("Main").Shapes("shpMap") Set myMask = Worksheets("Main").Shapes("shpMask") Application.EnableCancelKey = xlErrorHandler On Error GoTo StartUpAnimation_EndErrorHandler Application.ScreenUpdating = False myMap.Visible = msoFalse myLogo.Adjustments(1) = 91 myLogo.Adjustments(2) = 0.49 myLogo.TextEffect.Tracking = 0.1 Worksheets("Main").Select Application.ScreenUpdating = True For i = 91 To 176 Step 5 myLogo.Adjustments(1) = I DoEvents Next I For i = 0.48 To 0.18 Step -0.04 myLogo.Adjustments(2) = I DoEvents Next I For i = 0.1 To 1.41 Step 0.2 myLogo.TextEffect.Tracking = I DoEvents Next I For i = 0.2 To 0.45 Step 0.02 myLogo.Adjustments(2) = I DoEvents Next I myMap.ZOrder msoSendToBack myMask.Fill.Transparency = 0 myMap.Visible = msoTrue For i = 0 To 1 Step 0.2 myMask.Fill.Transparency = I DoEvents Next I StartUpAnimation_EndErrorHandler: myLogo.Adjustments(1) = 176 myLogo.Adjustments(2) = 0.44 myLogo.TextEffect.Tracking = 1.3 myLogo.Visible = msoTrue myMap.ZOrder msoBringToFront myMap.Visible = msoTrue End Sub This macro consists of five parts, separated by blank lines. The first part simply declares some variables and assigns references to the three shapes on the worksheet. The second part and the fifth part work together to allow you to skip the animation by pressing Ctrl+Break. The On Error Goto ErrorHandler statement tells the macro to jump to the ErrorHandler label if there's an error. The EnableCancelKey property tells Excel to consider it an error if the user presses Ctrl+Break. The statements in the final part (after the label) simply set the shape adjustments to their final values and display both shapes. The third part of the macro sets the logo shape adjustments to their initial values, hides the map, and makes sure that screen updating hasn't been turned off by an earlier procedure. It then activates the Main worksheet, ready to show the animation. The Tracking property controls how much WordArt letters overlap. | Tip | The constants msoTrue and msoFalse are identical to the ordinary Visual Basic constants True and False. The mso- prefix stands for 'Microsoft Office'; for some unknown reason, the designer of the Shape objects decided to create True and False values that are unique to Microsoft Office. You can use the True and False constants with Shape objects, but when you enter a statement using a Shape object, the Auto List offers only msoTrue and msoFalse. | The fourth part of the macro does the real animation. It consists of five loops, four of which change three different settings of the logo shape. The fifth loop changes the transparency of the mask. You can find appropriate start and end values for an animation by turning on the recorder and making manual changes to the adjustments for a shape. Much of the process is simply trial and error. The DoEvents statement is the secret to making an animation work. This statement tells Windows to refresh the screen (refreshing is an action that Windows should perform), without waiting for the macro to end. -
Save the Chapter12 workbook, click in the StartUpAnimation macro, and press F5 to test the macro. You might want to set breakpoints in the macro and step through parts of the macro. Your application now has both functionality and an effective user interface; however, it's still obviously part of Excel. Now is the time to package the application by removing any distracting toolbars, window features, and menu commands and by making the macros run automatically. |