Configuring the XMLConnector
| | ||
| | ||
| | ||
You can add an XMLConnector to your Flash movie by dragging it from the Components panel. I normally place these components off the Stage as they have no visual appearance in compiled Flash movies. Once youve added the component, youll see the icon shown in Figure 8-3.
Figure 8-3: The XMLConnector component icon
You can configure the settings for the XMLConnector in the Component Inspector. This panel allows you to specify the external XML document and configure other settings, such as white space. Dont forget that youll also need to give the XMLConnector component an instance name . I usually use the suffix _xc to indicate that the component is an XMLConnector, for example, instanceName_xc .
Using the Component Inspector
Once youve added an XMLConnector to your Flash movie, youll need to configure it with the Component Inspector. Figure 8-4 shows the Component Inspector panel.
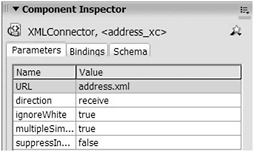
Figure 8-4: The Component Inspector panel
The Component Inspector has three tabs that youll use to work with the XMLConnector. To start with, youll need to configure the Parameters panel so that you can set the connection properties. Table 8-2 shows a summary of the parameters in this panel and their purpose.
| Parameter | Purpose |
|---|---|
| URL | The path to an external XML document. This setting does not need to refer to a file ending with .xml . You can enter the path to a server-side file that results in an XML document. If you do this, you must remember to include the full server path, e.g., http://localhost/XML/generateXML.aspx. |
| direction | Determines whether you are sending, sending/receiving, or receiving the XML data. These values correspond to the send , load , and sendAndLoad methods of the XML class. |
| ignoreWhite | Determines whether white space is significant in the XML document. Note that this is set to true by default whereas the XML class has a default setting of false . |
| multipleSimultaneousAllowed | Specifies whether to allow multiple connections. If you set this property to false , when you are triggering one XMLConnector, further triggers are not possible. |
| suppressInvalidCall | Sets the behavior for invalid data parameters. If you set the value to true , the component wont be triggered if the parameters are invalid. |
Most of the time, youll only need to configure the first two settings: URL and direction .
After youve configured the parameters for the XMLConnector, you can import a sample XML document into Flash so you can see the XML element and attribute structures. This gives you a visual representation of the XML document structure and lists the names and datatypes of attributes and elements. Flash refers to this representation as a schema. Bear in mind that this is not the same as an XML schema. The next section covers the process of importing an XML structure into Flash.
Creating a schema from an XML document
The Schema tab in the Component Inspector allows you to generate a schema from an existing XML document. You choose a document with an .xml extension and Flash will find the names and datatypes of each element and attribute.
If youre using an XML file instead of a server-side file, you can generate a schema from the document that youre loading into Flash. You can also use a trimmed -down version of the file, as long as it contains at least two data elements. Note that you cant load a schema from a server-side file that results in an XML document.
Flash allows you to generate two different types of schemas from external XML documents: one called params:XML and the other results:XML . The params type represents the structure of data being sent out of Flash while you use results for the structure of incoming XML data. Figure 8-5 shows both options. You can see their direction by looking at the arrows. The right arrow to the left of params indicates that XML data is outgoing while the left arrow indicates incoming data for results .
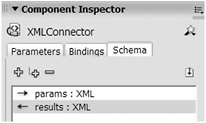
Figure 8-5: The Schema tab in the Component Inspector panel
To create a schema, select either params or results and click the Import a schema button at the right side of the Schema tab. Figure 8-6 shows the button.
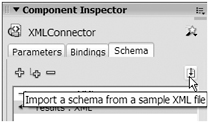
Figure 8-6: Importing a schema from a sample XML document
Click the button and navigate to the XML document. You must use a physical XML document rather than a server-side file that generates an XML document. Once youve imported the document, Flash will display the structure within the Schema tab.
Ive used the resource file address.xml to generate the structure shown in Figure 8-7. The following listing shows the contents of the XML document:
<?xml version="1.0" encoding="UTF-8"?> <phoneBook> <contact> <id>1</id> <name>Sas Jacobs</name> <address>123 Some Street, Some City, Some Country</address> <phone>123 456</phone> </contact> <contact> <id>2</id> <name>John Smith</name> <address>4 Another Street, Another City, Another Country</address> <phone>456 789</phone> </contact> <contact> <id>3</id> <name>Jo Bloggs</name> <address>7 Different Street, Different City, UK</address> <phone>789 123</phone> </contact> </phoneBook>
The address.xml document generates the Flash schema shown in Figure 8-7.
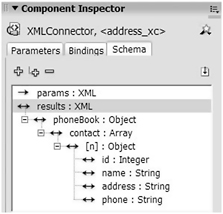
Figure 8-7: A sample results schema
Flash lists the name and datatype of each element in the Schema tab. In Figure 8-7, the root element is called phoneBook . It has an Object datatype. It contains an array of contact elements, equivalent to the childNodes collection in the XML class. The contact element contains id , name , address , and phone content.
Youll notice that the XML document shown in the previous listing is slightly different from the one we used in earlier chaptersit doesnt use attributes. In this version of the XML document, Ive modified the id attribute and made it a child element of <contact> . The revised structure will make things easier as we bind data to UI components. Figure 8-8 shows a schema that contains attributes. They are prefaced by an @ sign.
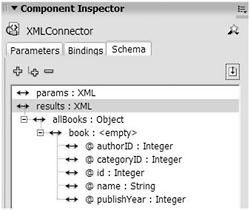
Figure 8-8: The results schema showing attributes
The schema shown in Flash is a representation of the bindable data structures within an XML document at the time of import. In other words, it shows what data you can bind to your other data components.
Flash doesnt maintain a link back to the XML document used to generate the results schema. If you change the XML document, youll need to import the XML document again and regenerate the schema. You may also need to change your data bindings. Its probably not ideal to use the XMLConnector component if the structure of your XML document is likely to change.
If you dont have a sample XML document, you can create a schema in Flash manually.
Creating a schema by adding fields
While the usual method is to generate a schema by importing an existing XML document, it is possible for you to create the schema yourself. Select the parent element for your schema field and click the Add a field button, as shown in Figure 8-9. If youre adding the root element, youll need to select either params or results first. For each subsequent element, youll need to click the parent and add another field.
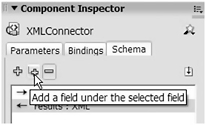
Figure 8-9: Clicking the Add a field button
Flash will add a new field underneath the selected element. You can configure the field using the settings at the bottom of the Schema tab. Figure 8-10 shows the properties that you can configure.
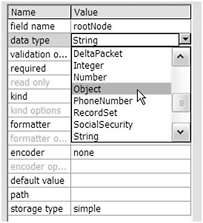
Figure 8-10: Configuring a new field
In Figure 8-10, Ive entered the name rootNode for the new field and Im selecting the Object datatype.
You can also use the Schema tab with the UI components. For example, if youre binding the XML data to a DataGrid component, youll use the Schema tab to set the details for each column. Ill show you an example of this later in this chapter.
Understanding schema settings
Once youve created a schema for your XML document, you can configure the settings in the panel at the bottom of the Schema tab. The panel will display the settings for the currently selected schema item. Figure 8-11 shows the settings for an Array item called contact .
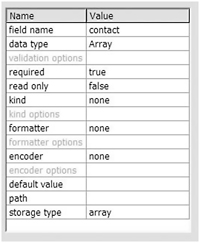
Figure 8-11: The settings for an Array field
You dont often need to change the field properties within the Schema tab. Table 8-3 summarizes each setting and its purpose.
| Setting | Explanation |
|---|---|
| field name | Lists the name of the field. |
| data type | Sets the datatype for the field. You can choose from Array , Attribute , Boolean , Custom , DataProvider , Date , DeltaPacket , Integer , Number , Object , PhoneNumber , SocialSecurity , String , XML , or ZipCode . |
| validation options | Specifies the validation for the field contents, for example, the number of characters within a String field. This option is only available for the following datatypes: Custom , Integer , Number , String , and XML . |
| required | Specifies whether the field is required. |
| read only | Specifies whether the content can be updated through data binding. |
| kind | Sets the kind of data at runtime. Select from none , AutoTrigger , Calculated , or Data . You could use a Calculated kind to create a calculation based on other field values. |
| kind options | Specifies any additional settings associated with the kind setting. |
| formatter | Details the name of a formatter to use when converting the field to a String type. |
| formatter options | Specifies any additional settings associated with the selected formatter. |
| encoder | Sets the encoding for the data at runtime. Select from Boolean , Compose String , Custom Formatter , Date , Rearrange Fields , or Number Formatter . |
| encoder options | Specifies any additional settings associated with the encoder. |
| default value | Specifies the default setting when the data is undefined or when you add a new item in Flash. |
| path | An optional setting specifying a path expression for the data. |
| storage type | The way data is stored. This setting relates to the data type chosen and is one of the following values: simple , attribute , array , or complex . You shouldnt need to change this setting. |
Once youve configured the parameters and added a schema, you can trigger the XMLConnector component and test that its working correctly. Triggering forces the XMLConnector to load data. After youve done that, you can bind the XML data to other components.
Triggering the component
You have to trigger the XMLConnector component before it sends or loads an XML document. One option is to trigger the XMLConnector after a button click. You can also trigger the component when the Flash movie first loads.
Triggering requires a single line of ActionScript that you can either write yourself or generate by adding a Behavior. Whichever method you choose, its important to check that youve given the XMLConnector an instance name first. Ill start by showing you how you can trigger the component with a Behavior.
First, youll need to show the Behaviors panel by using the SHIFT-F3 shortcut key. Select frame 1 of the layer for the ActionScript. You can also select a button instance. Click the plus sign in the Behaviors panel, choose the Data category, and select Trigger Data Source . Figure 8-12 shows the selected option.
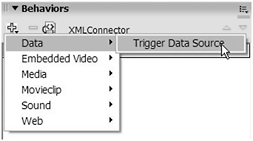
Figure 8-12: Adding a Behavior to trigger the XMLConnector
Flash will prompt you to select the component instance to trigger, as shown in Figure 8-13.
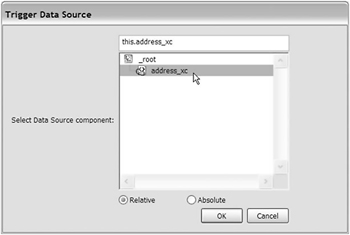
Figure 8-13: Selecting the XMLConnector component
Choose the instance and select whether you want a Relative or Absolute path. I normally leave the default Relative option selected. Click OK , and Flash will create a new Behavior to trigger the XMLConnector. Figure 8-14 shows the new Behavior in the Behaviors panel.

Figure 8-14: The Behaviors panel showing the new Behavior
Flash adds the ActionScript that triggers the XMLConnector to your selected location. You can view the Actions panel to see the code that Flash generates. Figure 8-15 shows a frame action in the Actions panel after adding the Behavior. We used a Relative setting in the Trigger Data Source dialog box.
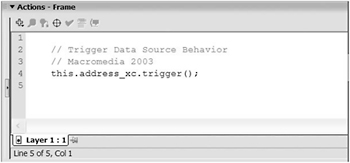
Figure 8-15: The ActionScript generated by Flash
The code to trigger a component is very simple. It consists of the instance name of the XMLConnector and the trigger method. In Figure 8-15, it also includes the word this . If youre working on the main timeline, you can remove this without affecting the trigger method.
instanceName.trigger();
The trigger method creates a call to the XML document specified in the Component Inspector. When it completes the call, the result event is broadcast. You can use this event to process the results from the loaded XML document with ActionScript. In the first exercise, youll see how to use this event to display the XML tree in an Output window.
Testing for a loaded XML document
To test whether an XML document has loaded, youll have to write ActionScript that accesses the results from the XMLConnector. Youll use an event listener to listen for the result event. The results property of the XMLConnector contains the XML document, and you can trace this to see the contents. Be careful not to mix up the result and results keywordsthey mean very different things. This code snippet shows an example:
var xmlListener:Object = new Object(); xmlListener.result = function(evtObj:Object):Void { trace (evtObj.target.results); }; myXML_xc.addEventListener("result", xmlListener); myXML_xc.trigger(); If you tested this code, youd see the XML document displayed in an Output window. The listener passes the evtObj object to the event handler function, and you can use evtObj.target.results to display the complete XML document.
Loading an XML document into Flash
A common use for the XMLConnector is to load an external XML document into Flash. Youll drag an XMLConnector component to the Flash movie. Youll then configure the parameters and add a URL for the file that you want to load. If you dont need to update the content in Flash, you can set the direction property to receive on the Parameters tab of the Component Inspector. If you do need to update the content in Flash, you can use the send/receive setting; however, its more common to use a second XMLConnector to send the updated data from Flash.
While you dont need to use a schema when you load an external XML document, its a good idea. It makes binding much easier if you can see a visual representation of your element and attribute structure.
So far, Ive shown you the theory about how to use the XMLConnector component. Now, lets work through an example that uses the XMLConnector to load an external XML document.
| |
In this example, well load the file address.xml into Flash using the XMLConnector component. Well add some ActionScript to display the XML content within an Output window.
-
Open Flash and create a new movie.
-
Rename Layer 1 as UI and add another layer called actions .
-
Drag an XMLConnector component to the UI layer. Position it off the Stage.
-
Name the component instance address_xc .
-
Save the file as loadContacts.fla in the same folder as the address.xml file.
-
Select the XMLConnector and show the Component Inspector. Configure the Parameters tab as shown in Figure 8-16.
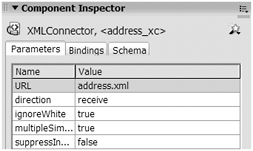
Figure 8-16: The completed Parameters tabThe tab shows the settings that will load the file address.xml .
-
Click on the Schema tab and import the file address.xml to create a schema. You should see the structure of the document displayed in the tab.
-
Click in frame 1 of the actions layer. If necessary, open the Behaviors panel using the SHIFT-F3 shortcut.
-
Add a new Behavior to trigger the address_xc component. Click the plus sign in the Behaviors panel, choose the Data category, and select Trigger Data Source .
-
Open the Actions panel with the F9 shortcut key and modify the code as shown here. The new lines appear in bold.
var xmlListener:Object = new Object(); xmlListener.result = function(evtObj:Object):Void { trace (evtObj.target.results); }; address_xc.addEventListener("result", xmlListener); address_xc.trigger();The lines create a new listener called xmlListener . The listener responds to the result event and displays the results of the XMLConnector component called address_xc .
-
Test the movie and you should see an Output window displaying the contents of address.xml . You can see my Output window in Figure 8-17. Ive saved the completed resource file as loadContacts.fla .
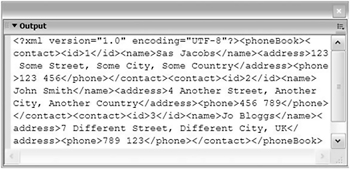
Figure 8-17: Tracing the results property of the XMLConnector
In exercise 1, we used the XMLConnector component to load XML content from the external file address.xml . We also added ActionScript so that we could display the XML tree and test that the XML document was successfully loaded.
After you load an XML document, you wont usually display the contents in an Output window. Instead, youll want to bind the content to other components. You can bind the XML directly to one or more UI components or you can bind to a DataSet component first. In the next section, Ill show you how to bind directly to UI components.
| |