Putting it All together
| | ||
| | ||
| | ||
Putting it All together
Well finish the chapter by putting together what weve covered to create a Flash application that uses content from Access 2003. Access will export the data in XML format and Flash will use it in a document search application.
| |
In this exercise, well use Flash to search the contents of an Access database via XML documents. Well export Access data into several different XML documents to populate the Flash interface. When the Flash movie loads, it will display all books from the Access database. Users will then be able to refine the list of books and filter the data by category or author. You can see the working example saved as documents_completed.fla in your resource files if you want to get a better idea of the application that youre building.
Generating the XML content
-
Open documents.mdb in Access 2003 if necessary.
-
Export the three tables from the database and save the XML documents as authorsList.xml , categoriesList.xml , and documentsList.xml . Make sure you uncheck the Schema option. You dont need to change any other settings.
-
Open the three documents in an XML or text editor to view the content.
Loading the XML documents into Flash
-
Open the starter file documents.fla in Flash. Figure 7-37 shows the interface. It contains two ComboBox components that youll use to search for documents. It also contains a List component to display book details, as well as two Button components .
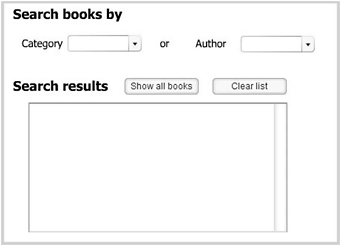
Figure 7-37: The documents.fla interface.
-
Create a new layer called actions and add the code show here on frame 1. The code creates three XML objects and loads the file documentsList.xml into one of the objects. The properties and onLoad event handlers are set for all three objects. When the document loads successfully, the DocsRootNode variable is set and Flash calls the loadCategoriesXML and loadAuthorsXML functions.
var DocsRootNode:XMLNode; var catsXML:XML = new XML(); catsXML.ignoreWhite = true; catsXML.onLoad = loadCategories; var authorsXML:XML = new XML(); authorsXML.ignoreWhite = true; authorsXML.onLoad = loadAuthors; var docsXML:XML = new XML(); docsXML.ignoreWhite = true; docsXML.onLoad = loadAllDocs; docsXML.load("documentsList.xml"); function loadAllDocs(success:Boolean):Void { if (success) { DocsRootNode = this.firstChild; trace (DocsRootNode); loadCategoriesXML(); loadAuthorsXML(); } } -
Test the movie and you should see the DocsRootNode variable shown in an Output window.
-
Modify the loadAllDocs function as shown here. The new lines appear in bold. The function loads the remaining two XML documents into the catsXML and authorsXML objects.
function loadAllDocs(success:Boolean):Void { if (success) { DocsRootNode = this.firstChild; catsXML.load("categoriesList.xml"); authorsXML.load("authorsList.xml"); } } -
Add the following functions below the loadAllDocs function in the actions layer. When the new XML objects have successfully loaded, the contents display in an Output window. Ive added a separator to make it easier to see the different XML trees in the Output window.
function loadCategories(success:Boolean):Void { if (success){ var catsRootNode:XMLNode = this.firstChild; trace (catsRootNode); } } function loadAuthors(success:Boolean):Void { if (success){
var authorsRootNode:XMLNode = this.firstChild; trace ("-----------"); trace (authorsRootNode); } } -
Test the movie and you should see the two root node variables in an Output window. Figure 7-38 shows this window.
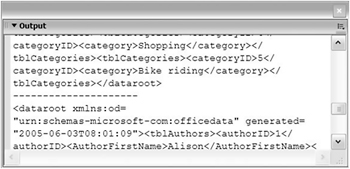
Figure 7-38: The Output window showing the XML trees
Populating the List component
-
Modify the loadAllDocs function to call the showAllDocs function. The showAllDocs function will populate the List component. Ive created a function for this code so that we can call it again later when we click the Show all books button.
function loadAllDocs(success:Boolean):Void { if (success) { DocsRootNode = this.firstChild; catsXML.load("categoriesList.xml"); authorsXML.load("authorsList.xml"); showAllDocs(); } } -
Add the showAllDocs function. This function populates the List component using the book title and publication year. It sorts the book names into alphabetical order.
function showAllDocs():Void{ var BookNode:XMLNode; var ListItem_str:String; for (var i:Number = 0; i < DocsRootNode.childNodes.length; i++) { BookNode = DocsRootNode.childNodes[i]; ListItem_str = BookNode.childNodes[1].firstChild.nodeValue; ListItem_str += ", "+BookNode.childNodes[3].firstChild.nodeValue; results_list.addItem(ListItem_str); } results_list.sortItemsBy("label"); }
-
Test the movie. Figure 7-39 shows the appearance of the movie at this point.
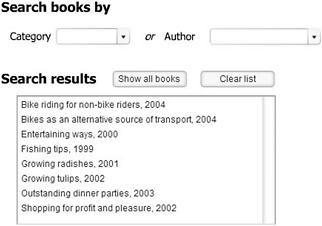
Figure 7-39: The populated List component
Configuring the buttons
-
Add the following code on the actions layer. The code configures the Show all books and Clear list buttons. When we click the Show all books button, we clear the existing contents and call the showAllDocs function. Clicking the Clear list button removes the contents of the List.
show_btn.onRelease = function():Void { results_list.removeAll(); showAllDocs(); } clear_btn.onRelease = function():Void { results_list.removeAll(); } -
Test the movie and check that you can remove and show the contents within the List.
Configuring the ComboBoxes
-
Modify the loadCategories function as shown here so that it loads the categories in the category_cb ComboBox component. The function sorts the ComboBox and adds a Choose item at the top of the list.
function loadCategories(success:Boolean):Void { if (success){ var catsRootNode:XMLNode = this.firstChild; var categoryNode:XMLNode; var category_str:String; var catID_int_int:Number; for (var i:Number = 0; i < catsRootNode.childNodes.length; i++) { categoryNode = catsRootNode.childNodes[i]; category_str = categoryNode.childNodes[1].firstChild.nodeValue; catID_int = categoryNode.childNodes[0].firstChild.nodeValue;
category_cb.addItem(category_str, catID_int); } category_cb.sortItemsBy("label"); category_cb.addItemAt(0, "Choose "); category_cb.selectedIndex = 0; } } -
Modify the loadAuthors function as shown here. The new code appears in bold. Again, the function populates the ComboBox and adds a Choose item.
function loadAuthors(success:Boolean):Void { if (success){ var authorsRootNode:XMLNode = this.firstChild; var authorNode:XMLNode; var author_str:String; var auID_int:Number; for (var i:Number = 0; i < authorsRootNode.childNodes.length; i++) { authorNode=authorsRootNode.childNodes[i]; author_str=authorNode.childNodes[2].firstChild.nodeValue; author_str+=", "+authorNode.childNodes[1].firstChild.nodeValue; auID_int = authorNode.childNodes[0].firstChild.nodeValue; author_cb.addItem(author_str, auID_int); } author_cb.sortItemsBy("label"); author_cb.addItemAt(0, "Choose ..."); author_cb.selectedIndex = 0; } } -
Test the movie and check that Flash has loaded the ComboBoxes. Figure 7-40 shows how the interface should look at this point.
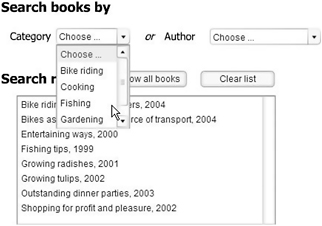
Figure 7-40: Testing that the ComboBox components have successfully loaded
Adding listeners to the ComboBoxes
-
Add the listeners shown here to the ComboBox components. The listeners listen for the change event and call the doFilter function, passing the name of the component and the selected value. Note that this only happens if the user selects an option other than Choose .
var CatListener:Object = new Object(); CatListener.change = filterResults; category_cb.addEventListener("change", CatListener); var auListener:Object = new Object(); auListener.change = filterResults; author_cb.addEventListener("change", auListener); function filterResults(evtObj:Object):Void { var componentName:String = evtObj.target._name; var componentValue:Number = evtObj.target.selectedItem.data; if (componentValue > 0) { doFilter(componentName, componentValue); } }
Displaying the results
-
Add the following doFilter function. The function sets variables and removes the existing contents from the List. It determines which Combo were working with and sets the child node number for use in the docsXML object. Child node 4, the fifth element, contains the author ID while number 2, the third element, contains the category ID. We then loop through the childNodes collection, that is, the books, and add any matching values to the List component. Finally, we sort the list into title order.
function doFilter(theComponent, theComponentValue){ var nodeNum:Number; var BookNode:XMLNode; var nodeFilterID:Number; var ListItem_str:String; results_list.removeAll(); if (theComponent._name == "category_cb") { nodeNum = 4; author_cb.selectedIndex = 0; } else { nodeNum = 2; category_cb.selectedIndex = 0; } for (var i:Number = 0; i <DocsRootNode.childNodes.length; i++) { BookNode = DocsRootNode.childNodes[i]; nodeFilterID = BookNode.childNodes[nodeNum].firstChild.nodeValue; if (nodeFilterID == theComponentValue) { ListItem_str=BookNode.childNodes[1].firstChild.nodeValue; ListItem_str+=", "+BookNode.childNodes[3].firstChild.nodeValue;
results_list.addItem(ListItem_str); } } results_list.sortItemsBy("label"); } -
Modify the button functions as shown here. The new lines (which appear in bold) reset the ComboBox components back to the Choose option.
show_btn.onRelease = function():Void { results_list.removeAll(); category_cb.selectedIndex = 0; author_cb.selectedIndex = 0; showAllDocs(); } clear_btn.onRelease = function():Void { results_list.removeAll(); category_cb.selectedIndex = 0; author_cb.selectedIndex = 0; } -
Test the movie. You should be able to filter the data by either category or author. You can see the completed documents_completed.fla within your resource files.
-
Modify the content in Access and export the files again. Check that the updated content appears in the Flash movie.
In this example, we were able to take the contents from Access tables and add them to a Flash application. There was only a small amount of content in the database, but the Flash movie would work the same way with larger amounts of data. The only thing to remember is that whenever you modify the Access database, youll need to export the XML documents again to update the Flash movie. If your users arent familiar with how to use Access, a Flash interface creates a more user-friendly means of interacting with the data.
| |
- Chapter III Two Models of Online Patronage: Why Do Consumers Shop on the Internet?
- Chapter VII Objective and Perceived Complexity and Their Impacts on Internet Communication
- Chapter XI User Satisfaction with Web Portals: An Empirical Study
- Chapter XIII Shopping Agent Web Sites: A Comparative Shopping Environment
- Chapter XVIII Web Systems Design, Litigation, and Online Consumer Behavior