Chapter 3: Developing The PowerPoint File
By following the advice in Chapter 2, Jane was able to develop an outline for her informational, speaker-led presentation. She built the outline in Word and sent it to PowerPoint.
As preparation for using PowerPoint, I gave her 10 Things to Do Before Doing Anything in PowerPoint.
Before You Start
I recommend adjusting a few default settings before creating the PowerPoint file. These are things that should always be checked when working on a new installation of PowerPoint, regardless of the version.
-
Turn off the Fast Saves feature
-
Turn on the AutoRecover feature
-
Verify the default save location
-
Install drivers for a local printer
-
Adjust your Most Recently Used files list
-
Verify the size of WAV files to be included in your files
-
Adjust the number of undos
-
Turn off Background Printing
-
Verify Macro Security Level
-
Adjust automatic layout options
One thing Jane learned is to check these things any time you change to a new computer. These settings go with the computer, not the presentation. Since Jane was developing her presentations at the office and at home, she needed to make the adjustments on two PCs.
Turn Off Fast Saves
Fast saves sounds like something everyone would want, right? The idea behind this option is to allow only the changed parts of the file to be saved, therefore shortening the time to save the file. Only one problem: historically, fast saves has caused more corrupted presentation files than any other culprit.
When PowerPoint does a fast save, it guesses what has changed. It can mess with file structure, place actual changes at the end of the file and adjusts pointers inside the file to record what was changed. When PowerPoint is closed, the various edits are pulled together into the main body of the file.
Because PowerPoint is trying to keep track of every action taken, the file size grows exponentially. The tradeoff originally became the time between a fast save while editing and the disk space it used. While the feature worked properly, it came with the side effect that the chances of the file corruption are now increased exponentially.
Instead, I recommend turning off fast saves and doing regular saves. This way, every time the save button is pressed, the full file is saved as a straight PowerPoint file and no interpretation is needed upon re- open , which in turn requires less disk space.
| |
In addition to turning off Fast Saves, I strongly recommend you get Microsoft PowerPoint MVP Shyam Pillai's Sequential Save add-in. This add-in is available from his site for free. It adds a button to your toolbar you use instead of the regular Save button.
Once the add-in has been set up for a file, it automatically saves your file under a new name each time you click the button. No more lost presentations!
The URL for the add-in is:
http://www.mvps.org/skp/seqsave.htm
| |
To turn off Fast Saves, select Tools ’ Options. Select the Save tab and remove the checkmark from Allow Fast Saves.
Turn On Autorecover
Unlike Fast Saves, AutoRecover is a useful option. This option creates snapshots of your file and stores the snapshot in a temporary file. The name of this file is created by taking the first two characters of the filename and replacing them with "~$".
Setting AutoRecover causes less data and work to be lost if PowerPoint or the computer crashes. Unless saving files every ten or fifteen minutes is an unbreakable habit, this option can save you quite a bit of re-work.
Make the time setting long enough to not interfere with or slow down work, but short enough to prevent loss of large amounts of work.
As shown in Figure 3-1, 10 minutes is a good, round choice. Make sure the checkbox is checked to turn the option on.
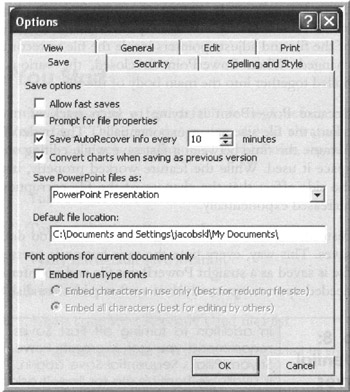
Figure 3-1: Save Options
Verify Default Save Location
Default File Location (shown in Figure 3-1) defines the location where PowerPoint looks for files to open and where it saves your files by default. By setting up your own save location, you ensure the files are stored where you want them, instead of where PowerPoint thinks you want them.
The default for the save location is My Documents. If you use My Documents, then you don't need to change the setting. However, if you store the documents elsewhere on the hard drive, change the directory name and save some time and mouse clicks when you open or save files.
Install Drivers For A Local Printer
In order for PowerPoint to run correctly, a local printer must be defined. PowerPoint uses this local printer definition to determine available fonts, default page setup information and several other options. If you don't have a local printer defined, PowerPoint may run, but in a very limited manner. It won't be able to find the fonts on your system or do a print preview.
Even if your computer uses a network printer all the time, install a local set of print drivers. In general, the process to add a printer is to bring up the Control Panel and select Printers. Select to add a printer and work through the wizard.
Adjust Your Recently Used File List
While it is not required the number of files in the recently used list be adjusted, the default value of 4 is generally too low. The maximum allowed value is 9, but I recommend 6. To change the number, click to the General tab on the Options window (see Figure 3-2). Adjust the number up to as far as desired and ensure the checkbox is selected.

Figure 3-2: General Options
Verify The Size Of WAV Files To Be Included In Your Files
Multimedia files other than WAV files are not included in the PowerPoint file, but are linked to the file. WAV files are only included if your sound file is smaller than the value indicated on the General Tab.
PowerPoint defaults to a value too low for realistic usage. If you create presentations that include WAV files, set the size to any number up to 50000 Kb (that's 50 MB). To make it easy on myself , I set the number to the maximum value and leave it.
The only time I set this number lower is when I am working with a presentation in which I don't want the sounds ever included in the PowerPoint file. Then, I set the value to a very low number so all sounds are linked.
Adjust Number Of Undos
PowerPoint allows a maximum of 150 actions to remain on the undo list. Don't do it. The more actions on your undo list, the more space and memory PowerPoint needs to store the information.
Similar to fast saves, keeping track of this many actions can cause PowerPoint to become lost. This results in program crashes and file corruption.
As can be seen in Figure 3-3, 20 (the default) is a good, round number. It is high enough to allow you to change your mind about actions, but low enough to avoid document corruption. So why mention it? Because there are times when you may want to have your value higher or lower than the default. If you are trying out different fonts, styles or pictures in a presentation, you may want to set the number of undos to a higher number temporarily, allowing you to play around with changes, but still go back to the original set up.
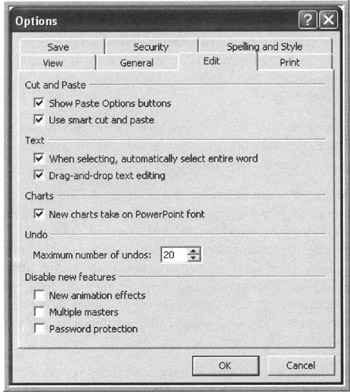
Figure 3-3: Edit Options
If you are low on disk and/or temporary space, set this number to a very low number. The lower the number, the less temporary information PowerPoint keeps around and the less space it needs for a file.
If working on a number of presentations at once, do the same: Set the undo number lower so each presentation has more memory with which to work.
Turn Off Background Printing
Background printing allows PowerPoint to print the document while you continue to work on it. The side effect is the computer may slow down. Your ability to edit and move around in the document may be impaired while the presentation prints.
PowerPoint is enough of a resource hog that turning this option on can be hazardous to the performance of a computer. It won't cause crashes, but it usually slows down the entire computer, limiting what you can work on until it is finished printing.
In general, keep background printing turned off, as shown in Figure 3-4. If you need to background print, turn it back on by checking the box on the Print tab of the Options window.
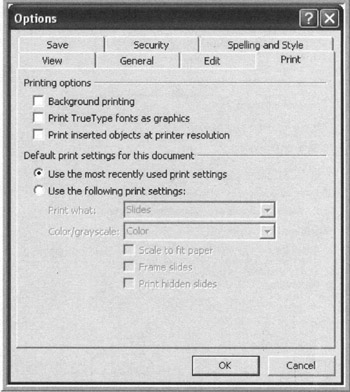
Figure 3-4: Print Options
Verify Macro Security Level
Your security level setting determines which macros can be run from within PowerPoint, if any. To get to the Macro Security information, go to the Security tab of the Options window (see Figure 3-5).
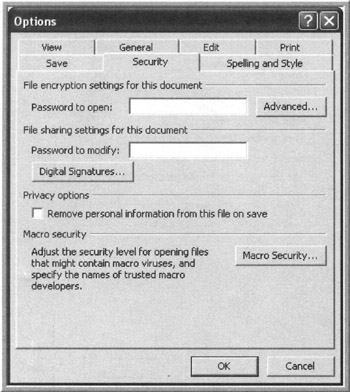
Figure 3-5: Security Options
Click the Macro Security button to choose the level of macro security you wish to use (see Figure 3-6). The Security window sets up both the security level and the trusted sources for the macros. Trusted sources relate to digitally signed macros. Digitally signed macros can generally be trusted to be virus free. You shouldn't need to worry about the trusted sources tab, but you should set the security level as you expect to need it.

Figure 3-6: Security Levels
If you don't expect to run macros, the security level can be left at the default level of High. This turns off all macro functions.
If you don't know whether macros will be run regularly, select medium security. This option allows the user to decide on a case-by-case basis whether to enable macros to run.
If you expect macros will be developed and used frequently on a machine, set the macro security level to low. This will prevent annoying security messages from coming up. Be aware this allows all macros to be run. If you open a PowerPoint File with a macro virus in it, you will not be protected from the virus.
You are done with the Options window for now. Close it and move to the Tools ’ AutoCorrect Options.
Adjust Automatic Layout Options
You define what you want PowerPoint to automatically format and what you want to format yourself from the AutoCorrect window.

Figure 3-7: AutoFormat Options
Unless you want PowerPoint to define a lot of the formatting on the slides, turn off the bottom three options. Leaving them on allows PowerPoint to adjust cut and paste items to fit into the placeholders or objects.
The two AutoFit options ignore any formatting done via the slide master (the template) or on the slide itself. Having these options on changes the size of the text so it all fits in the placeholder. This means if you put in a lot of text, the font may become smaller than defined by the master and if you put in a small amount of text the font may become larger than defined by the master. Automatic layout for inserted objects changes your slide layout if you add certain shapes or items. Since it is likely that you want to make these decisions, remove the checks from these boxes and move on.