Section 13.1. Creating Personalized Web Sites
To get started, you'll want a new web site that duplicates the work you accomplished in the security chapter. Create a new web site called SitePersonalization and copy the ASPSecurityRoles web site from Chapter 11 (Website  Copy Web Site). Copy over all the files, including the data files. Set Welcome.aspx as the start page and run the program to make sure you have a working duplicate.
13.1.1. Recording Personalization Information
The simplest form of personalization is to record information about the user and then to make that information available whenever the user logs on. This requires a kind of persistence that goes beyond session state. To create true personalization, you'll want to store the user 's choices and information in a database that associates the saved information with a particular user and persists indefinitely. Fortunately, ASP.NET 2.0 provides all of the plumbing required. You do not have to design, edit, or manage the database tables; all of that is done for you.
To get started, you'll need to modify your project to handle user Profiles.
13.1.2. Setting Up Profile Handling
ASP.NET 2.0 has decoupled the Profile API (how you programmatically interact with profile data) from the underlying data provider (how you store the data). This allows you to use the default provider (SqlServerExpress), or one of the other providers supplied (SQL server) or even write your own provider (for example, if you have an existing customer relationship management system) without changing the way you interact with the profile in the rest of your code.
To add data to the user's profile, you must first alert the system about the data you wish to store. You do this in web.config by adding a profile section to the system.web element:
<?xml version="1.0"?> <configuration> <connectionStrings> <remove name="LocalSqlServer"/> <add name="LocalSqlServer" connectionString="data source=.\sqlExpress;Integrated Security=SSPI;
 Initial Catalog=aspnetdb"/> </connectionStrings> <system.web> <authentication mode="Forms"/> <membership defaultProvider="AspNetSqlMembershipProvider"/> <roleManager enabled="True" defaultProvider="AspNetSqlRoleProvider"/> <compilation debug="true"/> <profile enabled="True" defaultProvider="AspNetSqlProfileProvider"> <properties> <add name="lastName" /> <add name="firstName" /> <add name="phoneNumber" /> <add name="birthDate" type="System.DateTime"/> </properties> </profile> </system.web> </configuration> This causes the Profile API to create storage for four pieces of information: lastName , firstName , phoneNumber , and birthDate . The default storage type is string . Notice, however, that you are storing the birthdate as a DateTime object.
You can gather this personalization information any way you like. To keep the example simple, we'll remove the role groups section from Welcome.aspx and add a new hyperlink to the LoggedInTemplate :
<asp:LoginView ID="LoginView1" runat="server"> <LoggedInTemplate> Welcome <asp:LoginName ID="LoginName1" runat="server" /> <br /> <asp:HyperLink ID="hlChangePW" NavigateUrl="ChangePW.aspx" runat="server">Change Password </asp:HyperLink> <asp:HyperLink ID="hlCreateUser" NavigateUrl="CreateUser.aspx" runat="server">Create User </asp:HyperLink> <br /> <asp:HyperLink ID="hlManageRoles" NavigateUrl="ManageRoles.aspx" runat="server">Manage Roles </asp:HyperLink> <br /> <asp:HyperLink ID="hlProfile" NavigateUrl="ProfileInfo.aspx" runat="server">Add Profile Information </asp:HyperLink> </LoggedInTemplate> As you can see, the link brings you to ProfileInfo.aspx , a page you'll now create. Add a table, and within the table, add labels, checkboxes, and a Save button, as shown in Figure 13-1.
Figure 13-1. Profile Table
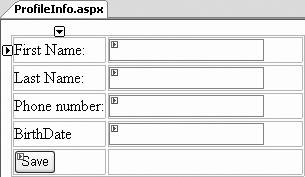
The content file for the Profile Table is shown in Example 13-1.
Example 13-1. Content file for Profile Table
<%@ Page Language="VB" AutoEventWireup="false" CodeFile="ProfileInfo.aspx.cs" Inherits="ProfileInfo_aspx" %> <!DOCTYPE html PUBLIC "-//W3C//DTD XHTML 1.1//EN" "http://www.w3.org/TR/xhtml11/DTD/xhtml11.dtd"> <html xmlns="http://www.w3.org/1999/xhtml" > <head runat="server"> <title>Untitled Page</title> </head> <body> <form id="form1" runat="server"> <div> <table> <tr> <td>First Name: </td> <td style="width: 193px"> <asp:TextBox ID="firstName" Runat="server" /> </td> </tr> <tr> <td>Last Name: </td> <td style="width: 193px"> <asp:TextBox ID="lastName" Runat="server" /></td> </tr> <tr> <td>Phone number: </td> <td style="width: 193px"> <asp:TextBox ID="phone" Runat="server" /> </td> </tr> <tr> <td>BirthDate</td> <td style="width: 193px"> <asp:TextBox ID="birthDate" Runat="server" /> </td> </tr> <tr> <td> <asp:Button ID="save" Text="Save" Runat="server" OnClick="save_Click" /> </td> <td style="width: 193px"></td> </tr> </table> </div> </form> </body> </html>
All that remains to be done is for you to add an event handler for the Save button:
protected void save_Click(object sender, EventArgs e) { if (Profile.IsAnonymous == false) { Profile.lastName = this.lastName.Text; Profile.firstName = this.firstName.Text; Profile.phoneNumber = this.phone.Text; DateTime birthDate = Convert.ToDateTime(this.birthDate.Text); Profile.birthDate = birthDate; } Response.Redirect("Welcome.aspx"); }
|

When you start the application, you are asked to log in. Once you're logged in, a new hyperlink appears: Add Profile Info . This was created by the hyperlink you added to the LoggedInTemplate (above). Clicking on that link brings you to your new profile page.
The Profile object has properties that correspond to the properties you added in web.config . To test that the Profile object has stored this date, you want to add a panel to the bottom of the Welcome page just before the closing </div> tag:
<asp:Panel ID="pnlInfo" Runat="server" Visible="False" Width="422px" Height="63px"> <br /> <table width="100%"> <tr> <td> <asp:Label ID="lblFullName" Runat="server" Text="Full name unknown"> </asp:Label></td> </tr> <tr> <td> <asp:Label ID="lblPhone" Runat="server" Text="Phone number unknown"> </asp:Label> </td> </tr> <tr> <td> <asp:Label ID="lblBirthDate" Runat="server" Text="Birthdate unknown"> </asp:Label> </td> </tr> </table> </asp:Panel>
The panel has a table with three rows, and each row has a label initialized to say the value is unknown (this is not normally needed, but is included here to ensure the data you see was in fact retrieved from the Profile object.) When the page is loaded, you check to see if you have Profile data for this user and, if so, you assign that data to the appropriate controls.
To do so, implement Page_Load in Welcome.aspx.cs :
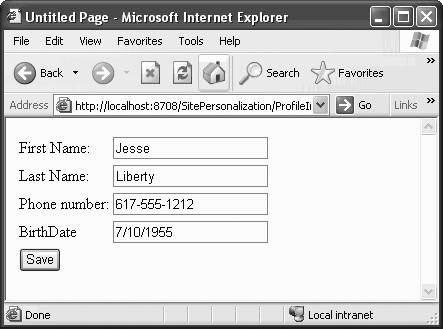
protected void Page_Load(object sender, EventArgs e) { if (Profile.UserName != null && Profile.IsAnonymous == false) { this.pnlInfo.Visible = true; this.lblFullName.Text = Profile.firstName + " " + Profile.lastName; this.lblPhone.Text = Profile.phoneNumber; this.lblBirthDate.Text = Profile.birthDate.ToShortDateString( ); } else { this.pnlInfo.Visible = false; } } Run the application, log in, and click Add Profile Info. You will be brought to the Profile Information form, as shown in Figure 13-2.
Figure 13-2. Profile information page
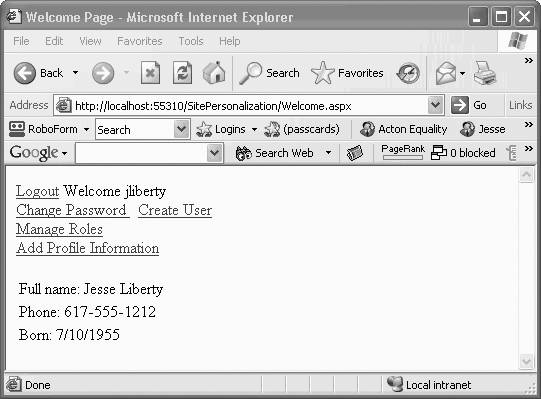
When you click Save and return to the Welcome page, the Page_Load event fires, both parts of the if statement return TRue , that is the UserName value is in the profile (and is not null) , and the user is logged in and not anonymous.
if (Profile.UserName != null && Profile.IsAnonymous == false)
Your profile information is displayed, as shown in Figure 13-3.
Figure 13-3. Profile information displayed
13.1.3. Exploring the Profile Tables
Open the Database Explorer window, and look at the Tables in the aspnetdb database. Open two tables: aspnet_Users (which lists all the users your security system knows about) and aspnet_Profile (which lists the profile information for those users). To see these next to each other, click and drag the tab for one of the views, as shown in Figure 13-4.
Figure 13-4. Drag tab
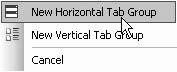
When you let go a menu will open, offering to create a new tab group , as shown in Figure 13-5.
Figure 13-5. Create new tab group
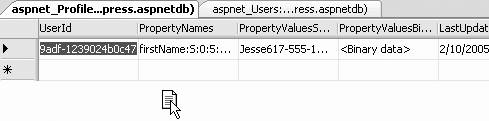
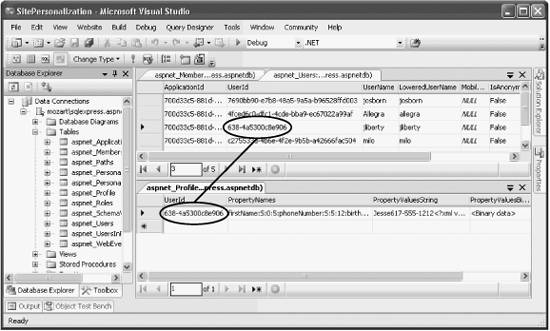
This done, you can see the Profile tab and the Users tab in a single window. The Users tab shows you that each user has a unique UserID . The profile table has a foreign key into that table ( UserID ) and lists the PropertyNames and PropertyValues , as shown in Figure 13-6.
PropertyNames matches up with the entries you created in the <profile> section of web.config :
<profile> <properties> <add name="lastName" /> <add name="firstName" /> <add name="phoneNumber" /> <add name="birthDate" type="System.DateTime"/> </properties> </profile>
Each property is named (such as phoneNumber ), given a type (S for string), and a starting offset ( phoneNumber begins at offset 5) and a length ( phoneNumber 's value has a length of 12). This offset and value are used to find the value within the PropertyValueString field.
Figure 13-6. Profile Tables
|
EAN: 2147483647
Pages: 173