| Symbols are the basic building blocks of a well-designed Flash movie, allowing you to reduce the size of your SWF file and organize movie assets conveniently in the Library. Understanding Symbols Any time you draw a shape, place an imported bitmap, or animate an object, your published movie must store the information required to render these elements. Symbols allow you to store each asset just once in the Library. You can then display each asset on the Stage as many times as you want without significantly increasing the movie's size. Smaller movies mean faster downloads and better performance. In addition, when you need to make changes, you can make them in a single place and affect many parts of your movie. If a client doesn't like the color scheme you've used for a project, you may be able to change it very quickly just by editing a few symbols. When you drag a symbol from the Library to the Stage, each "appearance" of the symbol on the Stage is called an instance . Each instance is independent and can be manipulated freely without affecting the Library symbol or other instances. Think of instances as Flash Lego blocks. The trick is to learn to separate the elements of your movies into component parts ”Lego blocks ”that can be snapped together to form complex animations and interface systems. You can create symbols directly in the Library. In addition, any object on the Stage can be converted to a symbol. (Select the object and choose Modify, Convert to Symbol. Or use F8.) There are three types of symbols: graphic, button, and movie clip. Each has its own timeline, Stage, and layers . Graphic Symbols Graphic symbols are the most basic and least powerful symbols, best used with static images, such as backgrounds. Graphics can be animated but cannot contain sounds or interactive elements. Further, because it is controlled by the Timeline of the movie or movie clip in which it resides, a graphic symbol plays only for the duration of the Timeline. Use movie clips for animation; reserve graphic symbols for static elements that are reused. Button Symbols Buttons are interactive symbols that respond to user interaction, such as mouse clicks and rollovers. Buttons have unique timelines containing Up, Over, Down, and Hit frames, as shown in Figure 18.1. These frames represent button states. Button timelines don't unfold over time like other timelines , but instead respond and move among the four frames according to user interaction. Figure 18.1. Buttons have unique timelines containing Up, Over, Down, and Hit frames. 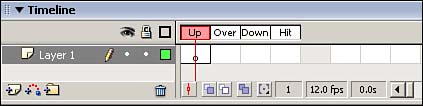
The four button states are as follows : -
Up ” Defines how the button appears with no user interaction. -
Over ” Provides a rollover state when the mouse pointer hovers over the button. -
Down ” Defines the appearance of the button when it is clicked. -
Hit ” Defines the area that responds to the mouse. Content in the Hit frame is not displayed. You don't need to create all four states for every button. Button states can contain graphics, sounds, and even movie clips.  To learn more about buttons, see "Buttons," in this chapter, page 420 . To learn more about buttons, see "Buttons," in this chapter, page 420 .
Movie Clips Movie clips are self-contained movies, with their own independent timelines that are not tied to the Main Timeline. Think of the Main Timeline as a master "container" movie clip. Like the Main Timeline, movie clips can contain graphics, buttons, and scripted interactive controls, sounds, videos , and even other movie clips. Nesting movie clips inside other movie clips permits complex interactivity and nonlinear narrative flow. To learn about the Movie Clip object in ActionScript, see "Working with Movie Clips," page 517 , in Chapter 20, "Basic ActionScript."
Creating Symbols from Scratch There are two ways to start creating a symbol from scratch: -
Make sure that nothing is selected on the Stage. On the Main Menu, choose Insert, Symbol, or press Cmd-F8 (Mac) or Ctrl+F8 (Windows). -
Click in the upper right corner of the Library panel, and choose New Symbol. NOTE Be on the lookout for opportunities to convert artwork into component parts that can be reused. Symbols increase your efficiency and reduce SWF size, so take the fullest possible advantage of them.
Either of these actions will bring up the Create New Symbol dialog box, as shown in Figure 18.2. Figure 18.2. In the Create New Symbol dialog box, you can name your symbol and choose its type. 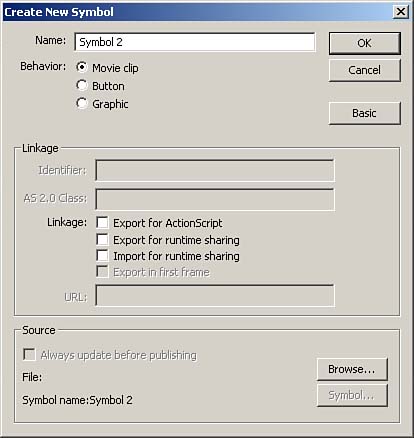
Type in a name for your symbol, and choose the type of symbol: movie clip (the initial default), button, or graphic. Then click OK. Your symbol is added to the Library and is opened in the work area in symbol-editing mode. The name of your symbol appears in the Information bar above the upper-left corner of the Stage, and a crosshair icon appears in the middle of the Stage, indicating the symbol's registration point, as shown in Figure 18.3. You can now add content to your symbol. Figure 18.3. When you create a new symbol, it is placed in the Library and opened in symbol-editing mode. 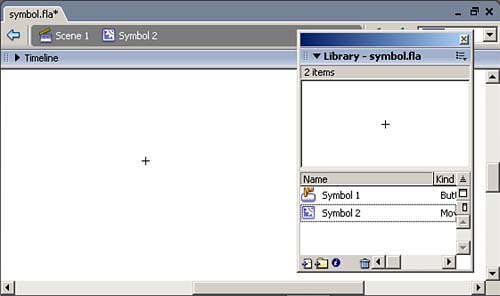
Registration The registration point, which appears as a crosshair when you select an object, is the point of reference used when you position a symbol using the Align panel, or when you choose to snap to grids, guides, pixels or objects. In fact, snapping works only if you drag an object by its registration point. When you use ActionScript to position an object numerically , it's the registration point that gets placed at the specified (x,y) coordinates. (When you use the Property inspector or the Info panel to position an object numerically , the upper-left corner is the reference point.) There are nine standard points of registration: each of the four corners, the center point, and the midpoint on each edge of an object. The registration point determines the 0,0 point ”0-x and 0-y ”for that symbol. NOTE The nine standard points of registration are the available options when you convert artwork to a symbol. In addition, you can edit a symbol to change its registration point to any point within the symbol.
Coordinate systems map a two-dimensional plane, allowing you to plot objects to specific coordinates. The x-axis is the horizontal axis, and the y-axis is the vertical axis. In the main "container" movie, 0,0 (x,y) is the upper-left corner of the Stage. Upper left is the default registration for artwork converted into a symbol, as well. However, when you create a new movie clip from scratch, 0,0 (x,y) is the center point by default. As an object moves to the right, its x-value increases. As it moves down, its y-value increases (inverted from the normal Cartesian coordinate system). Negative x-values occur when the object crosses to the left of the y-axis (which is off the Stage in the main movie). Negative y-values occur when the object crosses above the x-axis (also off the Stage in the main movie). Convert to Symbol To convert an existing object on the Stage to a symbol, select it and choose Modify, Convert to Symbol, or press F8. Choosing this option launches the Convert to Symbol dialog box, which is nearly identical to the Create New Symbol dialog box with an important exception ”it contains a Registration setting, as shown in Figure 18.4. Figure 18.4. The Convert to Symbol dialog box enables you to convert an object on the Stage to a symbol and set its registration point. 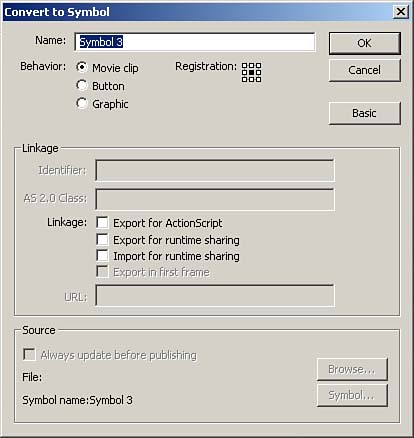
Click one of the squares in the Registration grid to set the registration point. In general, positioning objects according to their upper-left corner is easiest . If you change the registration in the Convert to Symbol dialog box, that setting becomes the default, even if you exit and restart Flash. Give your symbol a name, select the type of symbol, and click OK. The symbol is added to the Library, and the selection on the Stage becomes an instance of the symbol, as indicated by the square bounding box that appears. The crosshair indicates the symbol's registration point. For more on the Library, see "The Library," later in this chapter, page 389 .
You can also duplicate an existing symbol to use it as a template for a new symbol. Select an instance on the Stage and choose Modify, Symbol, Duplicate Symbol. You can name the new symbol in the Symbol Name dialog box that appears. This creates a copy of the symbol in the Library, where you can select and edit it. Editing Transformation Points The small empty circle within a selected symbol is the transformation point, the point around which rotate, scale, and skew transforms are performed. You may need to change a symbol's transformation point. A common example is a scripted status bar, used in a preloader to indicate the progress of a download to users. In this example, the status bar is a rectangle that is scripted to extend, or grow wider, to represent the progress of a download. If the transformation point is the center of the status bar symbol, changes in the width of the progress bar occur from the center in either direction, as shown in Figure 18.5, which is probably not the effect you intend. Figure 18.5. If a symbol's transformation point is its center, any transformations occur from that point. 
For a progress bar to grow wider to the right only, the transformation point of the status bar symbol must be on the left side of the graphic, as shown in Figure 18.6. Figure 18.6. The status bar symbol's transformation point is on the left side, so changes in its width occur from the left. 
A quick way to position the transformation point visually is to select a symbol instance on the Stage and then select the Rotate and Skew tool or the Scale tool in the Main Toolbar. The transformation point circle appears white within the selected instance. You can click and drag the circle to relocate the transformation point anywhere within the workspace (even off the Stage). Editing Symbols You can edit symbols in three ways: in place, in a new window, or in symbol-editing mode. Edit in Place The Edit in Place command enables you to edit a symbol in the context of other objects on the Stage. The other objects are slightly dimmed, and are not selectable. You can tweak size, color, or shape, for example, and see how the changes look in the context of the other objects on the Stage, without worrying about accidentally selecting and modifying another object. To edit in place, double-click a symbol on the Stage, or select a symbol and choose Edit, Edit in Place, or Ctrl-click (Mac), or right-click (Windows) and select Edit in Place from the pop-up menu. For instance, say you are creating a circle to use as the "O" in a tic-tac-toe game, as shown in Figure 18.7. As you can see, the circle symbol is too big for the tic-tac-toe grid. The Edit in Place command enables you to scale the circle within the context of the grid, without worrying about accidentally selecting the grid. Figure 18.7. Edit in Place allows you to edit symbols within the context of other objects on the Stage. 
After you finish editing, click the Back button or the current scene name in the Information bar above the upper-left corner of the Stage, click the current scene in the scene pop-up menu, or choose Edit, Edit Document. Ctrl+E (Windows) or Cmd-E (Mac) also works. Edit in New Window You can also edit symbols in a new window. Editing in a new window launches the symbol's timeline in a new window while the main movie remains open in the original window. You can go back and forth between the main movie and the symbol timeline, editing the symbol without the distraction of surrounding objects, but still checking to see what it looks like in context. To edit a symbol in a new window, select the symbol on the Stage and Ctrl-click (Mac) or right-click (Windows) and select Edit in New Window from the pop-up menu. The symbol opens in a separate window. Edit as needed and then click the Close button in the upper-left corner (Mac) or the upper-right corner (Windows) to close the separate window and return to the Main Timeline. Symbol-Editing Mode Editing in symbol-editing mode takes you from the main work area ”whichever timeline you may be working in ”into the symbol's timeline. If you need to make extensive changes to a symbol, it may be easiest to edit it in isolation. You can access symbol-editing mode in any of the following ways: -
Select the symbol on the Stage. Then Ctrl-click (Mac) or right-click (Windows) and select Edit from the pop-up menu. -
Select the symbol on the Stage and choose Edit, Edit Symbols. -
Double-click the symbol's icon (located to the left of the symbol's name) in the Library. -
Select the symbol in the Library and choose Edit from the Library options pop-up menu. Alternatively, Ctrl-click (Mac) or right-click (Windows) and select Edit from the context menu. Edit as needed and then, to return to the Main Timeline, do one of the following: -
Click the Back button in the Information bar. -
Choose Edit, Edit Document. -
Use a shortcut key: Ctrl+E (Windows) or Cmd-E (Mac). Instances Symbols reside in the Library. When you place a symbol on the Stage, you create an instance of the symbol: a reference to the symbol that takes up almost no memory or storage. Changing the original symbol in the Library changes every instance of that symbol. However, instances are independent of their original symbols. For example, you can transform (rotate, skew, or scale) an instance without changing the symbol itself or affecting any other instances of the same symbol. For example, if you select an instance and use the Scale tool to scale it, you change the dimensions of that instance only. To change the dimensions of the symbol itself, you would need to edit the symbol, using one of the methods outlined in the previous section. You can also change an instance's type. Say you have an instance of a graphic symbol that you want to animate independently of the Main Timeline. You can easily change that instance from a graphic to a movie clip. Select the instance and, in the Property inspector, use the drop-down menu to change the instance type, as shown in Figure 18.8. Figure 18.8. Use the Instance Type drop-down menu in the Property inspector to change instance behavior. 
Changing Instance Properties An instance's brightness, tint, and alpha (transparency) are independent of its original symbol, as are its advanced color settings. You access these properties by using the Color drop-down menu on the Property inspector, as shown in Figure 18.9. Figure 18.9. The Color drop-down enables you to manipulate an instance's color properties. 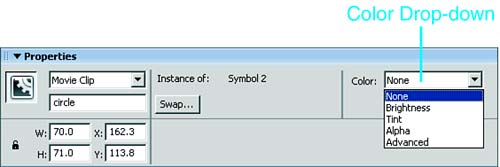
Use the Brightness option to make an instance lighter or darker . Enter a value directly in the Brightness field or drag the slider (see Figure 18.10) to change the relative brightness of an instance from 100% (white) to “100% (black). Figure 18.10. Change the brightness setting using the numerical type-in or the slider. 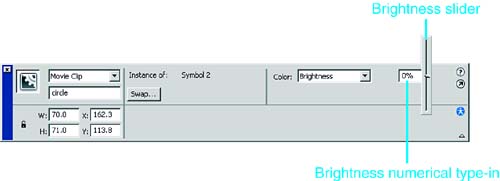
The Tint option enables you to change the hue of an instance by manipulating its red, green, blue, and alpha values. First, click the color box to select the tint color, and either enter its values in the red, green, and blue fields or use the Color box to select a Web-safe color. Then adjust the alpha setting to change the saturation of the tint, as shown in Figure 18.11. Figure 18.11. Change the red, green, blue, and alpha settings with-in the Tint option to change an instance's hue. 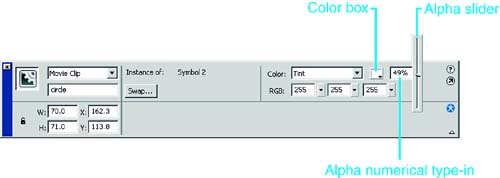
The Alpha option changes an instance's transparency, from 100% ( opaque ) to 0% (completely transparent). Enter a numerical value in the Alpha field or use the slider to select a setting. The Advanced option allows you to manipulate the red, green, blue, and transparency values separately, producing more subtle effects than tint. To launch the Advanced Settings dialog box, select Advanced from the Color pop-up menu and click the Settings button on the right to launch the Advanced Effect dialog box. You can adjust values either by percentages (using fields in the left column) or by absolute values (using fields in the right column), as shown in Figure 18.12. Figure 18.12. In the Advanced Effect dialog box, you can manipulate settings by percentages or by numeric values. 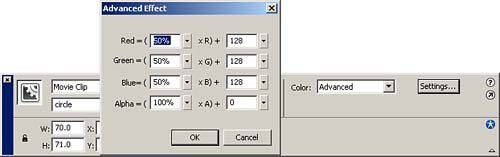
Advanced effects work by taking the current red, green, and blue values and multiplying them by the percentages entered in the left column. These amounts are then added to the values in the right column, producing new color values. Don't be intimidated by the Advanced Color settings; just take the time to experiment with them. You'll find these subtle effects work best with the range of color values found in bitmaps. Swapping Symbols As you develop a movie, you may want to swap an instance of one symbol for an instance of a different symbol ”for example, to swap graphics. To swap a symbol instance, select the instance and click Swap in the Property inspector to launch the Swap Symbol dialog box. The Swap Symbol dialog box displays all the symbols in the Library. Select a substitute image and click OK. Instance Names You can give movie clip and button instances unique instance names, which allow you to access symbol instances using ActionScript. Symbol instances can then be manipulated programmatically. Scripting provides much greater control over symbol instances and enables you to create content that can change in response to user actions. For more information about using ActionScript to access instances, see "Working with Movie Clips," page 517 , in Chapter 20.
To assign an instance name, select a button or movie clip instance on the Stage and type a unique name in the Instance Name field in the Property inspector, as shown in Figure 18.13. Figure 18.13. Instance names enable you to access individual movie clip and button instances with ActionScript. 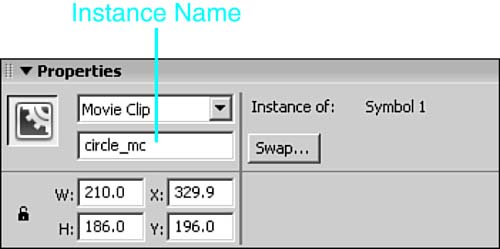
The Library Symbols are housed and organized in the Library. To open the Library, choose Window, Library. You'll need to have the Library open to drag symbol instances to the Stage, so you may want to dock the Library with the other panels you keep open as you work. The Library panel consists of a preview window at the top, below which is a scrolling list of symbols and imported assets. You can expand the Library by clicking the Wide Library View button, as shown in Figure 18.14, to see more information about symbols, such as their Linkage identifiers, use counts (how many times the symbol is used in the movie), and last modification date. Figure 18.14. Click the Wide Library View button to expand the Library panel. 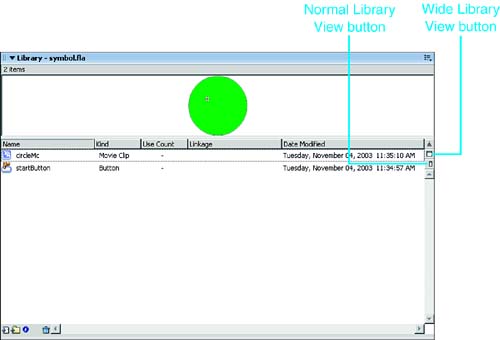
To change the sort order in the Library, click on the column headers to sort by name, kind (type), use count, linkage, or date modified. Sorting by use count is helpful in identifying symbols that are no longer used in your movies. By default, you have to explicitly request updating of the Use Count by selecting Update Use Counts Now from the Library options pop-up menu. You can keep use counts constantly updated by choosing Keep Use Counts Updated from the Library options pop-up. The contents of the Library can be organized into folders. Simply click the New Folder icon at the bottom left of the Library panel to create a new folder. As with layer folders, using Library folders helps to conserve scarce screen real estate. You can also use folders to organize the contents of the Library. You might have a folder for imported assets, one for navigation symbols, and so on. The number of items in the Library can quickly mushroom when you're working on big projects, and you can waste a lot of time scrolling through the contents of the Library to locate a particular symbol if you do not use folders to organize your symbols and assets. |