| Now that you are aware of some of the issues and technologies driving digital video, we can explore how video arrives in Flash and how it can be controlled using some of the new features in the application. The first big change is the use of a wizard to manage the importation of digital video into Flash. Prior to this release, any video that was imported into Flash opened the Spark Codec dialog box. Though it was quite intuitive, to occasional users of video in Flash, it was also quite mysterious . We will be reviewing this new feature shortly. The next big change is the addition of behaviors to control video playback. The new Behavior panel in Flash MX 2004 contains a number of behaviors solely designed to control digital video. They range from Play to Rewind. We will be using these as well. The last big change is probably the most profound. Video can either be embedded in the Flash movie, or it can be streamed for playback through the Flash Communication Server MX. Until this release, the video file could only be embedded into the Flash movie. This meant the video was added to the Library and was compiled into the .swf file when the movie was published. The implication , of course, was larger file sizes and longer waits for the video to load. The capability to stream a video file sitting on a server and play it through the Flash Player will most likely result in an exponential increase in the use of video in Flash sites. The other use you will start to see is the creation of Flash movies whose sole purpose is to play a video from a frame or other location in Dreamweaver. In addition, the use of the Flash Communication Server to "call" the video into a dynamic page means dynamic sites can make increased use of video. Importing Digital Video into Flash MX 2004 The first thing to be aware of is that you call the shots. It is up to you to decide whether the video is embedded or linked. Use the file size, bandwidth profiler, video length, and frame size to help you make this determination. Then again, if the company hosting the site does not have the Flash Communication Server installed or available, the decision is essentially made for you. The next thing to be aware of is to not be terribly surprised if your video supplier/producer wants to provide you with an FLV file. As we pointed out earlier, the FLV Export plugin is now available for the leading video editing systems. Once again, the decision regarding whether to link or embed is up to you. A FLV file imported into Flash will go straight into the Library or onto the timeline. A QuickTime video will open the new and improved Flash MX 2004 Video Import Wizard. Using the Flash MX 2004 Video Import Wizard As noted previously, in the previous version of Flash, importing a video opened up the Spark Video Import window shown in Figure 15.1. This window, to people that understood the information requested , was simple to use. To many users, it was rather cryptic. The move to a wizard-based approach not only makes the process less intimidating but also follows the lead of Dreamweaver's wizard-based approach to the complex subject of defining a site and a remote server. Figure 15.1. The old way of importing digital video is now history. 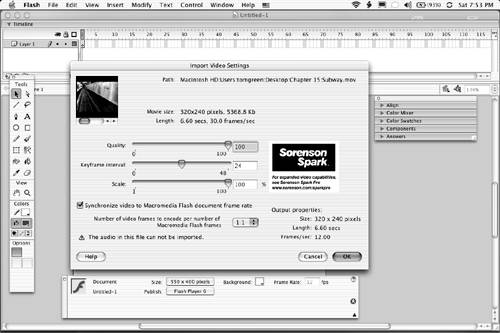 Before we start, be sure to download the Chapter 15 Exercise folder from the book's web site to your desktop. To import a digital video and prepare it for Flash playback, follow these steps: -
Open Flash MX 2004 and select File, Import, Import to Library to open the Import to Library dialog box. -
Navigate to your Chapter 15 Exercise folder and select the subway .mov file. Click Open to launch the Video Import dialog box shown in Figure 15.2. Figure 15.2. Importing a QuickTime movie or other non-.flv video format supported by Flash MX 2004 opens the Digital Video Import Wizard.  The dialog box offers you two choices. You can choose to embed the file or link to an External Video file. Embedding creates the .flv file that is headed for the Library. The second choice is worded a bit improperly. When a QuickTime video is "linked," it will not become a part of the .swf file, and the Flash file must now be exported as a QuickTime movie with the inevitable loss of interactivity through ActionScripting. -
Select the embed option and click Next to open the Editing Screen of the wizard. -
Two more choices are presented to you. You can choose to embed the entire movie or edit the video first. You will also see a yellow alert triangle at the bottom of the wizard. It is telling you it can't find an audio track. There isn't an audio track, so ignore it. Select Edit Video First and click the Next button to open the QuickTime Editing screen (see Figure 15.3). Figure 15.3. The editing area of the Import Wizard offers you some very basic editing capabilities. 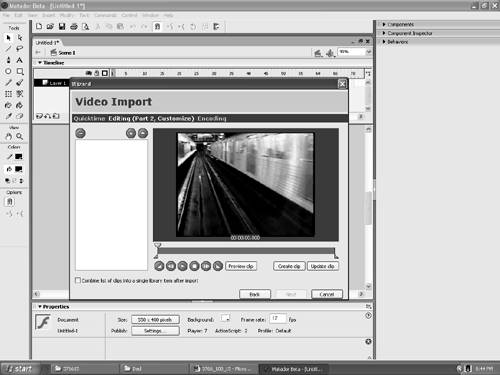 -
As you can see, the Video Editing tools are not exactly industrial-strength. The area at the right enables you to combine a series of clips into one video. Frankly, if you need to do that, this isn't the tool for the job. On the left side are the controls. The yellow triangle is the playback head, which can be dragged across the timeline. The half triangle under the playback head and on the left side of the timeline is the "In" point, and the one of the right is the "Out" point. The In and Out tools are also located at either end of the video playback controls. Drag the playback head across the video, and you will notice there is a lot of black starting at the 5.9-second mark of the movie. Drag the Out marker to the left, and when the timer reads 5.9 seconds, release the mouse. Click the Create clip button, and the clip moves into the list at the left (see Figure 15.4). Click Next to open the Encoding window. Figure 15.4. About one half second has been trimmed off the end of the video and a new clip created.  -
The encoding window offers you two choices. The Compression profile is the target modem available through the pop-down. Select 56 Kbps modem from the choices. The Advanced settings are a bit misleading. Selecting Create New Profile from the pop-down opens the Advanced settings window for the video where you can change many of the video's physical properties. Click the Edit button in the Compression profile area to open the Encoding Part 2 Window (see Figure 15.5). Figure 15.5. The bandwidth, key frames , picture quality, and synchronization settings are found in the Advanced Encoding dialog box. 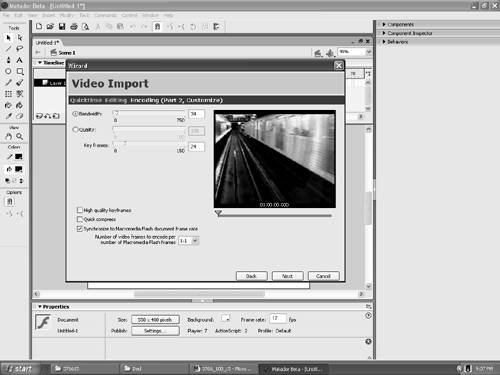 -
Select High Quality keyframes and click the Synchronize check box to ensure the movie plays at the same rate as the Flash movie. Click Next to open a summary of the settings. Click Next to return to the Encoding dialog box. Click Finish, and a dialog box with a progress bar will appear. When it closes , open your Library, and the video will appear in the list (see Figure 15.6). Figure 15.6. The QuickTime movie is converted to a FLV movie and placed in the Library.  Using the New Video Behaviors to Control a Flash MX 2004 Video New to this release of Flash are a number of pre-coded behaviors designed to control digital video. They are an absolute "snap" to use. To create a video controller, follow these steps: -
Import the CIAS.flv file from your Chapter 15 Exercise folder to the Library of the currently open Flash file. When the Import progress bar is finished, the video will appear in the Library. Note Recognizing there is no such thing as free content, the authors would like to thank Talon GTS (http://www.talongts.com) of Guelph, Ontario, for allowing us to use the small video clip taken from their production for the Canadian International Air Show used in this exercise. The video is copyright by Talon GTS. As a sidenote, Jordan, one of the authors, composed the soundtrack (and thus, holds the copyright for the soundtrack). Neither Chris nor Tom had anything to do with the video, so we hold the copyright on nothing. -
Add two more layers to the Flash movie. Name the three layers from the top down: -
Select frame 1 of the Scripts layer and press the F9 key to open the Actions panel. Enter the following action: stop(); Close the Actions panel. This action will hold the Flash movie on the first frame and stop the video from playing. -
Select frame 1 of the Video layer. Drag the CIAS video from the Library onto the stage. When you release the mouse, an alert box will tell you the timeline is too short for the video and ask for permission to lengthen it. Click OK. The video, at least the first black frame, will appear on the stage. -
Select frame 1 of the Buttons layer. Open Window, Other Panels, Common Libraries, Buttons to open a Library of pre-designed buttons. -
In the LibraryButtons panel, double-click the briefcase beside Circle Buttons to open the button choices. Drag copies of the Play, Rewind, and Stop buttons onto the stage. When finished, your stage should resemble Figure 15.7. Figure 15.7. The stage is set to "code" the buttons that came from the Button Library.  Adding Video Behaviors to the Buttons With everything in place on stage, you can now add the code to the buttons that will control the video. This code will come from the Video Behavior Library. Follow these steps to apply a video behavior to the Play button. -
Select the video on the stage and give it the instance name of airShow in the Property Inspector. If the video doesn't have an instance name, the behavior will prompt you for one and even add one if you can't decide. -
If your behaviors panel isn't visible, select Window, Development Panels, Behaviors or press Shift-F3 to open it. The Video Play behavior is going to be attached to the Play button on the stage, and it will point to the video. -
Select the Play button on the stage. Press and hold the + sign in the Behavior panelthe Add Behavior buttonto open a pop-down menu of behaviors. -
Select Embedded Video, Play to open the Play Video dialog box shown in Figure 15.8. Select the instance name of the video in the dialog box, and it will appear in the text input box. Select Relative to set a relative path to the video and click OK to close the dialog box. Figure 15.8. For the Video behaviors to work, the dialog box will ask you to identify the instance of the video being controlled. 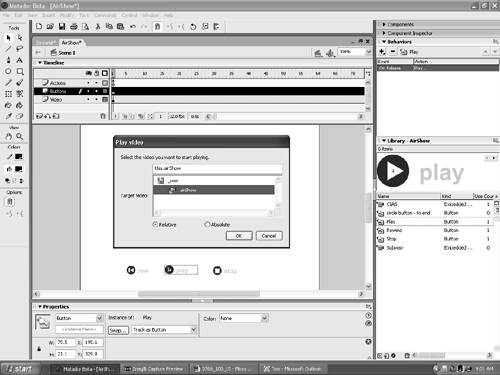 -
Add the Rewind and Stop Video behaviors to the Rewind and Stop buttons on the stage. The Rewind button behavior will ask you how many frames to step back. The default is two. This means if you press the button and keep it pressed, it will skip backwards to every other frame of the movie until the start. -
Save the movie to your Exercise folder. Select Control, Test Movie. The Exporting Flash Movie progress bar will appear, and when it is finished, the movie will appear in the Flash Player. Click the Play button, and the video will play (see Figure 15.9). Try clicking the other buttons. When finished, close the Flash Player by clicking the Close box at the top of the Document window. Figure 15.9. The video controls and the video playing through the Flash Player.  Note New to this version of Flash are the behaviors. Behaviors are prewritten codes designed to help non-coders go right to work. You can use behaviors to control video, movie clips, and sound files. As you saw in this exercise, they are rather easy to implement in a Flash movie. There are a couple of reasons behind the addition of behaviors to Flash. The first is the loss of the Basic Mode from the ActionScript editor. Replacing it with a collection of prewritten code should enable non-coders to learn how ActionScript works. The second is that behavior collections are not new to Macromedia. Director has an extensive library of prewritten behaviors.
|