| If anything will fuel an explosion of video use in Flash MX 2004, it is the capability to use the Flash Communication Server MX to stream a video on the server through the Flash Player. The previous release of Flash only offered the developer two choices. He or she could choose to embed the entire video in the Flash movie, which meant a longer wait for the Flash movie to appear in the web page, or he or she could use a preloader. The only other option was to sacrifice interactivity and output the whole thing as a QuickTime video. Just the fact that the video isn't included in the .swf file will result in exceedingly fast load times. Preparing to Stream The first step in the process has nothing to do with Flash. You are going to have to tell the Flash Communication Server where to find the video. This means it will have to reside in the FlashComm folder in the Inetpub folder of your PC. To create the directories and resulting path to the video, follow these steps: -
Open the Inetpub folder in your in your PC and open the FlashComm folder. Open the wwwroot folder and add a new folder named ch15 . Open this folder and create a new one named streams . Open this folder and create a new one named feature . Thus the path to the video will use the following directories: ch15/streams/feature/. This is how the Flash Communications Server (FCS) manages streaming video. To "call" the video, you have to instantiate the FCS application and give it an instance name. In this case, we are naming it "feature" (as you will see when we call our URL). Thus, the stream has to be in a folder with the same instance name . -
Copy the CIAS.flv and the stream.as files from your Chapter 15 Exercise folder to the new feature folder. -
Copy the main.asc file in the Chapter 15 Exercise folder to the feature folder. This is the script that will call the component used to play the video in the Flash movie. If you remember, the single line of code used is: load("components.asc"); Preparing the Flash MX 2004 Movie With the folder structure in place, you can now concentrate on building the Flash movie. Follow these steps: -
Open Flash MX 2004, and when the movie opens, save the movie as stream.fla to your Chapter 15 Exercise folder. -
Create the following 4 layers : -
Labels -
Actions -
Text -
Components -
Select frame 1 of the Labels layer. In the Property Inspector, name frame 1 Login . Add a key frame at frame 10 of the Labels layer and name it Feature . Add a frame at frame 20 of the Labels layer by right-clicking (PC) or Control-clicking (Mac) frame 20 and selecting Insert frame from the Context menu. As you may have guessed, the user will be logging in between frames 1 and 10. -
Add a keyframe at frame 10 of the Actions layer. -
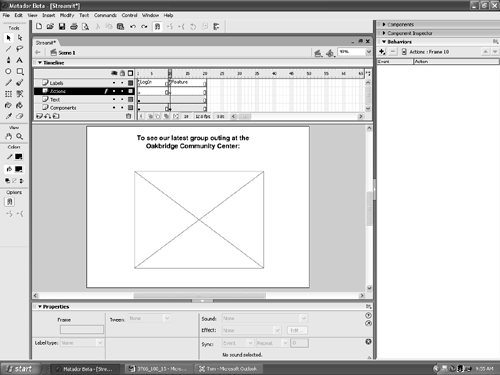
Select frame 1 of the Text layer. Select the Text tool and click once on the stage. Enter the following text: To see our latest group outing at the Oakbridge Community Center: Use your discretion regarding fonts and point size. When finished, add a frame at frame 20 of the Text layer. -
Select the first frame of the Components layer. Open the Components panel and drag a copy of the Button component to the stage. Select the button and name it loginBtn in the Property Inspector. Click the Parameters tab of the Property Inspector and change the label name to Click Here . -
Add a keyframe in frame 10 of the Components layer. With the keyframe selected, open the Panel Options menu for the Library panel. When the pop-down menu appears, select New Video from the choices presented. This simply creates a placeholder for the video. Drag the Embedded Video Library item to the stage (it looks like a box with a big "X" through it) and set the width and height in the Property Inspector to 320 wide and 240 high. These are the dimensions of the video in the streams folder created in the previous section. When you finish, your timeline and stage should resemble Figure 15.10. Figure 15.10. The stage is set and only requires the code to make it work.  Coding for Video Streaming The file that pulls the video into the Flash movie is currently sitting in the feature folder. The file is named stream.as, and its job is to locate the feature folder and connect the video placeholder in frame 10 of the movie to the Flash Communication Server when the button in frame 1 is clicked. Here's the code in the stream.as file: [View full width] [View full width] // ActionScript Document // To log into the Flash Communications Server and automatically Stream a Video // Jordan L. Chilcott // our URL - CHANGE TO MATCH YOUR SERVER! ourURL = "rtmp://10.0.1.21/ch15/feature"; // NOTE: 'feature' is known as an instantiated session within the server (it is not a  subdirectory in this case) // Instantiate the NetConnection object ourConnection_nc = new NetConnection(); login = function() { ourConnection_nc.connect(ourURL); // connect to our Flash Comm Server ourConnection_nc.onStatus = function( info ) { trace( "LEVEL: " + info.level + " -- CODE: " + info.code ); } gotoAndPlay( "feature" ); } subdirectory in this case) // Instantiate the NetConnection object ourConnection_nc = new NetConnection(); login = function() { ourConnection_nc.connect(ourURL); // connect to our Flash Comm Server ourConnection_nc.onStatus = function( info ) { trace( "LEVEL: " + info.level + " -- CODE: " + info.code ); } gotoAndPlay( "feature" ); } If you want the movie to work on your machine, be sure to change the RTMP values in the code to match your server's IP address. To add the code to your movie, follow these steps: -
Click once in frame 1 of the Actions layer, press F9 to open the Actions panel, and add the following code to stop the playback head on frame 1 of the movie: stop(); Close the Actions panel. -
Select the button in frame 1 of the Components layer and make sure the instance of the button in the Property Inspector is named loginBtn . The button doesn't need to be coded; just given an instance name. The button handler in the stream.as file will do the work of attaching the button to the login function using the onRelease event handler. -
Click once on the keyframe in frame 10 of the Actions layer. Open the Actions panel (press the F9 key) and enter the following code: videoStream_ns = new NetStream( ourConnection_nc ); videoStream_ns.onStatus = function( info ) { trace( "LEVEL: " + info.level + " -- CODE: " + info.code ); } ourVideo.attachVideo( videoStream_ns ); videoStream_ns.play( "CIAS" ); stop(); There are basically three lines to this code that perform some significant functions. The first line creates a NetStream object, which is our streaming connection to the Flash Communication Server. The second line attaches the embedded video to the NetStream object. This basically "wires" the FLA interface to the Flash Communication Server. The last three lines tell the stream which movie to play on the Flash Communication Server and to stop the playback head on frame 10 of the Flash movie. In this case, it will play the CIAS movie located in the feature folder. -
Publish the movie, place the .swf file in a Dreamweaver MX page, and play it through a browser (see Figure 15.11). Figure 15.11. The members of the Oakbridge Community Center visited an air show.   |

