Creating the Site Model
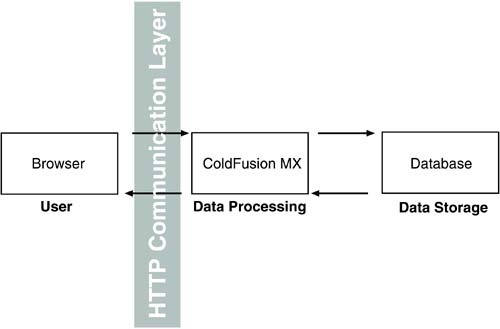
| There is a great saying about designing a web site. "All you have to do," said this observer, "is to simply stare at your screen until drops of blood appear on your forehead." Though web designers will tell you there is a grain of truth in that saying, the blood, sweat, and tears process doesn't start on the forehead. It starts with a blank sheet of paper. The designer will start sketching the navigation and data flow between the pages and to and from the database. He or she will start drawing the placement of the page elements or dynamic content and showing how dynamic content appears on each page, and eventually those drawings will become a site. Looking at this as a continuum from sketch to comprehensive, it could be perceived as a complex process. It is. The main reason for the complexity is the importance of this stage of the process. Much of what will appear on the site and how the user not only moves through the site but also how the user interacts with the data will be determined at this stage. Usability issues will become evident. Information design mistakes, if not caught here, can have a profound impact upon the way the user accesses information on the site. Color choices, font choices, navigation models, data flowall are determined in the model, and if problems with them are not caught and fixed, their negative impact on the site will only magnify as the site approaches upload. Modeling the Server-Side Workflow for Flash MX 2004In our previous New Riders book, Building Web Sites with Macromedia Studio MX , we took a rather extensive look at building a site model for a static site. Interestingly, the modeling process for a static site and a dynamic site is not radically different, depending on which way you choose to proceed. A dynamic site adds the server side of the equation to the mix. This is where we will be focusing our efforts regarding modeling. Rather than look at the broad picture, we are going to get a bit specific and focus on building the model for a dynamic Flash application. The workflow on the server sidethe side the user never seesis fundamentally different from what takes place on the user's computer. The client side depends on the way the user interacts with the Flash MX 2004 UI. The functionality of that UI is provided by the server-side workflow. Depending upon your projecta hotel reservation system, for examplethis workflow can become quite complex. Information, thanks to the Internet, can be retrieved from any number of locations, which involves accessing servers to complete the user's request. This use of internal and external sources of data is sometimes referred to as the data storage tier . This tier is primarily focused around storing data commonly through the use of individual database documents created in such applications as Microsoft Access, MySQL, and FileMaker Pro. In fact, the power of this tier is unleashed when you consider that data does not have to reside on your network; it can live anywhere , so the data resources can be pulled into the Flash application from any external source. Remember, the user's computerthe client sidecouldn't care less where the data it is displaying resides. It simply requests information, and it is up to the server to determine where to go to fulfill the request. This is why the workflow models for Flash applications look so complex. The workflow moves between the server side and the client side by passing through a communication layer. These two very different worlds use the common language of HTTP when they talk to each other through the communication layer, as shown in Figure 5.1. Figure 5.1. All communication between the Flash Player in the user's browser and the web server passes through an HTTP Communication Layer. In the model shown in Figure 5.1, data flow is quite simple to understand. The user makes a request, the request flows into ColdFusion MX, and ColdFusion passes the request on to the database. When the information is found, ColdFusion essentially tosses it between the appropriate "include" tags on the page. That code is then passed through the HTTP Communication Layer to the user's browser where the content appears in the Flash Player on the browser's screen. This is fundamentally different from the static model of web design. In this case, the user makes a request and the server feeds the page into the browser. The HTTP Communication Layer is important because a Flash application is delivered through a web browser and HTTP (Hyper Text Transfer Protocol) to get the content to your browser. Just be aware that using it in a dynamic Flash environment results in a bit more work on the client side than it does when the dynamic page is authored using Dreamweaver MX 2004. The reason is that the Flash application is always working, even when the work is being done on the other sidethe server sideof the fence. A dynamic web page put together in Dreamweaver and viewed through a browser essentially rests when the work is being done on the server side. This is the great strength and weakness of creating dynamic Flash presentations. The more server-side requests you make, the greater the number of weaknesses will be present. If the dynamic Flash presentation is built efficiently , it will be faster and more reliable because the client side will send out the request for data whether the server side is able to receive it or not. Though there are solutions, the "First Rule of Dynamic Web Physics" will come into play. The rule according to one of the authors is: "For every action, there is an equally opposite and ugly implication ." You could, for instance, load in a preloader at the start of the Flash presentation. With the bulk of the information loaded at startup, the application will run a lot smoother in theory. This is, however, not necessarily true in practice. If the preloader or configuration file can't be loaded at start-up, the dynamic Flash application will become useless. To avoid this, play the "what if" games and build those solutions into the Flash application. For instance, anticipate what would cause a failure and build the solution into the application. Mapping a Flash MX 2004 LoginA login is relatively easy to understand. In one of the applications we are going to build, the user will be asked to log into a Flash chat room. Nothing could be simpler than that. Right? Not so fast. The application was built so that users only have to register once. That information is resident in a shared object located on the user's hard drive. If it is there, the route to the chat room branches in one direction. If it isn't on the hard drive, the route branches in the other direction. The user enters the wrong name. What happens? What if the user enters the right name but the wrong password? Getting the picture? The map shown in Figure 5.2 is created in Freehand MX using the Connector tool and a box. This is a typical map for a dynamic secure login. Figure 5.2. Mapping of a Flash login can be created in Freehand MX. What you don't do to get yourself started is to immediately begin drawing. Break out a pad of paper and start telling the story of what a user has to do to log in. Start with, "When the user arrives at the page..." and go from there. In the case of the login, "When the user arrives at the page..." the application looks for a previously created "cookie" on the user's hard drive. If it is there, the user will be asked if they want to automatically log in using the details from the object. If the user agrees, the information is sent to the server. If the user disagrees, he or she will be shown an area where they have to enter their username and password. The text fields are completed and the user is asked if he or she wants the details stored in a shared object. The data is then checked to ensure all the fields have been completed. If this fails, the user sees an appropriate message prompting him or her to complete the missing field. Otherwise, the data is shot off to the server to be authenticated. If the authentication fails, the user gets an error message and is returned to the input area. If the data is correct, the user will then see a message to that effect and consequently be taken directly to the chat room. Note During the writing of this book, one of the authors was driven absolutely crazy by an online survey. In order to participate in a special project, all he had to do was to complete a simple form. The form contained three text input areas for his address. He filled out the form four or five times, and each time, after clicking the submit button, he was prompted to fill in the address area. He finally got the form accepted by entering his street number in the first address box, his street name in the second, and the word "road" in the third. In this instance, the data map didn't account for the fact that all three address boxes had to be completed. In fact, there was nothing on the survey indicating this requirement. When he returned to the address area, he was understandably mystified. There was nothing on the screen to show him where he had made the mistake. This is a good lesson in planning these sorts of things. If all boxes have to be completed, let the user know. If an error message is generated, show the user where the error is located. A properly- constructed map will point out these problems. Accounting for Dynamic Data on a Site MapIf you do build a site map, don't forget to include server interactions and data flow. In the case of data flow, you can easily include pages that illustrate content flowing in from a database. To do this, you simply create "data buckets" like those shown in Figure 5.3. The square represents database content and the "buckets" underneath illustrate where the content flows after being summoned by the user's browser. Figure 5.3. "Data buckets" can represent pages where content flows in from a server. The login presented earlier in the chapter shows how a user interacts with the server. Obviously representing all of the interactions shown in Figure 5.2 would be overkill. When you encounter those areas of the map where the user interacts with the server side, simple shapes can be used to demonstrate that particular user interaction. Just be sure everyone agrees on the meaning of the shape. In the case of the login, the interaction can be illustrated as shown in Figure 5.4. Figure 5.4. Simple shapes can be used to illustrate user interaction with the server side. Notice how the diamond shape replaces the schematic in Figure 5.2. The amount of detail you wish to show is something you should agree on with the information designer and technical director. Also understand that this simple diagram shows nothing more than flow. It should never replace a technical or functional specification. |
EAN: 2147483647
Pages: 158