Putting Samba to Work
| Samba uses the Session Message Block (SMB) protocol to enable the Windows operating system (or any operating system) to access Linux files. Using Samba, you can make your Ubuntu machine look just like a Windows computer to other Windows computers on your network. You do not need to install Windows on your PC. Samba is a complex programso much so that the book Samba Unleashed (Sams Publishing, 2000, ISBN 0-672-31862-8) is more than 1,200 pages long. The Samba man page (when converted to text) for just the configuration file is 330KB and 7,013 lines long. Although Samba is complex, setting it up and using it does not have to be difficult. There are many options, which accounts for some of Samba's complexity. Depending on what you want, Samba's use can be as easy or as difficult as you would like it to be. Fortunately, Ubuntu includes the Samba Web Administration Tool (SWAT), which you can use to configure Samba by using the Mozilla web browser. SWAT provides an easy way to start and stop the Samba server; set up printing services; define remote access permissions; and create Samba usernames, passwords, and shared directories. This section delves into the basics of configuring Samba, and you should first read how to manually configure Samba to get an understanding of how the software works. At the end of this section, you will see how to enable, start, and use SWAT to set up simple file sharing. Like most of the software that comes with Ubuntu, Samba is licensed under the GPL and is free. Installation is straightforward and the software can be installed using either synaptic or apt-get. Installing from source code can be more time-consuming. If you do not want to install using Ubuntu's default locations, however, installing from the source code is a more configurable method. Just download the source from http://www.samba.org/ and unpack the files. Change into the source directory and, as root, run the command ./configure along with any changes from the defaults. Then run make, make test (if you want), followed by make install to install Samba in the specified locations. When you install Samba, it is a good idea to also install the samba-doc and samba-doc-pdf packages because they contain extensive documentation in text, PDF, and HTML format. After you install it, you can find this documentation in /usr/share/doc/samba*/doc. If you install Samba using your Ubuntu disc, you can find a large amount of documentation in the directory tree starting at /usr/share/doc/samba-doc or /usr/share/doc/sambadoc-pdf in several formats, including PDF, HTML, and text, among others. Altogether, almost 3MB of documentation is included with the source code. After installing Samba, you can either create the file /etc/smb.conf or use the smb.conf file supplied with Samba, which is located by default under the /etc/samba directory with Ubuntu. You can find nearly a dozen sample configuration files under the /usr/share/doc/samba*/examples directory. Note Depending on your needs, smb.conf can be a simple file of fewer than 20 lines or a huge file spanning many pages of text. If your needs are complex, I suggest picking up a copy of Samba Unleashed. Manually Configuring Samba with /etc/samba/smb.confThe /etc/samba/smb.conf file is broken into sections. Each section is a description of the resource shared (share) and should be titled appropriately. The three special sections are as follows:
Each section in your /etc/samba/smb.conf configuration file should be named for the resource being shared. For example, if the resource /usr/local/programs is being shared, you could call the section [programs]. When Windows sees the share, it is called by whatever you name the section (programs in this example). The easiest and fastest way to set up this share is with the following example from smb.conf: [programs] path = /usr/local/programs writeable = true This bit shares the /usr/local/programs directory with any valid user who asks for it and makes that directory writable. It is the most basic share because it sets no limits on the directory. Here are some parameters you can set in the sections:
The possibilities are almost endless. Any parameters set in the individual sections override the parameters set in the [global] section. The following section adds a few restrictions to the [programs] section: [programs] path = /usr/local/programs writeable = true valid users = ahudsonahudson browseable = yes create mode = 0700 The valid users entry limits userid to just ahudson. All other users can browse the directory because of the browseable = yes entry, but only ahudson can write to the directory. Any files created by ahudson in the directory give ahudson full permissions, but no one else will have access to the file. This is exactly the same as setting permissions with the chmod command. Again, there are numerous options, so you can be as creative as you want to when developing sections. Setting Global Samba Behavior with the [global] SectionThe [global] section set parameters establishes configuration settings for all of Samba. If a given parameter is not specifically set in another section, Samba uses the default setting in the [global] section. The [global] section also sets the general security configuration for Samba. The [global] section is the only section that does not require the name in brackets. Samba assumes that anything before the first bracketed section not labeled [global] is part of the global configuration. (Using bracketed headings in /etc/samba/smb.conf makes your configuration file more readable.) The following sections discuss common Samba settings to share directories and printers. You will then see how to test your Samba configuration. Sharing Home Directories Using the [homes] SectionThe [homes] section shares out Ubuntu home directories for the users. The home directory is shared automatically when a user's Windows computer connects to the Linux server holding the home directory. The one problem with using the default configuration is that the user sees all the configuration files (such as .profile and others with a leading period in the filename) that he normally wouldn't see when logging on through Linux. One quick way to avoid this is to include a path option in the [homes] section. To use this solution, each user who requires a Samba share of his home directory needs a separate "home directory" to act as his Windows home directory. For example, this pseudo home directory could be a directory named share in each user's home directory on your Ubuntu system. You can specify the path option when using SWAT by using the %u option when specifying a path for the default homes shares (see the section "Configuring Samba Using SWAT" later in this chapter). The complete path setting would be this: /home/%u/share This setting specifies that the directory named share under each user's directory is the shared Samba directory. The corresponding manual smb.conf setting to provide a separate "home directory" looks like this: [homes] comment = Home Directories path = /home/%u/share valid users = %S read only = No create mask = 0664 directory mask = 0775 browseable = No If you have a default [homes] section, the share shows up in the user's Network Neighborhood as the user's name. When the user connects, Samba scans the existing sections in smb.conf for a specific instance of the user's home directory. If there is not one, Samba looks up the username in /etc/passwd. If the correct username and password have been given, the home directory listed in /etc/passwd is shared out at the user's home directory. Typically, the [homes] section looks like this (the browseable = no enTRy prevents other users from being able to browse your home directory and is a good security practice): [homes] browseable = no writable = yes Thisexample shares out the home directory and makes it writable to the user. Here's how you specify a separate Windows home directory for each user: [homes] browseable = no writable = yes path = /path/to/windows/directories Sharing Printers by Editing the [printers] SectionThe [printers] section works much like the [homes] section but defines shared printers for use on your network. If the section exists, users have access to any printer listed in your Ubuntu /etc/printcap file. Like the [homes] section, when a print request is received, all the sections are scanned for the printer. If no share is found (with careful naming, there should not be unless you create a section for a specific printer), the /etc/printcap file is scanned for the printer name that is then used to send the print request. For printing to work properly, you must correctly set up printing services on your Ubuntu computer. A typical [printers] section looks like the following: [printers] comment = Ubuntu Printers browseable = no printable = yes path = /var/spool/samba The /var/spool/samba is a spool path set just for Samba printing. Testing Samba with the testparm CommandAfter you have created your /etc/smb.conf file, you can check it for correctness by using the testparm command. This command parses through your /etc/smb.conf file and checks for any syntax errors. If none are found, your configuration file will probably work correctly. It does not, however, guarantee that the services specified in the file will work. It is merely making sure that the file is correctly written. As with all configuration files, if you are modifying an existing, working file, it is always prudent to copy the working file to a different location and modify that file. Then, you can check the file with the testparm utility. The command syntax is as follows: # testparm /path/to/smb.conf.back-up Load smb config files from smb.conf.back-up Processing section "[homes]" Processing section "[printers]" Loaded services file OK. This output shows that the Samba configuration file is correct, and, as long as all the services are running correctly on your Ubuntu machine, Samba should be working correctly. Now copy your old smb.conf file to a new location, put the new one in its place, and restart Samba with the command /etc/init.d/smb restart. Your new or modified Samba configuration should now be in place. Starting the smbd DaemonNow that your smb.conf file is correctly configured, you can start your Samba server daemon. This can be done with the /usr/sbin/smbd command, which (with no options) starts the Samba server with all the defaults. The most common option you will change in this command is the location of the smb.conf file; you change this option if you don't want to use the default location /etc/smb/smb.conf. The -s option allows you to change the smb.conf file Samba uses; this option is also useful for testing whether a new smb.conf file actually works. Another useful option is the -l option, which specifies the log file Samba uses to store information. To start, stop, or restart Samba from the command line, use the /etc/init.d/samba script with a proper keyword, such as start, like so: $ sudo /etc/init.d/samba start Using the smbstatus CommandThe smbstatus command reports on the current status of your Samba connections. The syntax is as follows: /usr/bin/smbstatus [options] Table 22.2 shows some of the available options
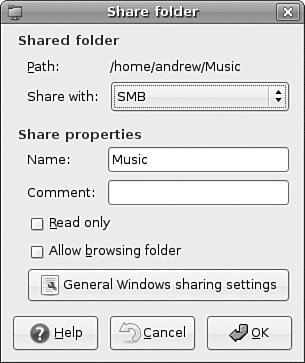
Connecting with the smbclient CommandThe smbclient command allows users on other Linux hosts to access your smb shares. You cannot mount the share on your host, but you can use it in a way that is similar to an FTP client. Several options can be used with the smbclient command. The most frequently used is -I followed by the IP address of the computer to which you are connecting. The smbclient command does not require root access to run: smbclient -I 10.10.10.20 -Uusername%password This gives you the following prompt: smb: <current directory on share> From here, the commands are almost identical to the standard UNIX/Linux FTP commands. Note that you can omit a password on the smbclient command line. You are then prompted to enter the Samba share password. Mounting Samba SharesThere are two ways to mount Samba shares to your Linux host. Mounting a share is the same as mounting an available media partition or remote NFS directory except that the Samba share is accessed using SMB. The first method uses the standard Linux mount command: mount -t smbfs //10.10.10.20/homes /mount/point -o username=ahudson,dmask=777,\ fmask=777 Note You can substitute the hostname for an IP address if your name service is running or the host is in your /etc/hosts file. This command mounts ahudson's home directory on your host and gives all users full permissions to the mount. The permissions are equal to the permissions on the chmod command. The second method produces the same results using the smbmount command, as follows: # smbmount //10.10.10.20/homes /mount/point -o username=ahudson,dmask-777,\ fmask=777 To unmount the share, use the following standard command: # umount /mount/point You can also use these mount commands to mount true Windows client shares to your Ubuntu host. Using Samba, you can configure your server to provide any service Windows can serve, and no one but you will ever know. Configuring Samba Using SWATThe Samba team of developers has made administering Samba much easier with the Samba Web Administration Tool (SWAT). SWAT is a web-based configuration and maintenance interface that gets as close to a point-and-click Samba environment as possible. This section provides a simple example of how to use SWAT to set up SMB access to a user's home directory and how to share a directory. Note Using SWAT requires you to install the inetd and swat packages, so make sure you have these before proceeding. Also you need to enable the root account by giving it a password by using the command sudo passwd root. Not enabling the root account prevents you from using SWAT effectively. You need to perform a few steps before you can start using SWAT. First, make sure you have the Samba and the swat packages installed. You then enable SWAT access to your system by editing the /etc/inetd.conf file by changing the following line to remove the #<off># comments: #<off># swat stream tcp nowait.400 root\ /usr/sbin/tcpd /isr/sbin/swat Save the file, and then restart the inetd daemon using the following command: # /etc/init.d/inetd restart Next, start an X session, launch Firefox, and browse to the http://localhost:901 uniform resource locator (URL). You are presented a login prompt. Enter the root username and password, and then click the OK button. The screen clears, and you see the main SWAT page, as shown in Figure 22.2. Figure 22.2. You can use SWAT to easily configure and administer Samba on your system.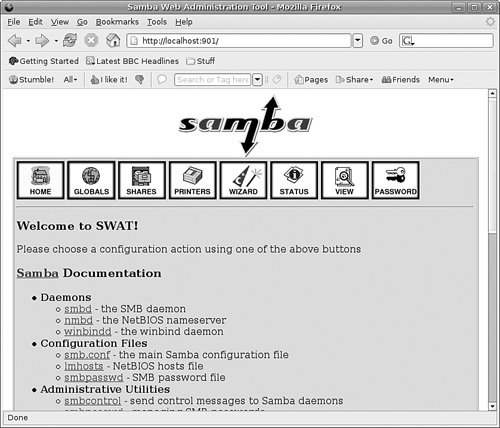 Tip You can also configure Samba using Ubuntu's shares-admin client. Launch the client from the command line of an X terminal window or select the System, Administration, Shared Folders menu item (as shown later in Figure 22.9). Figure 22.9. Enter the root password to perform printer administration with CUPS.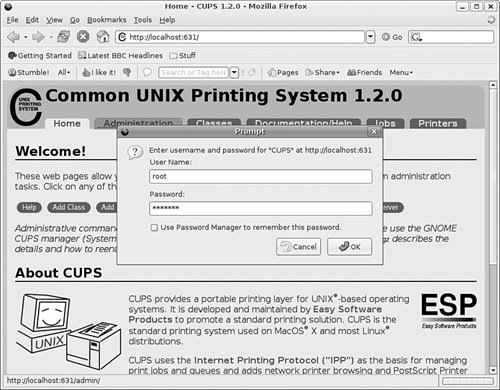 First, click the Globals icon in SWAT's main page. You see a page similar to the one shown in Figure 22.3. Many options are in the window, but you can quickly set up access for hosts from your LAN by simply entering one or more IP addresses or a subnet address (such as 192.168.2.note the trailing period, which allows access for all hosts; in this example, on the 192.168.2 subnet) in the Hosts Allow field under the Security Options section. If you need help on how to format the entry, click the Help link to the left of the field. A new web page appears with the pertinent information. Figure 22.3. Configure Samba to allow access from specific hosts or subnets on your LAN.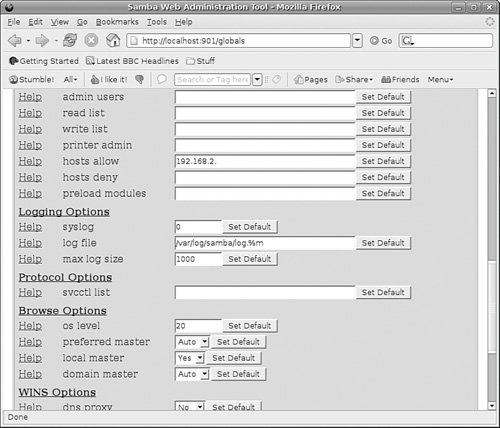 When finished, click the Commit Changes button to save the global access settings. The next step is to create a Samba user and set the user's password. Click the Password icon on the main SWAT page (refer to Figure 22.2). The Server Password Management page opens, as shown in Figure 22.4. Type a new username in the User Name field; then type a password in the New Password and Re-type New Password fields. Figure 22.4. Enter a Samba username and password in the SWAT Password page.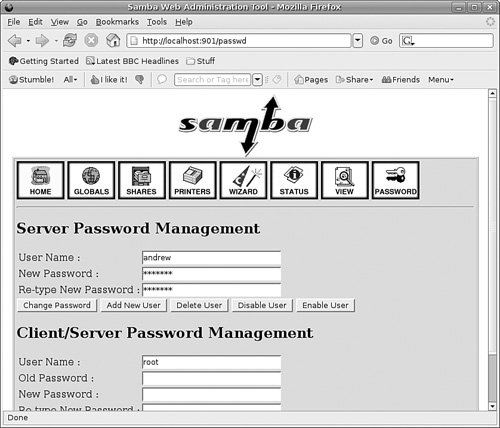 Note You must supply a username of an existing system user, but the password used for Samba access does not have to match the existing user's password. When finished, click the Add New User button. SWAT then creates the username and password and displays Added user username (where username is the name you entered). The new Samba user should now be able to gain access to the home directory from any allowed host if the Samba (smb) server is running. For example, if you have set up Samba on a host named mini that has a user named andrew, the user can access the home directory on mini from any remote host (if allowed by the Globals settings), perhaps by using the smbclient command like so: $ smbclient //mini/andrew -U andrew added interface ip=192.168.2.68 bcast=192.168.2.255 nmask=255.255.255.0 Password: Domain=[MYGROUP] OS=[Unix] Server=[Samba 2.2.5] smb: \> pwd Current directory is \\mini\andrew\ smb: \> quit Click the Status icon (as shown in Figure 22.2 or 22.4) to view Samba's status or to start, stop, or restart the server. You can use various buttons on the resulting web page to control the server and view periodic or continuous status updates. You can also use SWAT to share a Linux directory. First, click the Shares icon in the toolbar at the top of the main Samba page (refer to Figure 22.2). Then, type a share name in the Create Shares field, and then click the Create Shares button. The SWAT Shares page displays the detailed configuration information in a dialog box, as shown in Figure 22.5, providing access to detailed configuration for the new Samba share. Figure 22.5. Use the SWAT Shares page to set up sharing of a portion of your Linux file system.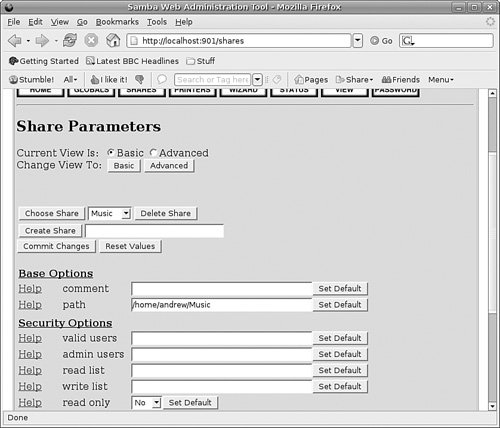 Type the directory name (such as /music) you want to share in the Path field under the Base options. Select No or Yes in the Read Only field under Security options to allow or deny read and write access. Select Yes in the Guest OK option to allow access from other users and specify a hostname, IP address, or subnet in the Hosts Allow field to allow access. Click the Commit Changes button when finished. Remote users can then access the shared volume. This is how a Linux server running Samba can easily mimic shared volumes in a mixed computing environment! Alternatively, use the shares-admin client (from the command line or the Server Settings Samba Server menu item on the System Settings menu). Figure 22.6 shows the properties of a shared directory named /music. Use the Add button to create new shares and the Properties button to edit the share's access options. Figure 22.6. Configure a Samba share by editing the share defaults. |
EAN: 2147483647
Pages: 318
- Structures, Processes and Relational Mechanisms for IT Governance
- An Emerging Strategy for E-Business IT Governance
- Measuring ROI in E-Commerce Applications: Analysis to Action
- Technical Issues Related to IT Governance Tactics: Product Metrics, Measurements and Process Control
- The Evolution of IT Governance at NB Power