| The MenuBuilder Project options, in many respects, can be regarded as preferences you set for the document rather than the application. The ability to change the options means you can perform such tasks as: Changing a project's name Assigning an icon to a project Assigning a new background image to a project Setting the background image transparency Setting the window size for the final project
You can also add audio to the project and introduce audible effects such as mouse clicks and so on to the project. Finally, you can change the MenuBuilder preferences to make global changes to the application. To change a project's options 1. | Open a MenuBuilder project and, in the Projects Tasks area, click View Project Information or select Options > Project Options.
The Project Options dialog box opens (Figure 12.18).
Figure 12.18. The Project Options dialog box allows you to make global changes to the project. 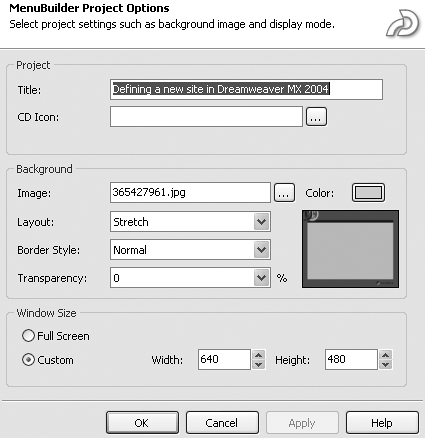
| 2. | To change the project's name, select the text in the Title field and enter a new name.
Note that renaming a project does not rename the file. The name you enter will appear as the window name when the file opens on your desktop.
| 3. | To change the project icon from the generic MenuBuilder icon to a custom icon, click the Browse button and navigate to the folder containing the icon image you want to use.
Icons are located in the C:\Program Files\Captivate\MenuBuilder\Icons folder. You can add icons to projects destined for use as a PC EXE file only. Mac users can add icons to their projectors using the Tip presented earlier in this chapter.
MenuBuilder does not include a set of icons. Icons must have the .ico extension and are created using PC imaging software that allows for the export of the ICO format. You can also download icons from a variety of sources on the Internet.
| 4. | To add or change a background image, click the Browse button and navigate to the folder containing the desired image.
| 5. | To change the background color of the project, click the Color Chip, select your color in the color picker that opens, and click OK.
If your image fills the background, you won't see the background color. If you use a background image that is smaller than the project's dimensions or apply transparency to the background image, the background color will be visible.
If you are finding it hard to read any text you may add to a MenuBuilder project because it is sitting on an "odd" background color, change the background color to white in the Project Options dialog box.
| 6. | Use the Layout pop-down menu to determine the placement of the background image:
- Stretch Forces the image to fit the project area and, most likely, distorts the image.
- Center Places the image in the center of the project window.
- Tile Copies of the background image fill the project window.
| 7. | To add a border to the background image, select a border style from the Border pop-down menu.
Note that selecting Normal is the same as choosing not to add a border. If you need to control the border width and style, consider creating the background image with a border in Fireworks MX 2004 using a LiveEffect (Figure 12.19) or apply a Photoshop filter to the image in Adobe Photoshop.
Figure 12.19. The LiveEffects in Fireworks MX 2004 contain a robust collection of special effects that can be applied to images. 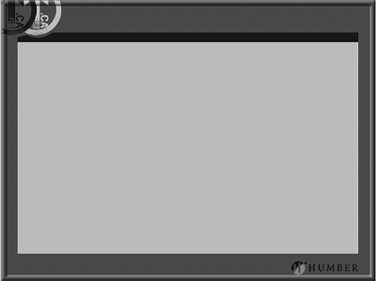
| 8. | To add transparency to your background image, use the Transparency pop-down slider.
The values range from 0% (no transparency) to 100% (the image becomes invisible).
| 9. | In the Window Size area, select a window size for the project.
If you want the project to fill the screen when viewed, select Full Screen. Otherwise, select Custom and enter the appropriate height and width values.
| 10. | Click OK.
The options are applied to the project.
|
 Tips Tips
If you are using a PowerPoint template, you may be surprised to discover you actually have a background image. This file is the background image applied to the PowerPoint template when the template was created. Changing a template's background image in MenuBuilder does not affect the original PowerPoint template. Selecting Full Screen may introduce distortion to your project, or the screen may appear to be fuzzy as the resolution reduces to fit the screen size. Test this option carefully on a variety of machines or screen resolutions prior to publishing the project. If you are reducing the window size using the Custom area, be sure to apply the same reduction percentage to both the width and the height values for the window. Failure to do so will distort the project.
To add audio to a MenuBuilder project 1. | Open a MenuBuilder project and, from the Task area, select "Change audio settings." Alternatively, click the Audio button on the Main toolbar or select Options > Audio Options.
The MenuBuilder Audio Options dialog box opens (Figure 12.20).
Figure 12.20. Audio can be added to MenuBuilder projects. 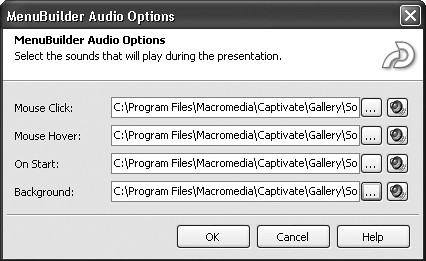
| 2. | To add a mouse click sound, click the Browse button and navigate to the folder containing the sound to be used.
| 3. | To add a mouse hover or rollover sound, click the Browse button and navigate to the folder containing the sound to be used.
| 4. | To add a sound that starts playing when the project is launched, click the Browse button and navigate to the folder containing the sound to be used.
| 5. | To add a sound that plays in the background while the project is playing, click the Browse button and navigate to the folder containing the sound to be used.
| 6. | Click the OK button to accept the changes.
|
 Tips Tips
MenuBuilder accepts only WAV or MP3 files. If you need a couple of sound effects, use the ones found in the Captivate gallery Sound folder, located at C:\Program Files\Captivate\Gallery\Sound. You can preview your selected sounds by clicking the Play buttonit looks like a speakerlocated next to the Browse button in the Audio Options dialog box.
To set the MenuBuilder preferences 1. | Open a MenuBuilder project and select Options > Preferences.
The Preferences dialog box opens (Figure 12.21).
Figure 12.21. There is a lot of flexibility available to you in the MenuBuilder Preferences dialog box. 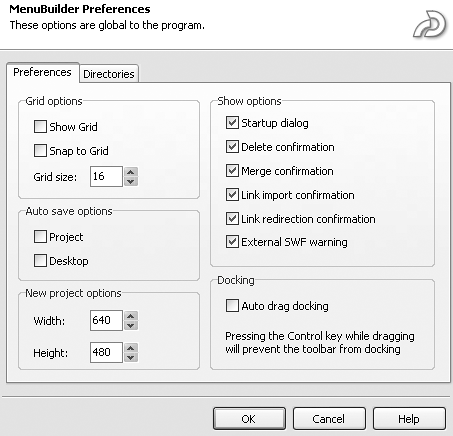
| 2. | Select the Preferences tab and choose the following settings:
| 3. | Select the Directories tab (Figure 12.22) and set the following options:
- Project Directory Select the folder to be used to hold all MenuBuilder projects. The content of this folder is what appears in the initial MenuBuilder Projects list. The default directory is C:\Program Files\Captivate\MenuBuilder\Projects.
- Background directory Select the folder to be used to hold all of the background images for your projects. The default directory is C:\Program Files\Captivate\MenuBuilder\Backgrounds.
- Audio directory Select the folder to be used to hold all of the audio files for your projects. The default directory is C:\Program Files\Captivate\MenuBuilder\Audio.
- Icon directory Select the folder to be used to hold all of the icon files (with .ico extensions) for your projects. The default directory is C:\Program Files\Captivate\MenuBuilder\Icons.
- Template directory Select the folder to be used to hold MenuBuilder templates used in your projects. The default directory is C:\Program Files\Captivate\MenuBuilder\Templates.
- Image directory Select the folder to be used to hold all of the image files for your projects. The default directory is C:\Program Files\Captivate\MenuBuilder\Images.
- Export directory Select the folder to which exported MenuBuilder projects are saved. The default directory is C:\Program Files\Captivate\MenuBuilder\Exports.
- Browse directory Select the folder to be used to hold all your saved MenuBuilder projects. The default directory is C:\Program Files\Captivate\Projects.
Figure 12.22. The Directories window in the MenuBuilder Preferences lets you assign the locations for many of the files used in the project. 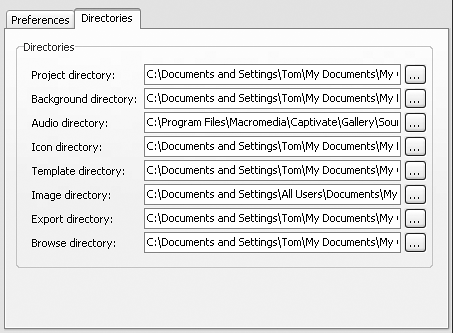
| 4. | Click OK.
The preferences close and MenuBuilder accepts them.
|
 Tip Tip
|


 Tips
Tips

