Setting a Movie's Mouse Options When a movie is playing, the mouse is usually moving around the screen if mouse movement has been captured. As the mouse moves, the cursor, called a pointer in Captivate, changes depending on the action being undertaken. You can modify how the mouse moves as well its speed, its sound, its visibility, and even the color used when something is clicked. You can even change the path of the mouse from one slide to the next and the shape of the mouse's path from curved to straight and vice versa. To change the mouse pointer 1. | In Storyboard view, click Mouse in the "Slide tasks" area to open the Mouse Options pop-down menu.
| 2. | Select either Project Pointers or Current Theme Pointers.
You can use the Project pointers (Figure 2.31) to change the pointer used in the slide.
Figure 2.31. Project pointers enable you to customize the pointer used in the movie. 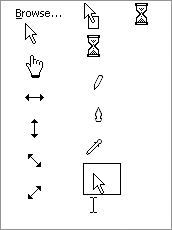
The Current Theme pointers (Figure 2.32) are the ones that your computer uses.
Figure 2.32. Current Theme pointers are based upon those used in the operating system. 
| 3. | When the pop-up menu of pointers appears, select a pointer by clicking it.
|
 Tips Tips
The Current Theme pointer is directly related to the Windows theme set in your computer's Display control panel. Even though a theme can be changed, end users don't need to have the same themes on their computers for the movie to work. The pointers used will be exported with the project. If the selected slide has no mouse actions associated with it, a new default mouse movement will be added to the slide. You aren't limited to just the pointers shown in the Project Pointers pop-down menu. If you click Browse in the Project Pointers pop-down, you will be taken to the Cursors folder in your computer's Windows folder. From here you can choose from all of the cursors that your system uses. If you are in the Edit View panel, you can access the pointers by selecting Slide > Mouse.
To change the mouse pointer's size 1. | Select a slide in the Edit View panel.
| 2. | Click the Mouse button on the Advanced toolbar.
The Mouse Properties dialog box opens (Figure 2.33).
Figure 2.33. The Mouse Properties dialog box. 
| 3. | Select Double Mouse Size and click OK.
| 4. | To change back to the normal size mouse, deselect Double Size Mouse.
|
Tip
To change how quickly the mouse moves 1. | In either the Storyboard View or Edit View panel, double-click a slide containing an icon showing the presence of a captured mouse movement.
| 2. | Open the timeline at the top of the Edit View panel. by clicking the down arrow beside the word Timeline.
The mouse object is indicated on the timeline (Figure 2.34), and the length the mouse is visible is indicated by the duration, in brackets, and the length of the mouse span on the timeline. Also, placing the pointer on the mouse span will result in a tool tip that shows the start time of the mouse movement and the duration of the movement.
Figure 2.34. Adjust mouse speed on the timeline. 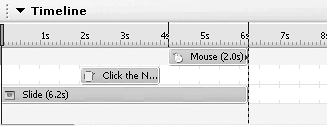
| 3. | Click and drag the right side of the mouse object to the right to decrease the mouse speed or to the left to increase the mouse speed.
|
Tips The click-and-drag to the right or to the left actually makes sense. If you drag the right edge of the mouse object to the right, you are increasing the mouse object's duration in the slide. The effect is to have the same movement distance over a longer time, which means the mouse is effectively slowed down. Moving to the left has the opposite effect: The same movement in a shorter time period means the mouse speed is increased. Double-clicking the mouse object in the timeline opens the Mouse Properties dialog box.
To change the mouse's visual effect You can change the color used in the movie to indicate a mouse click, or you can use a Flash SWF file to change the visual effect of a clicking an object in your movie. There are two that are added when you install Captivate on your computer. Here's how to change the mouse click color and the mouse click effect: 1. | Open the Mouse Properties dialog box.
| 2. | To change the color of a mouse click, select "Default click" in the "Show mouse click" area.
| 3. | Click the color chip to open the Color Picker, select a new color and click OK.
The new color appears as the default.
| 4. | To change the mouse click effect, select "Click effect" and select one of the two options from the pop-down menu (Figure 2.35). Click the Play button (it has an arrow) to see the effect chosen in the preview area.
Figure 2.35. The mouse click effect is a small Flash SWF file. Click the Play button to preview your selected effect. 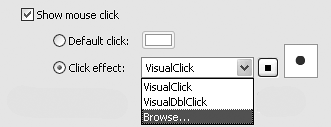
| 5. | Click OK.
|
Tips You can have either a click color or a click effect. Selecting one will deselect the other. You can create your own click effect in Flash. In this case, create the SWF file, place it in the Visual clicks folder (Captivate\Gallery\Mouse\Visual Clicks) and select it using the Browse button in the Visual Clicks pop-down menu. You can apply click colors and visual clicks to the entire movie, not just a slide. Select "Apply changes to all slides" in the Mouse Properties dialog box to apply your selection globally.
To change the mouse click sound 1. | In either the Storyboard or Edit View panels open the Mouse Properties dialog box.
| 2. | Select Mouse click sound and select a sound from the pop-down menu (Figure 2.36).
Figure 2.36. You can apply sound to mouse clicks. 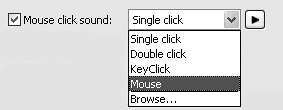
| 3. | Click the Play button to preview the sound.
|
Tips Mouse clicks are an invaluable audible clue to the user that something has happened. If the action you are performing requires either a single or a double click, you can add the mouse sound that matches the action. You can even turn off the sound. If you don't want to have a mouse sound, deselect Mouse click sound. If you have a library of mouse click sounds, you can add their WAV or MP3 versions to Captivate\Gallery\Mouse\Click Sounds and access them by clicking the Browse button in the Click Sounds pop-down menu.
Setting Keyboard Sounds It isn't only mouse click sounds that can give an aural clue to the user that something is changing. Keystrokes can also be given a "tap" sound. Here's how: 1. | Open a Captivate movie.
| 2. | Select Movie > Preferences and select the Preferences tab.
| 3. | Select "Play tap audio for recorded typing when movie is generated."
| 4. | Click OK.
|
|
To change the mouse movement direction and location 1. | In the Edit View panel, select a slide containing a mouse movement.
| 2. | Roll your mouse to the endpoint of the animation.
Your cursor changes to a grabber-hand cursor.
| 3. | Click and drag the pointer to a new location on the screen.
| 4. | Drag the pointer to the opposite side of the start point to change the direction of the mouse movement.
|
Tip
To change the mouse path to a curved or straight line 1. | In the Edit View panel, open a slide.
| 2. | Click a slide with a mouse icon in the Filmstrip.
| 3. | When the slide opens in the Edit View panel, click the mouse icon to open the pop-down menu.
| 4. | Select Straight Pointer Path (Figure 2.37).
Figure 2.37. You can straighten a curved mouse path. 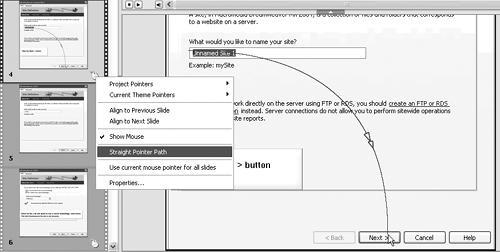
The curved path changes to a straight path.
|
Tip
The "peek-a-boo" mouse pointer Captivate's ability to relocate mouse animation on the screen is a great feature. What if you don't need the mouse to be visible in a slide? How do you align a changed mouse movement to avoid having the mouse disappear and "magically" reappear at another screen location as you move to the previous or next slide? There will be occasions where a moving pointer is unnecessary. For example, you may record a movie and discover the narration is more important than watching the pointer move. In this situation, you can hide the pointer in a particular slideor in the entire movie. To hide the pointer 1. | In the Edit View panel, open a slide with mouse movement.
| 2. | Open the Mouse Properties dialog box and deselect Show Mouse Pointer.
The check mark beside the Show Mouse menu item tells you the mouse is visible. Deselect the check mark, and the mouse is gone in that frame.
| 3. | In the Mouse Properties dialog box, deselecting Show mouse pointer and selecting "Apply changes to all slides" will hide the mouse for the entire movie.
|
If you reposition a mouse animation, you will discover that manually positioning the mouse to line up with the exact location in the previous or next slide is virtually impossible. To align your pointer 1. | Right-click the pointer to open the context menu.
| 2. | Depending upon your need, select Align to Previous Frame or Align to Next Frame (Figure 2.38).
Figure 2.38. Changes in a mouse path can be reflected in the frames on either side of the mouse path. 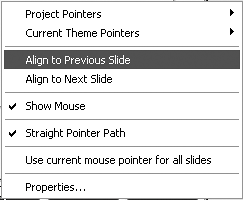
|
|