| Exporting a movie into Microsoft Word is one of those features that, when you first encounter it, makes you ask, "Why?" Then you discover how invaluable it is. When a movie is exported to Word, each frame of the document is placed, if you choose, on a separate Word page. Then it occurs to you, especially if you use PowerPoint, this is a great way of generating speaker notes or handouts. To export your movie to a Word file 1. | Open a Captivate movie and select File > Publish.
The Publish Options dialog box opens.
| 2. | Select Handouts from the list on the left side of the Publish Options dialog box.
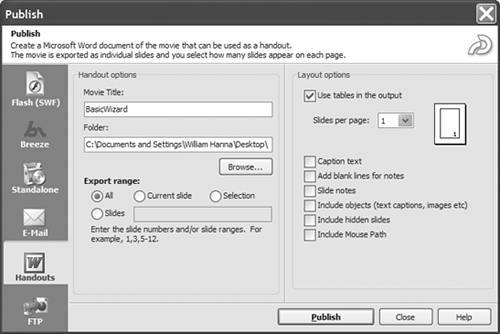
You will notice the Publish Options dialog box splits into two areas (Figure 13.11). The "Export range" area, on the left, is where you decide which slides will be sent to Word. The area on the right, "Layout options," determines how the Word document is formatted.
Figure 13.11. You can export handouts and speaker notes to Microsoft Word. 
| 3. | In the "Export range" area, select which slides of the movie are to be exported. Your choices are:
- All Select to send all of the slides in the movie to Word.
- Current slide Select to send only the currently open slide to Word.
- Selection Select to send only the objects selected on the frame to Word.
- Slides Enter a range of slides to be sent to Word. Use the form of comma-separated slide numbers (for example: 1, 2, 3, 4) and slide ranges (for example: 1-4). You can also mix them (for example: 1-4, 6, 9, 12, 21).
| 4. | In the "Layout options" area, enter the number of slides to be printed on each page of the Word document.
The icon at the side changes to show you how the slides will be placed on the page.
| 5. | Select "Caption text" to include any captions in the document.
This option actually moves the captions from the frame and prints them under the frame in the Word document.
| 6. | Select "Add blank lines for notes" if the document is to be used as a handout.
This option adds four lines, which can be used for notes, under each frame in the document.
| 7. | Select "Slide notes" to include notes, such as talking points, to the presenter.
Generally, the user does not see these notes.
| 8. | Select "Include objects (text captions, images etc)" to include all of the objects in the selected slides.
| 9. | Select "Include hidden slides" to include any slides you may have hidden in the movie.
| 10. | Select "Include Mouse Path" to show the mouse path in frames with mouse movement.
| 11. | Click the Publish button.
The Exporting Frames progress window appears.
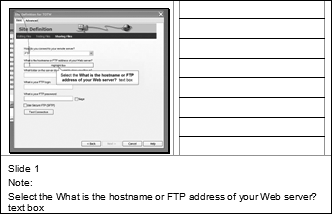
| 12. | When the publish process is complete, open the Word document in Microsoft Word (Figure 13.12).
Figure 13.12. A handout with speaker notes in Microsoft Word. 
|
|

