Captivate movies can be uploaded directly to a Web site using the application's FTP feature. You can use this handy feature for such purposes as:
This isn't to suggest that you should abandon such FTP applications as WS_FTP LE or WS_FTP Pro. An FTP capability is also built into Dreamweaver MX, and developers can choose whether to let Captivate do the upload or to use their third-party software.
1. | Open a Captivate Movie and select File > Publish.
The Publish dialog box opens.
|
2. | Select FTP from the list on the left side of the dialog box.
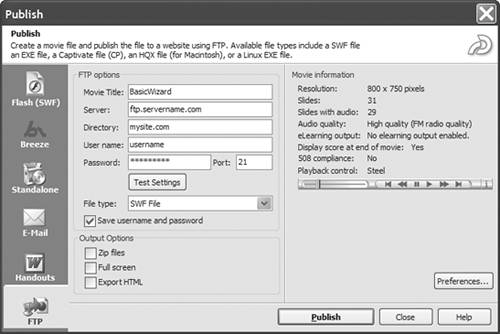
The "FTP options" dialog box opens (Figure 13.10).
Figure 13.10. You can export files to a Web server using FTP. 
|
3. | Enter a name for the file.
|
4. | Enter the server name. If you are unsure of this step, contact your Internet Service Provider (ISP).
|
5. | Enter the name of the directory on the server where the files will be placed.
|
6. | Enter your login name for the FTP site.
|
7. | Enter the password used for access to the FTP site.
|
8. | Enter the port number; the standard default port is 21. If you are unsure of what to enter, contact your network administrator or ISP.
|
9. | Click the Test Settings button.
Captivate attempts to connect to your server using the information you entered. You are notified if the connection was successful or not. If it wasn't successful, review your entries carefully to ensure there are no spelling errors, especially in situations where the username and password are case-sensitive. Also check with your ISP to ensure you are using the correct port number.
If you are a Dreamweaver MX 2004 user, you are familiar with this dialog box. The great thing about testing the connection is you will have to do it only once. If the connection is successful, Captivate will remember the information and use it for all subsequent uploads to that FTP site.
|
10. | In the "File type" pop-down list, select the Captivate file type.
|
11. | Select "Save username and password" to have Captivate remember your FTP login information for future ftp uploads.
|
12. | To have the file treated as a download from the server, select "Zip files."
|
13. | To have the file appear in a Web page, select Export HTML.
|
14. | To have the movie play full screen, select "Full screen."
Note that when it comes to publishing for Web playback, "full screen" means that the SWF will fill the content area of the browser window.
|
15. | Click the Publish button.
Two things happen. First, the SWF or EXE file is generated. When that finishes, you are shown the progress of the FTP upload. When the upload is finished, the dialog box closes and you are returned to the application.
|
