Understanding the Captivate View Panels
| The Captivate work environment is divided into three major view panels. They are the Start, Storyboard and View panels. This is a rather handy way of approaching your workflow because each panel contains only those tasks, relevant to the panel. For instance, the Start panel is only used to open new or existing projects. The Edit panel, where you will spend the bulk of your development time, is where individual slides can change. This would include the addition of such items as sound, object timing and the addition or deletion of captions. The Start panelWhen you launch Captivate, the first panel you will see is the Start panel (Figure 1.2), which is commonly referred to as the Start page. This is your entry into the movie-creation and editing process, and enables you to choose a number of tasks ranging from creating a new movie to adding a number of features to individual slides of an existing movie. Figure 1.2. Captivate's Start panel lets you get right to work. You can choose to open a movie you have been working on or another Captivate file (A). Also, you can record a new movie (B), create a MenuBuilder project, or use a template to create a new movie (B). Finally, you can work your way through a series of tutorials (C) or directly access the Captivate area of the Macromedia site (D).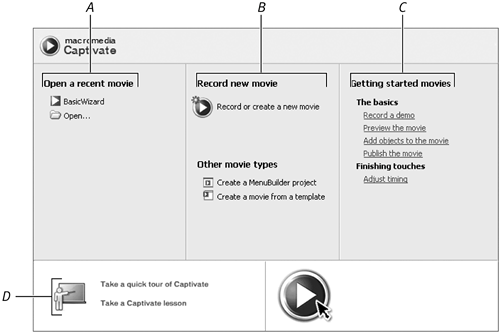 The Start page is modeled on the Start pages that are common to many Macromedia applications. This is where you can decide to create a new movie, open an existing movie, open a template, or launch MenuBuilder. On the left side of the panel is a listing of the recent movies that have been created. Click a movie in this section to open it. In the center of the Start page, you can choose to create a new movie, create a new MenuBuilder project, or open a template you've created. The right side of the page contains links to a series of tutorials that were added when you installed Captivate. The lower left corner enables you to explore the new features of Captivate, while the lower right corner is reserved for announcements from Macromedia. This functions in exactly the same manner as the other Macromedia applications and is a "one-click" method of obtaining product updates and so on. The Storyboard View panelWhen you open a movie, you will most likely find yourself in the Storyboard View panel. This panel replaces the Frames View panel of RoboDemo and is available only when you open a movie. Each slide of the movie is presented in Thumbnail view, which is invaluable in giving you an idea of how your movie flows. It is also quite robust. Here are just a few of the tasks you can accomplish in the Storyboard View panel:
On the left side of the Storyboard View panel are a number of Slide tasks ranging from adding audio to a slide to changing a slide's properties. At the bottom of this area is the Movie Information section at the bottom of the Tasks panel, which displays basic information like the size of the movie and how many slides are in it (Figure 1.3). Figure 1.3. The Storyboard View panel is quite robust. You can perform a number of tasks (A), from adding audio to a slide to changing a slide's properties. The slides are visible in Thumbnail view (B), and the Movie Information (C) provides you with information including the size of the movie to how many slides are in it.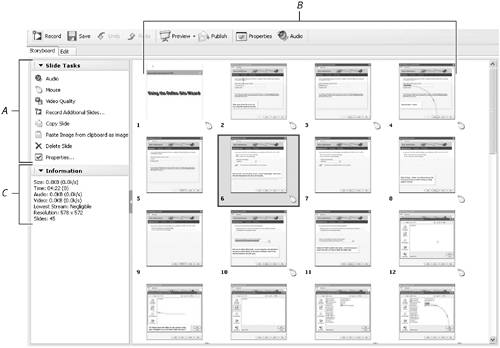 The Edit View panelThe final panel is the Edit View panel. You will soon discover that you will be spending most of your time here, for this is where you edit or modify slides by adding images, captions, and interactivity to your movie. Double-clicking a slide in the Storyboard View panel or clicking the Edit tab opens this panel. At the top of the Edit View panel is the new Timeline feature of Captivate. The Timeline enables you to control the timing and duration of a number of objects in the slide. On the right side of the panel is the Advanced toolbar. The left side displays the Filmstrip, which shows all of the slides of a movie even when you are editing a single slide (Figure 1.4). Figure 1.4. The Edit View panel is where you do your work in Captivate. Selecting a frame in the Filmstrip (A) opens the contents of the frame (B), which you can edit.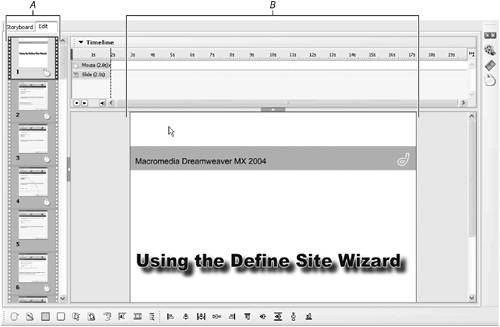
|
EAN: N/A
Pages: 130