Offering Windows File Sharing Service
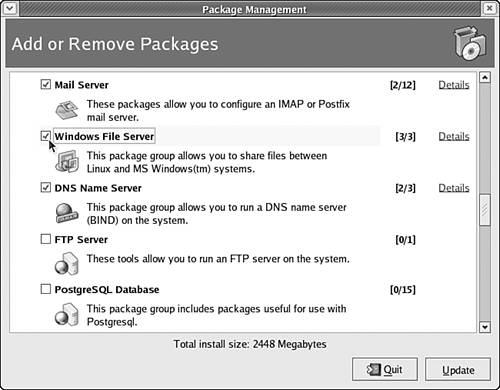
| Fedora Core 4 includes software that enables your Linux computer to share files with Windows computers on your network. This software is often referred to by its proper name, Samba, or by the type of high-level protocol it usesServer Message Blocks, or SMB. The Windows file server is not installed by default in Fedora Core 4 unless you chose the Server installation option when you were installing Fedora Core 4 on your computer. Activating your Windows file server is therefore a matter of several steps:
Installing Windows File Sharing ServiceTo ensure that the Windows file server is installed or to install it if it hasn't already been installed, follow these steps:
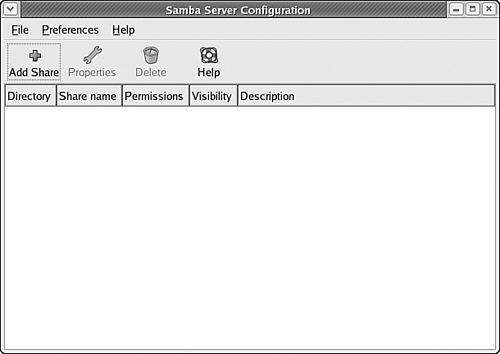
The Windows file server and related tools should now be installed on your system and ready for use. Starting the Samba Server Configuration ToolThe Samba Server Configuration tool is used to provide Fedora Core 4 with details about which files and directories should be made available to other Windows hosts on your network. To start the Samba Server Configuration tool, choose Desktop, System Settings, Server Settings, Samba. The Samba Server Configuration tool appears, as shown in Figure 33.7. Figure 33.7. The Samba Server Configuration tool tells Fedora Core 4 which files and directories you want to share.
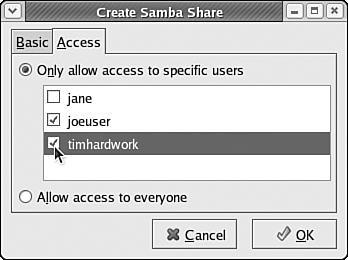
Deciding on a Security ModelYou can choose to give access to Windows file sharing users in two ways for a given shared folder or set of files:
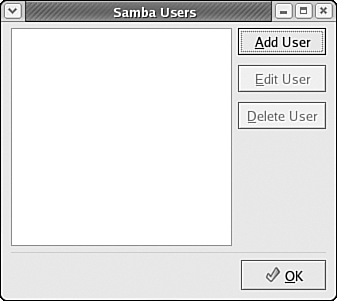
You can use a combination of these two paradigms, giving complete public access to some shared files or directories, while restricting other shared files or folders to a select list of users. Creating a Samba User ListTo limit access to shared files or directories on a per-user basis, you must create and maintain a list of Samba users on your Fedora Core 4 system. To edit the list of Samba users, choose Preferences, Samba Users from the Samba Server Configuration tool's menu bar. The Samba Users dialog box is displayed, as shown in Figure 33.8. Figure 33.8. Using the Samba Users dialog box, you can maintain the list of users given access to Samba shares.
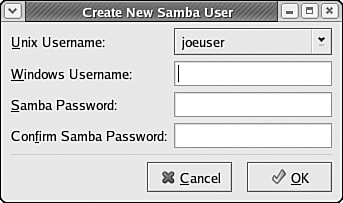
To add a new user to this list of users, click the Add User button on the right side of the dialog box. Another dialog box, labeled Create New Samba User, is displayed, as shown in Figure 33.9. Figure 33.9. Using the Create New Samba User dialog box, you can create a new Samba user, linking a Fedora Core 4 user account to a remote Windows system account.
Follow these steps to fill out the fields in the Create New Samba User dialog box:
Repeat these steps for each Fedora Core 4 user who needs to be given access to Fedora Core 4 files while using remote Windows computers. After you finish editing the user list, click OK to close the Samba Users dialog box and save your changes.
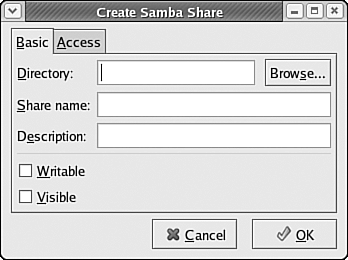
Creating Windows SharesWindows networking makes files and directories available in units known as shares. To create a new share that will be made available from your Fedora Core 4 system, choose File, Add Share or click the Add button near the top of the Samba Server Configuration tool window. The Create Samba Share dialog box is displayed, as shown in Figure 33.10. Figure 33.10. The Create Samba Share dialog box helps you to create new shares that will be made available from your Fedora Core 4 computer.
To add a share in the Create Samba Share dialog box, follow these steps:
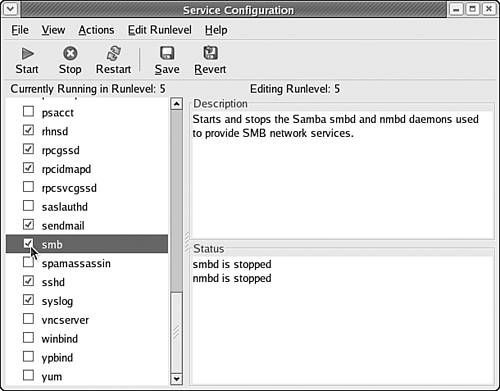
Repeat this process for each share that you need to create. After you finish creating all the shares you need, choose File, Quit or click the Close button near the upper right of the application window to save your changes. Starting and Autostarting Windows File ServiceTo start the Windows file server from your desktop after you configure it, choose Desktop, Server Settings, Services to display the Service Configuration tool. Select the smb service; then click the Start button near the top of the application window, as shown in Figure 33.12. Figure 33.12. To start Windows file sharing, select the smb service and click Start. To cause the service to start each time Fedora Core 4 starts, check the box next to smb.
To cause Windows file sharing to start each time Fedora Core 4 starts, check the box next to the smb service, then click Save, and then choose File, Quit to exit the Services Configuration tool. From the command line, you can start Windows file sharing by using the service command you learned about in Chapter 28: [root@workstation20 you]$ /sbin/service smb start [root@workstation20 you]$ You can configure the Windows file server to start automatically for your default runlevel by using the chkconfig command at the command line along with the --level option, supplying smb and the word on as arguments: [root@workstation20 you]# /sbin/chkconfig --level 5 smb on [root@workstation20 you]# Allowing Windows File Service Through Your FirewallAlthough your Windows file server is now fully configured and running, users on your network cannot access your Windows shares until you tell the firewall to allow Windows file service traffic. To enable Windows file service traffic, start the Security Level Configuration tool by choosing Desktop, System Settings, Security Level. Configure your firewall as usual but enter the following additional ports into the Other Ports entry box at the bottom of the tool: 137:tcp,137:udp,138:tcp,138:udp,139:tcp,139:udp Once again, be sure to enter these ports as well as any other special ports you configured for your firewall because each time you run the Security Level Configuration tool, it replaces the previous settings instead of augmenting them. After you configure your firewall, click the OK button to save and activate your firewall settings and close the Security Level Configuration tool. |
EAN: 2147483647
Pages: 311
- Key #1: Delight Your Customers with Speed and Quality
- Key #3: Work Together for Maximum Gain
- Beyond the Basics: The Five Laws of Lean Six Sigma
- Making Improvements That Last: An Illustrated Guide to DMAIC and the Lean Six Sigma Toolkit
- The Experience of Making Improvements: What Its Like to Work on Lean Six Sigma Projects
