Offering Network File System Service
| The Network File System (NFS) is the de facto standard for file system sharing among Linux and Unix computers. Although other Unix standards for file system sharing offer more security-oriented features or provide better network performance, NFS remains the most widely supported file system sharing service in the Unix world. The NFS Server Configuration tool is not installed by default in Fedora Core 4 unless you chose the Server installation option when you were installing Fedora Core 4 on your computer. Activating your NFS therefore involves the following steps:
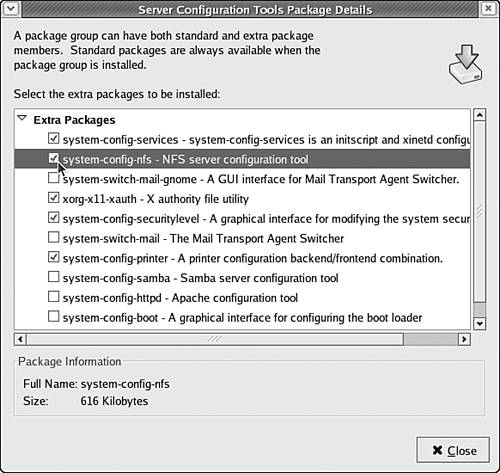
Installing the NFS Server Configuration toolTo install the NFS Server Configuration tool so that you can configure NFS on your system, follow these steps:
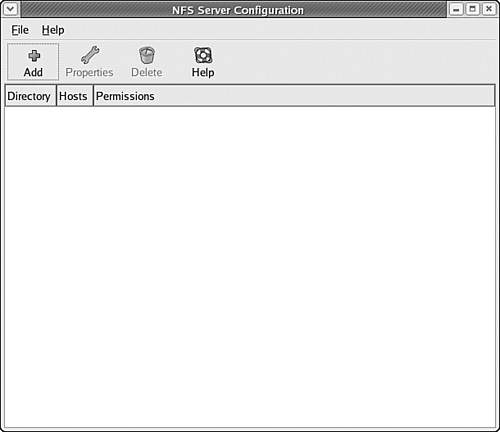
The NFS Server Configuration tool is now installed on your Fedora Core 4 system and is ready to be used. Adding and Configuring NFS SharesBefore you can enable the NFS service, you must configure it so that only the parts of your file system you choose to share are available on the network. You can configure your NFS service in two ways: by using the NFS Server Configuration tool on your desktop or by editing the NFS server configuration files directory with a text editor. You can start the NFS Server Configuration tool, shown in Figure 33.2, by choosing Desktop, System Settings, Server Settings, NFS from the desktop menubar. Figure 33.2. The NFS Server Configuration tool is used to configure your Fedora Core 4 system for the Network File System.
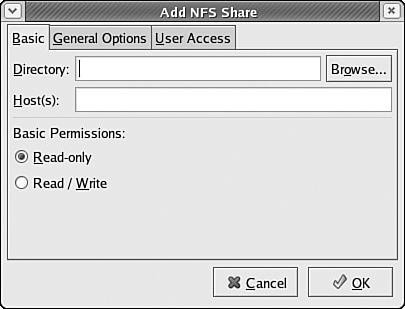
To add an NFS share (a directory tree in your file system that other Linux or Unix users can access), choose File, Add Share or click the Add button near the top of the application window. The Add NFS Share dialog box is displayed, as shown in Figure 33.3. Figure 33.3. Using the Add NFS Share dialog box, you can add to the list of file system trees that are available to network users.
Enter the name of the directory tree you want to share with other users into the Directory entry box. All the directory tree's contents are available to other users via NFS after you share it. In the Host(s) entry box, you must enter a host or set of hosts on your network that are allowed to use this shared file system. Hosts can be specified in several ways:
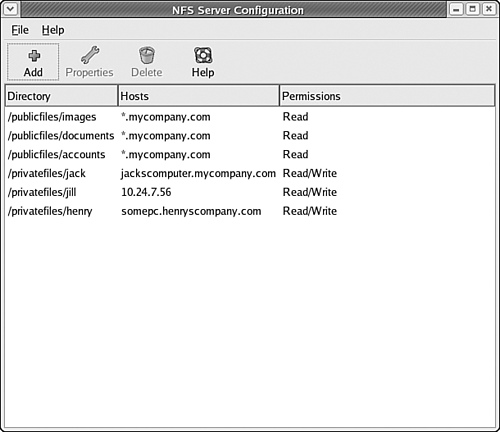
*.mycompany.com Set the Basic Permissions option to suit your needs. If you want users to be able to read or write to files, select Read/Write; otherwise, select Read-only. Note that Linux file system permissions still apply, even when a directory tree is shared as read/write; users still are prevented from accessing files they don't have permission to access. After you fill out the Basic tab, click the OK button to dismiss the Add NFS Share dialog box and add the directory tree to the list of shared file systems. The new shared directory tree appears in the list of shared directories in the NFS Server Configuration tool, as shown in Figure 33.4. Figure 33.4. After you enter share details into the Add NFS Share dialog box, the directory tree appears in the NFS Server Configuration tool.
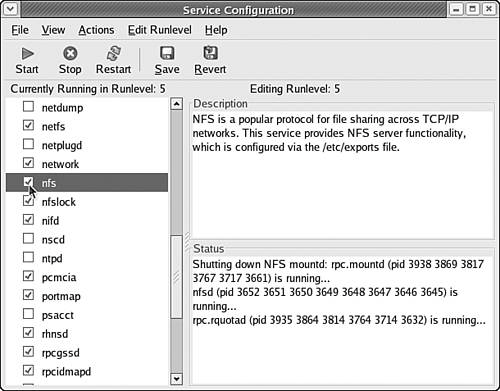
Repeat the process as many times as necessary to add other directory trees you want to share on your network. After your list of shared directory trees is complete, you can close the configuration tool window by clicking on the Close Window button or by choosing File, Quit from the application menu. Starting NFS Automatically via the DesktopTo cause the NFS service to start automatically each time your computer is started using the list of shares you created, you must enable NFS in the list of services that are associated with your default runlevel. To enable NFS, choose Desktop, System Settings, Server Settings, Services to launch the Service Configuration tool. In the Service Configuration tool, ensure that the nfs service is checked, as shown in Figure 33.5. Figure 33.5. Using the Service Configuration tool, you can specify that the NFS service should start automatically.
If the nfs service is not checked, check it now to indicate that NFS should be started when your computer starts. After you enable the service, click Save to save your changes. Then choose File, Quit to exit the tool. Configuring NFS at the Command LineThe NFS service can also be configured from the command line, if you are more comfortable editing configuration files directly. The NFS service is controlled by the /etc/exports file, which is a text file listing the directory trees to be shared, one per line. To configure your NFS service, simply load the /etc/exports file into your favorite text editor and edit it. The format of each line in the /etc/exports file is as follows: /directorytree host(access) Replace /directorytree with the directory tree that should be shared, host with the host or set of hosts to share using the same format given in the "Adding and Configuring NFS Shares" section earlier this chapter, and access with either ro for read-only access or rw for read/write access. For example, to share /home/you with all the hosts directly in the mycompany.com domain, giving read-only access to the file system, enter the following line into the /etc/exports file: /home/you *.mycompany.com(ro) To also share /publicfiles/august with read/write access to all the machines on the 10.2.4 subnetwork and /tmp with read/write access to a host called barney, enter the following lines into the /etc/exports file: /publicfiles/august 10.2.4.0/255.255.255.0(rw) /tmp barney.mycompany.com(rw) Enter a line for each directory tree you want to share into the /etc/exports file. When you finish editing the file, save it and exit the text editor. If you are not already running the NFS service and want to start it immediately based on your new settings, call the service command with the nfs and start arguments: [root@workstation20 you]# /sbin/service nfs start Starting NFS services: [ OK ] Starting NFS quotas: [ OK ] Starting NFS daemon: [ OK ] Starting NFS mountd: [ OK ] [root@workstation20 you]#
As the service command starts the NFS server, you should see four progress messages, each followed by the word OK in brackets. If instead at some point you see FAILED, check your /etc/exports file to make sure that you have formatted it correctly and check your system log for diagnostic information the NFS service is returning. For further help with the format of /etc/exports, see the exports manual page. Consider also consulting your Linux system logs. For details on how to do this, refer to Chapter 29. Starting NFS Automatically via the Command LineYou can use the chkconfig command at the command line to cause the NFS service to start automatically each time you start your computer. To cause NFS to automatically start for a specific runlevel, supply the --level option and the runlevel you want to use with NFS: [root@workstation20 you]# /sbin/chkconfig --level 5 nfs on [root@workstation20 you]# After you use the chkconfig command to enable NFS, NFS automatically starts each time you boot. Allowing NFS Through Your FirewallEven if you have correctly configured NFS and started the NFS service, you cannot share files with other Linux or Unix users unless you instruct the Linux firewall to allow NFS traffic to be processed. The mechanism NFS uses to mount shared directory trees is actually quite complex and thus requires both tcp and udp access to ports 111, 369, and 2049. These numbers correspond to the sunrpc, rpc2portmap, and nfs services in the /etc/services file, respectively.
To allow NFS requests to reach your Linux system, you must lower your firewalling security level to Medium and then create special filtering exceptions for these ports. To do this, start the Security Level Configuration tool by choosing Desktop, System Settings, Security Level. Check the Customize option, and enter the following list of ports into the Other Ports entry box: 111:tcp,111:udp,369:tcp,369:udp,2049:tcp,2049:udp If you previously allowed traffic on other ports or for other services using the Security Level Configuration tool, don't forget to enter them again, too: The settings you're entering now replace the previous security level settings, not augment them. After you finish with the Security Level Configuration tool, click the OK button to accept, save, and activate your changes. Remote users should now be able to mount your shared NFS directory trees without problems. |
EAN: 2147483647
Pages: 311
