Navigating InfoView
|
| < Day Day Up > |
|
Immediately when you open InfoView, you see the difference in graphics between InfoView versions 6.0 and 2.7. The new icons are slick and replace what previously had been plain-text menus. The Top bar displays a “skin” that you can modify from three other default skins. Items such as Corporate Documents that used to appear along the Navigation bar on the left are now nicely displayed in both the Home page and links along the bottom of each list page. Previously, if you customized My InfoView, this became your default start page and replaced the Welcome page. With version 6.0, you continue to have access to the default Home page or the customized My InfoView.
The workflow for a number of actions has been greatly improved, making them more logical and requiring fewer steps. For example, notice that Inbox documents (documents that BCA or other users have sent to you) now appear under Personal Documents, rather than as a separate menu. Under New Document, you can either create a new document or select Add A Document, replacing the former Upload menu from the Top bar.
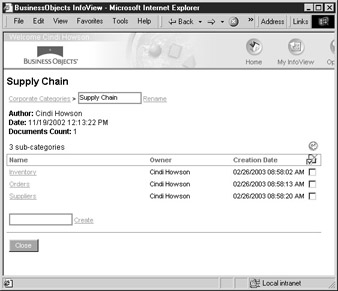
The initial list of Corporate Documents makes better use of Categories. As shown in Figure 24-1, subcategories are new to version 6.0, allowing companies with hundreds of standard reports to better organize their documents. There is no limit to the number of subcategories you can create.
In the Top bar, two new buttons, Help and Logout, are more prominently displayed and available within all InfoView pages.
Options
As with the previous version, there are still some Options that you should customize before you begin accessing the lists and documents. To modify any of the following options, select Options from the Top bar.
Display Options
From the Display page, you can specify your default start page, skins, and My InfoView settings. Skins are sets of graphic images and styles that change the appearance of the toolbars and buttons. For example, compare the default skin Sky Blue in Figure 24-1 with the following Top bar that uses a different skin, Midnight Blue. The WebI administrator can create and customize skins to display a corporate logo or corporate color scheme.
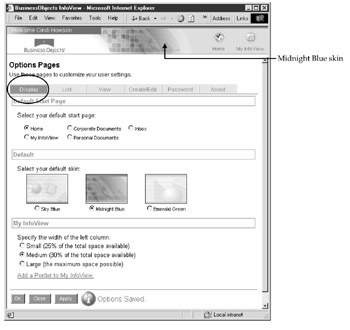
From the display page, you set the size of the left frame in My InfoView. By default, this frame contains a list of personal documents. You can set the size of the frame to small, medium, or large. The radio button Large sets the document list as large as possible, depending on what information appears to the right of the personal document list. You customize My InfoView by adding portlets to the page. Portlets are mini–portal windows that allow you to display different content within the My InfoView page. A portlet can be another web site, which you add via this page, or a document, which you add while viewing My InfoView. Previously, My InfoView was limited to four blocks within a page. With the portlet approach, the limit is what fits into the display area. This new approach provides greater flexibility over the previous block approach. With the portlets, you reorganize the layout while you are in My InfoView, not via the Options page.
You add additional document lists to My InfoView by clicking the link Add To My InfoView while viewing a particular list. Likewise, you display a document in My InfoView by selecting Add To My InfoView while viewing the document. For example, to add the list of Corporate Documents, Marketing Category to My InfoView
-
From the Home page, select the category Marketing under Corporate Documents.
-
While viewing the documents in the Marketing category, click the hyperlink Add To My InfoView.
-
My InfoView appears with the newly added list of documents.
View Options
The View Options page, shown in Figure 24-2, allows you to select the format for viewing a WebI document, actions when drilling within a WebI document, or how to view a BusinessObjects full-client document.
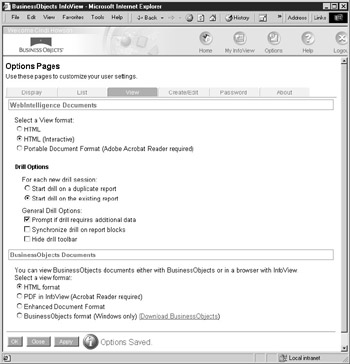
Figure 24-2: View options
InfoView version 6.0 provides some additional functionality when viewing a WebI document, such as sorting and filtering data. Previously, you could sort and filter data only by editing the document and launching WebI. In Version 6.0, when you select HTML (Interactive), you can sort and filter data directly from within InfoView, without having to launch WebI to edit the document. The BusinessObjects Supervisor can remove or enable this specific functionality through permissions.
Version 6.0 documents can now have multiple blocks and multiple reports within one document, introducing new view options when you drill. Similar to the full client, you now have options to specify if you want to
-
Create a duplicate report when you start drilling. With this option, the filters and display in the original report are preserved and WebI inserts a new report tab.
-
Drill within the existing report, without inserting a new report tab.
The General Drill options determine what happens once you have initiated a drill session. These options are described in the following table:
| Option | Explanation |
|---|---|
| Prompt if drill requires additional data | If a drill will launch a new query (when the additional details do not exist in the microcube), you are prompted before the query executes. |
| Synchronize drill on report blocks | Unique to WebI 6.0 is the ability to synchronize the drill actions in multiblock reports, set under the General Drill Options. For example, if your report has both a chart and a table, when you drill within the chart, the same drill actions apply in the table. If you drill from wine color red in a table to varietal, the detailed varietals will be displayed in both the chart and the table. If the drill is not synchronized, then the table will display the varietal details but the chart will continue to display the wine colors. |
| Hide drill toolbar | Previously, the only way to hide the drill toolbar from the report view was to end the drill session. Now, you can hide the drill toolbar, yet still have the drill actions within a block, either via hyperlinks, drill-up arrows, or pop-up menus. |
The View options for full-client BusinessObjects documents are unchanged and explained in Chapter 23. To modify the View options:
-
Select Options from the main toolbar.
-
Click the View tab.
-
Select the desired options.
-
Click Apply at the bottom of the page. InfoView displays the status at the bottom of the page, “Options Saved.” The new settings become effective only if you receive this confirmation message. You also can click OK to apply the changes and return immediately to the Home or Start page.
The About Page
About is a new page that lets you load server defaults, restoring your options to the initial settings. If you are a General Supervisor or BusinessObjects Administrator, the About page also lets you set the options as server defaults for new users. Users can continue to override these options, but this page allows you to modify their initial settings. The About page also displays the installed products and version information.
Document Lists
From the Home page, you access the different list of documents. You can access a list by clicking the icon or clicking the hyperlink. From the Home page, you navigate corporate documents by categories or subcategories. The category and subcategory names that appear on this page are ones that contain documents for which you have permission. Empty categories do not appear on this page.
If you want to view a list of corporate documents independent of their category assignment:
-
From the Home page, click the Corporate Documents hyperlink or button.
-
InfoView displays the Corporate Documents page. In addition to the categories that were displayed on the Home page, you now have two new hyperlinks: All Documents and Uncategorized Documents.
-
Select All Documents to display a full list of corporate documents to which you have access.
Note If you have customized your list of Corporate Documents to access a specific category directly, click the hyperlink Corporate Documents next to the specific category to see all the categories.
From within Corporate Documents, you can display a list of categories in a frame on the left, as shown in Figure 24-3. Click the Show Column button, in the upper-left corner, to show or hide the Categories list. This button acts as a toggle and becomes a Hide Column button when the category list is displayed. Having the categories continually displayed allows you to more quickly navigate from one category’s list to another’s.
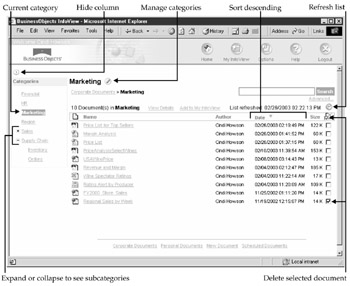
Figure 24-3: Corporate Document list
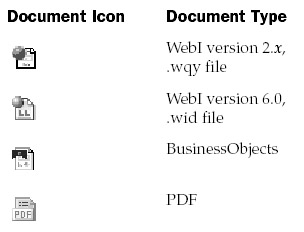
Notice in Figure 24-3 that some of the document icons have changed. WebI 6.0 uses a different file format, icon, and extension than WebI 2.x. When you view/edit a WebI 2.x document, WebI 6.0 dynamically converts it to the new format. You can then choose to save the file in the new format, or if you do modify the file, to leave it in the old format. Both copies and versions remain on the server. You must explicitly delete the old version once you have converted a document to version 6.0. The following table shows the icons for the different file formats. The file format for BusinessObjects documents (.rep) has not changed, so both versions 5.x and 6.x documents show the same icon.
The list of available Corporate Documents can change frequently if report authors publish new documents throughout the day. Your list may be updated
-
Every time you access the list
-
Only when you first access the list
-
When you specifically select Refresh List
You specify whether or not the list is updated on the first visit or each visit through Options | Lists. If your options are set to refresh the list only upon the first viewing of Corporate Documents, the list is maintained in a server cache. When a report author publishes a new report, click Refresh List to see the new document.
As with the previous version, you can sort any list by document name, author, date, and size. To sort the list by one of these columns, click the column name, not the triangle next to the name. An upward-pointing triangle appears next to the column heading. To change the sort order to descending, click the column heading again; the triangle points down. In Figure 24-3, the documents are sorted descending by Date.
To delete a document, check the box in the rightmost column, then click Delete Selected Document(s).
Search
The Search box searches the entire document name. For example, a Search on Margin finds:
-
Margin Analysis
-
Gross margin by product
-
Revenue and Margin

Clicking the Advanced hyperlink below the Search button allows you to specify additional search criteria such as the document list to search within, keyword, author/ sender, and date. The Search Document(s) page in version 6.0 is similar to that of WebI 2.x, shown in Figure 23-7 in Chapter 23.
Categories
Categories allow you to organize documents into meaningful groups and provide an additional filtering mechanism for what otherwise may be an overwhelmingly long list of documents. For categories to be effective:
-
Users and/or the administrator must define meaningful categories.
-
Report authors must associate a document with a category when saving, publishing, or uploading a document.
Tip The ability to display a list of uncategorized documents is new in Version 6.0. The administrator or support personnel should periodically view this list to ensure all documents are assigned to at least one category.
One document can be assigned to multiple categories or subcategories. New in version 6.0 is the ability to create multiple levels of subcategories. The Categories page also provides useful information such as who created the category and the number of documents associated with a category.
To create or modify a subcategory:
-
Display Corporate Documents.
-
Click Manage Categories.
-
InfoView displays a list of Corporate Categories. To add a new category, enter a category name in the bottom text box and click Create. To add a subcategory, click the main category. In the following screen, Supply Chain is the main category; Inventory, Orders, and Suppliers are the subcategories. Enter the new subcategory in the box—for example, Swaps.
-
Click Create. InfoView confirms that the “Category was successfully created.”
-
You can continue to add more categories or click Close to return to the list of corporate documents.
Tip Close is a nifty new button at the bottom of most pages. Previously, the only way to cancel your settings was to click the browser’s Back button, which may have brought you back too far. The Close button closes the current page without saving your changes and nicely returns you to the previous page.
Document Properties
The hyperlinks View List and View Details replace the Expand and Compact menu options. View Details changes the list to a two-column display that provides additional actions and details for each document. With View Details, you see keywords if they are available or the first few words of a description. To see the full description, click the Properties hyperlink beneath the document name, as shown in Figure 24-4.
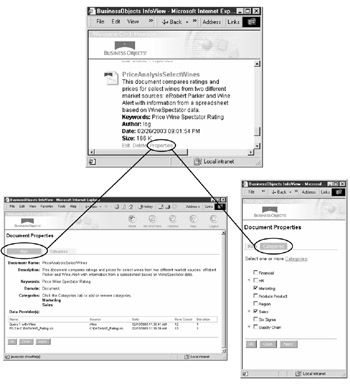
Figure 24-4: Document Properties
| Note | The Author displayed in the Document Properties is the person who published the document to the Corporate Documents; it may not be the author who originally created the document as listed under File | Properties in BusinessObjects. |
The Document Properties page now has two tabs, Main and Categories. The Main page is unchanged from the previous version. You cannot modify the keywords or the description from this page. To make these modifications, you must edit and then resave the document. From the Categories tab, you can assign a document to additional categories by checking the appropriate boxes. If you click the Categories hyperlink at the top of the page, you also can create and modify categories and then reassign the document.
|
| < Day Day Up > |
|
EAN: 2147483647
Pages: 206