Putting Together a Secure Solution
In this section, we'll go over the steps required to put together the end-to-end Kerberos solution. The process might seem complex, but it isn't too bad. To make things a little easier, we've included checklists at the end of the this chapter; also, Chapter 11, "Troubleshooting Secure Solutions," discusses troubleshooting in detail.
NOTE
The companion CD includes a series of scripts that will automate some of the steps described in this chapter. The scripts are located in the end2end directory, beneath which is a series of subdirectories, one for each computer in the sample scenario. Not only do the scripts reduce the time it takes to configure the application, they also show you how you can use scripts for security administration, thereby augmenting the scripts described in Chapter 13, "Security Administration with ADSI, WMI, and COM+."
Figures 10-3, 10-4, and 10-5 show the results you should ultimately see in the browser when the solution is configured correctly. Note that it doesn't really matter what client operating system is being used, so long as the browser supports Basic or Kerberos authentication and the user has an account in Active Directory. Figure 10-3 illustrates Internet Explorer 5 running on Windows 2000 showing Alice's delegated identity, Figure 10-4 illustrates Internet Explorer running on a Pocket PC showing Alice's delegated identity, and Figure 10-5 illustrates Netscape Navigator running on Red Hat Linux 6.2 showing Alice's delegated identity.

Figure 10-3. Internet Explorer 5 showing Alice's delegated identity using Kerberos authentication.
The first reference to the user's name, shown in the browser, is the name determined by Internet Information Services (IIS) when the user is authenticated; the second reference is the user's name determined by SQL Server. If the two identities are the same, delegation is working correctly.

Figure 10-4. Pocket Internet Explorer on a Pocket PC showing Alice's delegated identity using Basic authentication.
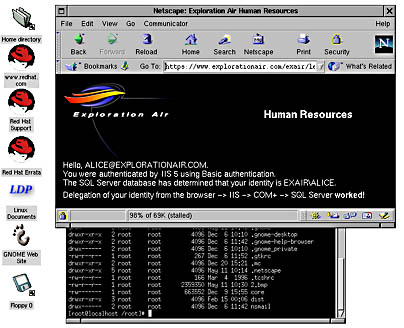
Figure 10-5. Netscape Navigator running on Red Hat Linux 6.2 and GNOME showing Alice's delegated identity using Basic authentication.
To build the example application with the least number of steps, we'll approach the task like so: configure the computers, the domain, the user accounts, and, finally, the application. Let's look at each step in detail. Technically, there are other ways to build the application, but this is the most straightforward.
Configure the Computers
The first step is to set aside four computers and install the appropriate operating systems onto each. To make this exercise easier, keep the machine names the same as outlined in this chapter. We'll use four computers, configured as described in Table 10-1.
Table 10-1. High-level configuration of the four computers used in our example.
| Computer NetBIOS Name | Operating System | IP Address | Comments |
|---|---|---|---|
| Cheryl-Laptop | Windows 2000 Professional | Determined by DHCP | This could be any operating system, so long as the browser can perform Basic authentication. The easiest solution is to use Internet Explorer 5 and Windows Integrated authentication. |
| WebServer | Windows 2000 Server or Advanced Server | Determined by DHCP | The Web server is IIS 5 configured to run Windows Integrated authentication or Basic authentication over SSL/TLS. |
| Middleware | Windows 2000 Server or Advanced Server | Determined by DHCP | This server is configured to run one or more COM+ Server applications. |
| DBServer | Windows 2000 Server or Advanced Server | 172.10.10.42 | This server runs SQL Server, and, for the purposes of our Server demonstration, it is also the Windows 2000 domain controller, the DNS server, the DHCP server, and the WINS server. |
Make sure you install IIS on the WebServer computer and DNS, DHCP, and WINS on DBServer.
Note that the IP addresses for all the computers, other than DBServer, are determined using DHCP because DBServer is the DHCP server. Once the computers are configured, you should be able to get IP addresses on reboot or by typing ipconfig /release and then ipconfig /renew at the command line.
CheckpointBefore continuing, check that you can ping all machines by using their IP addresses. If you can't, either DHCP is configured incorrectly or the computers are not configured to request an IP address from a DHCP server.
Now it's time to configure the domain settings.
Configure the Domain
On DBServer, which is the domain controller, run Dcpromo.exe and set up the computer as the domain controller for a new domain. When prompted, create a new domain tree and create a new forest of domain trees. The full DNS name for the domain is explorationair.com, and the NetBIOS name for the domain is EXAIR. If you are prompted to install a DNS server, do so.
Once the dcpromo tool has installed Active Directory and you've rebooted the server, you'll need to add the other computers, Cheryl-Laptop, Middleware, and WebServer, to the domain. You can do this with the Active Directory Users And Computers Microsoft Management Console (MMC) snap-in.
CheckpointBefore continuing, make sure you can ping all computers by using their NetBIOS and DNS names. You have a name resolution problem with the WINS server if NetBIOS name resolution fails or the DNS server if DNS name resolution fails.
CheckpointDouble-check that the net view command displays all shares on each computer. The computers might not have any shares, but you should not get any access denied errors.
With the Active Directory Users And Computers MMC snap-in, verify that WebServer and Middleware are both configured as Trusted For Delegation. Double-click the computer in question, and select the Trusted For Delegation check box. There's no need to do this for Cheryl-Laptop or DBServer because neither is delegating identity. You can use the SetDelg.js script on the companion CD to configure this option if you don't want to use the administrative tools. Figure 10-6 shows the Trust Computer For Delegation option.
Finally, Kerberos authentication is time-sensitive, so make sure the time is set correctly across all computers in the domain. You can achieve this by using the net time command. Times are synchronized correctly in Windows 2000 domains, but it's worth double-checking.

Figure 10-6. The Trust Computer For Delegation option in the Active Directory Users And Computers MMC snap-in.
Configure the Users
Now we need to add the sample users. All the users are domain accounts; none are local accounts, because Kerberos authentication works with domain accounts only. Think about it. For delegation to work, the accounts must be known on all computers, and only domain accounts are known on all computers. You can add users by using the Active Directory Users And Computers MMC snap-in, or the sample script AddUsers.js on the companion CD will automatically add the users for you. The settings for each account are described in Table 10-2.
Table 10-2. Sample domain user accounts and their settings.
| Account | Password | Trusted for Delegation? | Sensitive? | Password expires? |
|---|---|---|---|---|
| Alice | y14c&yWbR-A | No | No | Yes |
| Bob | y14c&yWbR-B | No | Yes | Yes |
| Cheryl | y14c&yWbR-C | No | No | Yes |
| AppAccount | y14c&yWbR-Z | Yes | No | No |
NOTE
Obviously, it's not a good idea to print passwords in a book! The passwords in Table 10-2 are intended as examples that are somewhat easy to remember. The phrase to remember for the passwords is, "Your ideas are clever and you will be rewarded." Refer to Appendix B, "Strong Passwords," in the companion CD's electronic book to see how we derived the passwords in Table 10-2. (For those of you who really need to know, the quote comes from a fortune cookie I got at a Chinese restaurant. It's currently taped to my laptop!)
You can look at the various Windows 2000 user account settings in Figures 3-12 and 3-13 in Chapter 3, "Windows 2000 Security Overview."
Alice, Bob, and Cheryl are normal user accounts. AppAccount is used as the process identity for IIS and the COM+ application. The account is marked as Trusted For Delegation because the IIS Web application process and the COM+ application must pass the caller's identity to another process or another computer. Give Alice, Bob, and Cheryl the rights to log on to Cheryl-Laptop. This step is not performed by the sample script.
Configure the Application
Three major parts of the application need configuring: the Web application that resides on WebServer, the COM+ application that resides on Middleware (and partially on WebServer), and the database that resides in SQL Server on DBServer. Let's focus on each.
The Web application
The Web application comprises a small number of Active Server Pages (ASP) pages that reside in a High Protection (Isolated) Web application—this is very important—named ExAirHR (Exploration Air Human Resources). Under the ExAirHR root lies another directory named Legacy. Legacy and ExAirHR use the same physical directory, C:\inetpub\wwwroot\exairhr, but ExAirHR requires Windows Integrated authentication and Legacy requires Basic authentication. The companion CD includes a tool named ExAirConfig.vbs that creates and configures these settings in IIS. You might need to adjust this script slightly if you installed IIS on a drive other than the C drive. The CD also contains all the ExAirHR Web application content in two files: default.asp and exair_logo.gif. Default.asp is simple: it merely calls a COM+ component on the Middleware server and presents the user with some information about the call. The most important information is the identity of the user as determined by SQL Server. If this identity matches the identity of the user accessing IIS, delegation has worked.
IMPORTANT
You can't use the Web server code just yet. You need to wait until the COM+ application and SQL Server database are configured.
NOTE
Actually, IIS does not call the COM+ application directly; instead, it calls a COM+ proxy, which in turn calls the COM+ application. We'll cover the steps required to configure the COM+ application later in this chapter in "The COM+ application."
A client using Internet Explorer 5 or later can browse to HTTP://WebServer/ExAirHR. Other browsers that do not support Kerberos can browse to HTTP://WebServer/ExAirHR/Legacy or HTTPS://WebServer/ExAirHR/Legacy, depending on whether you require SSL/TLS.
NOTE
If you plan to perform Basic authentication on the Internet, you must use SSL/TLS to protect the username and password in transit to the Web server.
Now that we've created the Web application content, we need to configure the Web application startup identity and set it to delegate callers' identities. By default, the process handling the client request will start as IWAM_machinename. However, this account is not trusted for delegation. We could give the IWAM_machinename account this capability, but that would mean every out-of-process application started by IIS could pass clients' identities to a remote computer. This is not a good idea; only specific applications that require this capability should execute using accounts with this setting. Failure to heed this advice could lead to security vulnerabilities.
We will therefore set our Web application to run as the AppAccount identity. You might remember that earlier we set this account to be trusted for delegation. You set the IIS application identity with the Component Services tool. Navigate to the IIS-{Default Web Site//Root/ExAirHR} COM+ application, as shown in Figure 10-7, set the Impersonation Level to the Delegate option and the process Account to EXAIR\AppAccount, and set the AppAccount password.
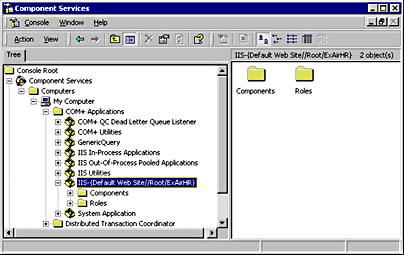
Figure 10-7. Navigating to the correct IIS out-of-process Web application by using the Component Services tool.
The two settings for the Web application in the Component Services tool are shown in Figures 10-8 and 10-9.
To make sure all settings are configured correctly and nothing is cached by IIS, enter net stop iisadmin /y and then net start w3svc at the command line. This will start and stop the Web server.
More configuration is necessary at the Web server: configuring a COM+ proxy to communicate with the COM+ application on Middleware. To install the proxy, you must install the COM+ component first, which is our next subject.

Figure 10-8. Setting the IIS application Impersonation Level to Delegate.

Figure 10-9. Setting the IIS identity to AppAccount.
The COM+ application
First we install the COM+ application on the Middleware server, and then we copy the COM+ proxy to WebServer. A COM+ proxy is a set of files containing registration information that allows a client to remotely access a COM+ server application. When run on a client computer, an application proxy file writes information about the server application—including CLSIDs, ProgIDs, the remote server name, and marshaling information—to the client computer. The client can then remotely access the server application. You can use the Component Services administrative tool to export a COM+ application proxy and simply run the resulting file on the client computer to set up the proxy.
The COM+ application is implemented as a dynamic-link library (DLL) written in Microsoft Visual Basic 6.0. The source code and binary files are included on the companion CD. The main file is named DBQuery.dll.
The general process for configuring the COM+ application used in our example is as follows:
- Add a new COM+ application to the COM+ catalog.
- Configure the security settings for the COM+ application.
- Configure the security settings for the Middleware computer.
- Export the COM+ application proxy.
- Import the COM+ application proxy into WebServer.
The first step is the same for any COM+ application—we need to create a new, but empty, COM+ application, like so:
- Start the Component Services tool.
- Navigate to Computers, My Computer, and then COM+ Applications.
- Right-click COM+ Applications, and click New; then click Application.
- Click Next when the COM Application Install Wizard starts.
- Click Create An Empty Application.
- Enter the name of the application, ExAirHR, and make sure that Server Application is selected. Click Next.
- Select the This User check box, and enter the application identity: EXAIR\AppAccount. The password is y14c&yWbR-Z.
- Click Next, and then click Finish.
The next step is to add COM+ roles to the application. To keep things simple, we'll allow all users to access the component.
- Select and right-click the Roles node under the ExAirHR application.
- Click New, and then click Role.
- Enter Everyone, and click OK.
- Right-click the Users node.
- Click New, and then click User.
- Double-click Everyone in the Select Users And Groups dialog box; click OK.
Now you need to add the DBQuery.dll component to the COM+ application:
- Select and right-click the Components node under ExAirHR application.
- Click New, and then click Component.
- Click Next when the COM Component Install Wizard starts.
- Click Install New Component(s).
- Locate the DBQuery.dll, and select it by clicking Open.
- Click Next, and then click Finish.
Now we need to set up some security settings on the application. Most notably, we need to enforce security checks, make the application support delegation, and allow everyone to launch this application.
- Select and right-click the ExAirHR application; then choose Properties from the context menu.
- Click the Security tab.
- Select the Enforce Access Checks For This Application check box.
- Choose Delegate from the Impersonation Level drop-down list box.
- Click OK.
- Right-click the DBQuery.GenericQuery component, and choose Properties from the context menu.
- Click the Security tab.
- Select the Enforce Component Level Access Checks check box.
- Select the Everyone Role check box.
- Click OK.
You also need to set the ACLs on the DBQuery.dll file so as to allow Everyone execute access.
The last step is to export the COM+ application proxy and load it onto the IIS server, WebServer:
- Select and right-click the ExAirHR application; then choose Export from the context menu.
- Click Next when the COM Application Export Wizard starts.
- Enter the name and location of the application file to be created. In this example, we'll save the file to the temporary directory and name the proxy ExAirHR.
- Click the Application Proxy option button.
- Click Next, and then click Finish.
Figure 10-10 shows what the COM Application Export wizard looks like.
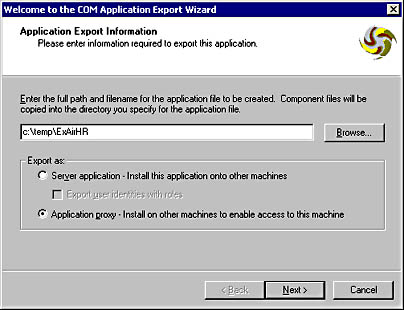
Figure 10-10. Exporting a COM+ Application proxy by using the COM Application Export wizard.
The Component Services tool has now created two files: a Windows Installer package named ExAirHR.msi and a Cabinet file named ExAirHR.msi.cab. Copy these files to a directory on the WebServer computer, and double-click ExAirHR.msi from the shell. When you double-click this file, you'll see the application proxy being automatically installed on the computer, as shown in Figure 10-11.

Figure 10-11. Installing a COM+ proxy on another computer.
At last, the COM+ application is installed on the Middleware server and the COM+ proxy is installed on the WebServer.
CheckpointYou should be able to invoke the COM+ component at the Middleware server from the same server with the following simple VBScript code:
Set o = CreateObject("DBQuery.GenericQuery")It won't do much, but you should see the ExAirHR COM+ application ball spin in the Component Services tool, showing that the component is activated. Stop the ball by right-clicking it and selecting Shut Down from the context menu. If all goes well, run the same code from WebServer. If you get no errors and the ball is spinning, give yourself a pat on the back. If things don't go so well, refer to the Middleware Server Settings checklist at the end of this chapter.
Now let's turn our attention to the final piece of this solution: the database.
The database application
Configuring SQL Server requires a small number of steps. First, the database server must be installed onto DBServer, and then you must create and populate a database with both data and a stored procedure. Next, you need to add logins to SQL Server and give the logins access to the database that was just created.
Regarding the installation of SQL Server, as we mentioned earlier we'll assume you know how to do this. Please make sure that you install the Named Pipes network library and make SQL Server run as LocalSystem.
IMPORTANT
Do not make SQL Server run as a non-LocalSystem account for this demonstration. If you do, you'll need to register a service principal name (SPN) for SQL Server. You can find out more about SPNs in Chapter 14, "An Introduction to Kerberos Authentication in Windows 2000."
Also make sure that SQL Server is configured to use Windows Integrated authentication rather than mixed authentication. Note that Windows Integrated authentication is the default configuration in SQL Server 2000. To check or set authentication in SQL Server, perform the following steps:
- Open the SQL Server Enterprise Manager.
- Right-click the database server in question—in this case, DBSERVER.
- Choose Properties from the context menu, and click the Security tab.
- Check the appropriate authentication radio button.
Once the database server is running, you need to create a database named ExAirHR. The most important part of the new database is a stored procedure named spGetCurrentUser. The syntax for this stored procedure is
CREATE PROCEDURE spGetCurrentUser AS select SUSER_SNAME() GO |
SUSER_SNAME() returns the user's login name. Feel free to add other tables if you want, but for the moment we're going to create only this stored procedure.
Next you need to add logins to the SQL Server database. We'll add only one login—EXAIR\Alice—who is permitted access to SQL Server, and the default database for her account is ExAirHR. Once the login is added, make Alice a valid user for the ExAirHR database:
- Right-click the database in question—in this case, ExAirHR.
- Select New from the context menu, and then select Database User.
- Select the Login Name and assign any appropriate role memberships. By default, all users in this example should be in the public role. The resulting dialog box will look like what's shown in Figure 10-12.
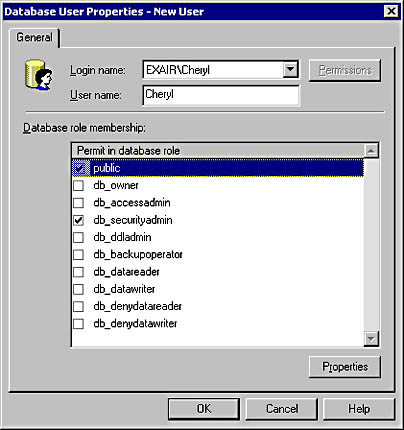
Figure 10-12. Adding users to a database.
Now add the execute permission to the spGetCurrentUser stored procedure. To do so, right-click the stored procedure, choose Properties from the context menu, and then click the Permissions button. Figure 10-13 shows what the permissions for spGetCurrentUser should look like.
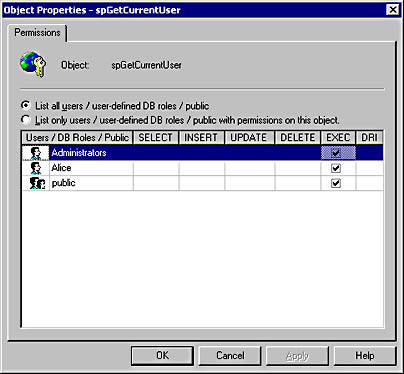
Figure 10-13. Permissions for the spGetCurrentUser stored procedure.
We've included a SQL script name ExAirHR.sql on the companion CD. You can load this into Query Analyzer to automate the setup of the database, including the data structures, the stored procedures, and the logins.
CheckpointBefore continuing, open the Query Analyzer and execute spGetCurrentUser. It should return one row of data containing your username.
All Done!
You should be all done now. You can test the application by opening the Web browser on Cheryl-Laptop and browsing to http://webserver/ExAirHR. If all goes well, you should see something like what's shown in Figure 10-5. If you decide to run SQL Server Profiler on DBServer, you should see something like what's shown in Figure 10-14.
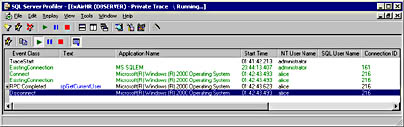
Figure 10-14. Using SQL Server Profiler to watch Alice's identity delegated to SQL Server.
Look at the NT User Name column; it says Alice. This shows that Alice's identity flowed from the browser to the Web server to a COM+ application and finally to SQL Server.
Delegation in SQL Server 7 and SQL Server 2000SQL Server 7 cannot delegate identity; however, SQL Server 2000 is aware of Kerberos and can delegate identity. Because of this, if a solution uses SQL Server 7, it must be the last server in the chain of Web, application, and database servers. Refer to Chapter 6 for more information about delegation in SQL Server 2000.
If things don't go well and you get some errors, refer to the configuration checklists at the end of this chapter, and then refer to the next chapter.
EAN: N/A
Pages: 138