IIS Authorization -- the Marriage of Windows 2000 Security and the Web
Windows 2000 uses access control lists to determine whether accounts are authorized to access resources. Because Internet Information Services is a service running on Windows 2000, and because it always authenticates and impersonates connections before accessing resources, it also uses ACLs. However, IIS also supports two other Web-specific authorization mechanisms: Web permissions and IP restrictions.
Web Permissions
Web permissions are a way of painting broad access permission to part of a Web space—for example, a Web site, virtual directory, directory, or file. They augment NTFS ACLs and can be used on non-NTFS volumes such as FAT disk partitions.
NOTE
FAT partitions are not recommended for use on secure Web servers because FAT does not support ACLs.
You can configure Web permissions on a Web location by performing the following steps:
- Open the Internet Information Services tool.
- Right-click the Web location in question, and choose Properties from the context menu.
- Click the Home Directory tab, Virtual Directory tab, Directory tab, or File tab, depending on the Web resource type you selected, as shown in Figure 5-25.
NOTE
If NTFS file ACLs and Web permissions conflict, the most restrictive setting will be enforced. For example, if the Web permissions on a virtual directory are Read and Write but the ACLs on the files in the directory are Read-only, write operations will fail.

Figure 5-25. The Web Permissions options for a virtual directory.
Table 5-6 explains each IIS Web permission.
Table 5-6. IIS 5 Web permissions.
| Permission | Comments |
|---|---|
| Script Source Access | This option is appropriate only when used in conjunction with the Read and/or Write permissions. Its primary use is to support the HTTP 1.1 WebDAV protocol, because when using WebDAV you might want to view the source of a document, not the results of a document. |
| Read | Data can be read or downloaded (depending on the content type). |
| Write | Data can be written to or files can be uploaded using the HTTP 1.1 PUT verb (depending on the content type). |
| Directory Browsing | If a user navigates to this virtual directory or directory and does not specify a resource, a listing of the directory contents will appear. |
| Execute Permissions: None | ASP files and executable files (batch files,.EXE files, .DLL files) will not run. |
| Execute Permissions: Scripts Only | ASP files will operate correctly, but executable files will not run. |
| Execute Permissions: Scripts and Executables | Both ASP files and executable files will run. |
IP Address and Domain Name Restrictions
Another important IIS authorization mechanism is access restriction by IP address or DNS name. Using IP address and DNS name restrictions, you can grant access to all hosts other than those you specifically deny or make sure that no host has access other than those you specifically allow.
When controlling access by IP address, be aware that many Web users will be passing through a proxy server or a firewall. The incoming connection to your Web server will appear to have originated from the proxy server or firewall and not the client's computer.
If you're performing restrictions based on the domain name, IIS must perform a reverse DNS lookup. If the lookup fails—for example, because of a failure to access the DNS server—the request is refused. Also note that DNS lookups can be time-consuming and thus their use is discouraged on high-volume Web sites.
Perform the following steps to configure IP address and domain name restrictions:
- Open the IIS tool.
- Right-click the Web site, virtual directory, directory, or file in question.
- Choose Properties from the context menu.
- Select the appropriate security tab.
- Click Edit in the IP Address And Domain Name Restrictions box.
Accessing IP restrictions from ADSI
The IIsIPSecurity object is an ADSI object that you can use to set access permissions by IP address and domain address. The following Visual Basic ADSI code will set the IP restrictions on the default Web server such that it can accept only connections from the local computer (localhost):
' Get the IP settings. Set oVDir = GetObject("IIS://localhost/W3SVC/1") Set oIP = oVDir.IPSecurity ' Set the IP grant list to 127.0.0.1 with subnet mask ' 255.255.255.0. Dim IPList(1) IPList(1) = "127.0.0.1,255.255.255.0" oIP.IPGrant = IPList ' Do not grant access by default. oIP.GrantByDefault = 0 ' Write the information back to IIS and clean up. oVDir.IPSecurity = oIP oVDir.SetInfo Set oIP = Nothing Set oVDir = Nothing |
This code yields the IP Address And Domain Name Restrictions dialog box in the IIS tool, as shown in Figure 5-26.
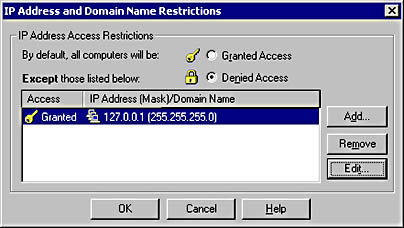
Figure 5-26. Setting IP and domain name restrictions in the IIS tool.
The Permissions Wizard
In the past, administering permissions was time-consuming and prone to error. To help alleviate this, Microsoft added the Permissions wizard to IIS 5. The purpose of this wizard is to set a known security baseline comprising authentication schemes, file access control lists, IP restrictions, and Web permissions. Running this tool on a Web server, virtual directory, or directory will set each of these mechanisms to a recommended minimum. From there, you can tweak the settings to meet your security requirements.
You access the wizard like so:
- Right-click the Web server, virtual directory, or directory in question in the IIS tool.
- Select All Tasks.
- Choose Permissions Wizard, which will display the wizard, as shown in Figure 5-27.
- Click Next.
- Click Select New Security Settings From A Template, and click Next.
- Select the type of Web site scenario you want to use. Public Web Site is for Internet servers, and Secure Web Site requires that users authenticate themselves first.
- Click Next.
- It's recommended that you replace all current file ACLs with those recommended by the wizard, so select Replace All Directory And File Permissions (Recommended) and click Next.
- Review the changes the wizard will make, and click Next.
- Once the changes have taken effect, click Finish.

Figure 5-27. The IIS 5 Permissions wizard.
The next screen offers two options, as shown in Figure 5-28: Inherit All Security Settings and Select New Security Settings From A Template. The first means "forget all the settings on this node; use the settings from the node above me." The second option steps you through some scenarios to derive security settings.

Figure 5-28. Selecting security settings in the IIS 5 Permissions wizard.
Assuming you want to set new security settings, let's continue with the process.
NOTE
The Windows 2000 Resource Guide CD includes a tool called the Internet Information Services Permissions Wizard Template Maker that allows you to create your own custom templates for inclusion in the Permissions wizard.
EAN: N/A
Pages: 138