Configuring SSLTLS
As discussed, SSL/TLS is a set of cryptographic technologies that provides authentication, privacy, and data integrity. It's also the most common security protocol used on the Web today because it is well understood and requires virtually no extra work on behalf of your users. All you need to configure SSL/TLS is a server X.509 certificate from a certification authority.
To make the certificate manipulation process easier, IIS 5 introduced a certificate wizard specific to the Web that is considerably more straightforward to use than KeyRing (also called Key Manager) in IIS 4. In fact, the Web Server Certificate wizard was added to IIS 5 based on user feedback about KeyRing.
The process of setting up SSL/TLS might seem complex at first, but it's quite easy using the new wizard. At the highest level, the process is as follows:
- Enroll for a server certificate with a certification authority (such as VeriSign or your own certificate authority using Microsoft Certificate Services).
- Apply the certificate to the Web server in question.
- Enable SSL/TLS on the appropriate virtual directories, directories, or files.
Installing a server certificate for use with SSL/TLS does not mean that SSL/TLS is enabled. In fact, the default is not to enable SSL/TLS because of the performance impact of the protocol.
IIS includes flexible SSL/TLS options. In Figure 5-18, a Web site is configured to use three SSL/TLS settings. The root of the Web site, www.exair.com, does not require SSL/TLS. However, because the certificate contains the name of the Web site, this is where the certificate is applied. You cannot set another certificate at another part of the Web space. The Marketing virtual directory also does not require SSL/TLS. The Secure and HighSecure virtual directories both require SSL/TLS, but the latter also requires stronger, 128-bit SSL/TLS.

Figure 5-18. Setting different SSL/TLS options on different parts of the Web space.
NOTE
Once you install a server certificate on IIS, SSL/TLS can still be used even if you don't require that the protocol be used. When the certificate is installed, a user can enter https://www.exair.com/marketingto access the marketing part of the Exploration Air Web site using SSL/TLS even though the marketing virtual directory does not require SSL/TLS.
A Closer Look at Configuring SSL/TLS
Although the process of configuring SSL/TLS is quite easy using the new wizard, there are a couple of matters you should be aware of. In the following example, we're going to assume you're enrolling for a new certificate, because this process requires the most steps. To enroll for a new certificate for your Web site, perform the following steps:
- Right-click the My Computer icon on the desktop.
- Choose Manage from the context menu.
- Expand the Services And Applications node, and then expand the Internet Information Services node.
- Locate the Web server for which you want to get a certificate, and right-click it.
- Choose Properties from the context menu.
- Click the Directory Security tab.
- Click the Server Certificate button. If this button is grayed out, you haven't right-clicked the Web server—instead, you've right-clicked a virtual directory, directory, or file. If this is the case, close the dialog box, and select the Web server.
- Read the opening screen of the IIS Certificate wizard. It not only introduces you to the wizard but also informs you of the status of any enrollments you performed in the past.
- Click Next.
- Select Create A New Certificate.
- You have two options, as shown in Figure 5-19: Prepare The Request Now, But Send It Later and Send The Request Immediately To An Online Certification Authority. The first option is always available, and the latter is available only if the Web server has access to one or more Microsoft Certificate Services servers in a Windows 2000 domain configured to issue Web server certificates.
- Enter the name of the Web site. The wizard will automatically extract the friendly name of the Web site defined when you initially configured the site. This property is not used in the certificate; it's just a friendly name to help the administrator.
- Select the public key length of the certificate. Usually, this will be 2048 bytes for North American sites and 1024 bytes for other sites.
- If you want to use a Server Gated Cryptography (SGC) certificate, check the SGC box.
- Click Next.
- Enter a valid organization (such as Exploration Air) and organization unit (such as Development Department). This information will go into the certificate, so make sure it's accurate.
- Click Next.
- Enter the name of the computer to be certified. It's imperative that you get this correct; failure to do so will later create problems in the user's browser. By default, the wizard will select either the NetBIOS or DNS name of the server. If the computer is to be used as an intranet server, you could use either name. If the server is to be placed on the Web, the name will be the name of the Web server as it appears on the Web. For example, the computer might have a NetBIOS name of WebServer and an internal DNS name of webserver.explorationair.com. However, because it's to be used as a Web server on the Internet, its Internet DNS name will be www.exair.com. This is the name you should enter into the Common Name edit box. This information will also go into the certificate; in fact, it's probably the most important information in the certificate.
- Click Next.
- Enter the country or region, the state or province, and the city in which you are located. This information will also be included in the certificate.
- Click Next.
- Enter the name of the text file that will contain the certificate request information. By default, the file name is C:\Certreq.txt. The file will look something like the following abridged sample, a base64-encoded text file. The certificate request is known as a PKCS #10 certificate request. You can find out more about PKCS #10 in Chapter 15.
- Click Next. The wizard will display a summary of the information you entered. After reviewing the information, click Next to complete the wizard.
- You can click the Click Here option to view a list of certification authorities that offer services for Microsoft products.
- Click Finish.
NOTE
Because the wizard knows the current state of the certificate request, it displays only the appropriate options and will warn you if you try to do something that might invalidate the request.

Figure 5-19. The two certificate enrollment options in the IIS Certificate wizard.
If you are running in an intranet environment and have configured a corporate public key solution, you'll probably want to select the first option. However, if you want to get a certificate from an external CA, such as VeriSign, you should select the second option. We'll assume you want to prepare the request now and send it later, so check the first option and click the Next button.
NOTE
SGC is an extension of SSL/TLS that allows financial institutions with export versions of Windows 2000 Server to use 128-bit encryption. However, with new cryptographic export laws that allow much stronger encryption than previously available outside North America, this capability is no longer required.
NOTE
When entering the state, enter the entire name of the state, not just its abbreviation. For example, if the company is in Washington State, enter Washington in the state field, not WA. If the company is in Queensland, Australia, enter Queensland, not QLD.
-----BEGIN NEW CERTIFICATE REQUEST----- MIID+DCCAuACAQAwXjEXMBUGA1UEAxMObWlrZWhvdy1sYXB0b3AxDDAKBgNVBAsT A0RldjEOMAwGA1UEChMFRXhBaXIxCzAJBgNVBAcTAlJlMQswCQYDVQQIEwJXQTEL . . more . LNihpipWqerGWnZAmSDtKmqnsOZsptlrTzIRMsSQSWmlmacTYExE0+6SPkyO2XeC pEzrI08CBxrheiZYf14K2gm12A62AItLznxIwgV4H+qP7jqkC9KmiW9WDwhdHneA 3Dq1dsTlscfyhsFU -----END NEW CERTIFICATE REQUEST----- |
NOTE
You can view the contents of the certificate request from the command line by using the Certutil.exe tool included with Microsoft Certificate Services. Typing certutil -v certreq.txtdisplays the contents of the PKCS #10 request that will be sent to the certification authority.
The certificate request file can now be sent to a certification authority for processing. (A list of CAs is available at http://backoffice.microsoft.com/securitypartners.) Processing time will vary depending on the type of certificate you asked for and the policies of the CA.
IMPORTANT
The certificate request contains only the public key that will go into the certificate. The private key associated with the public key does not leave the computer on which the request was generated.
Once you receive the certificate response from the CA, you can continue the enrollment process by using the Web Server Certificate wizard. The response from the CA is a PKCS #7 package containing your certificate. You can find out more information about PKCS #7 in Chapter 15.
Continue the enrollment process by performing these steps:
- Right-click the My Computer icon on the desktop.
- Choose Manage from the context menu.
- Expand the Services And Applications node and then the Internet Information Services node.
- Locate the Web server you want the certificate for, and right-click it.
- Choose Properties from the context menu.
- Click the Directory Security tab.
- Click the Server Certificate button. If this button is grayed out, you haven't right-clicked the Web server—you've right-clicked a virtual directory, directory, or file. In this case, close the dialog box and select the Web server.
- Read the opening screen of the Web Server Certificate wizard. It should indicate that you have a pending certificate request, as shown in Figure 520.
- Click the Next button.
- Select Process The Pending Request And Install The Certificate, and click the Next button.
- Enter the path and file name of the file containing the CA's response. If necessary, use the Browse option to locate the file.
- Click Next.
- Look at the certificate overview, and click Next.
- Click Finish.

Figure 5-20. The Web Server Certificate wizard informing you that you have a pending certificate request.
A Web server certificate is now installed on the computer.
Where Is the Private Key Held During a Certificate Request?When IIS makes a certificate request, the wizard creates a public and private key pair. The public key goes into the certificate request. The private key, along with other information about the certificate request, is held in a protected location called the REQUEST store.
You can look at the REQUEST store by performing these steps:
If you look inside the Certificates node, you'll see any pending certificate requests. Do not delete any pending certificate requests from this store unless you absolutely must. If you delete a pending certificate request, the private key associated with the certificate request will be deleted.
- Click Start.
- Choose Run, type mmc /a, and hit Return.
- Choose Add/Remove Snap-in from the Console menu.
- Click Add, and select Certificates from the list of available snap-ins.
- Click Add.
- Select Computer Account, click Next, and then click Finish.
- Click Close, and then click OK.
- Expand the Certificates node, and open the REQUEST node.
Now that you've applied your certificate to the Web site, you can go to appropriate virtual directories, directories, and files and enable SSL/TLS. It is not recommended that you require SSL/TLS at the root of a Web server unless all the content on the Web site is to be protected in transit from the Web server to the browser, which is highly unlikely.
You can check that the certificate is installed correctly by typing https://servername into your Web browser, where servername is the name of the Web site. If you see a lock icon appear on the Internet Explorer status bar, SSL/TLS is correctly installed. If you're using Netscape Navigator, you'll see that the broken key is now joined together or an open lock is now in the locked position, depending on the version of the browser.
If you want to find out a little more about the SSL/TLS connection, use the following ASP code:
<H2>SSL/TLS Information</H2> <PRE> SSL/TLS Connection? <%= Request.ServerVariables("HTTPS") %> Server Cert. Issuer <%= Request.ServerVariables("CERT_SERVER_ISSUER") %> Server Cert. Subject <%= Request.ServerVariables("CERT_SERVER_SUBJECT") %> Symmetric Key Size <%= Request.ServerVariables("HTTPS_KEYSIZE") %> Public Key Size? <%= Request.ServerVariables("HTTPS_SECRETKEYSIZE") %> </PRE> |
SSL/TLS connection logging
You can determine which protocol is used during the SSL/TLS connection by looking at the Windows 2000 event logs. To do this, you must first modify the following Registry setting:
HKEY_LOCAL_MACHINE \System \CurrentControlSet \Control \SecurityProviders \SCHANNEL \EventLogging: REG_DWORD : 0 |
This entry is set to 0 by default, which means that no SSL/TLS events will be logged. To enable SSL/TLS event logging, set the entry to one of the values in Table 5-2 and reboot the computer. Note that these values can be ORed together.
Table 5-2. SSL/TLS logging options.
| Value | Description |
|---|---|
| 1 | Log errors |
| 2 | Log warnings |
| 4 | Log informational and success events |
NOTE
It's recommended that you set this Registry value to 7, which means all categories of SSL/TLS data are logged.
When an SSL/TLS connection is successfully negotiated, look in the System log for events that look like that shown in Figure 5-21.

Figure 5-21. A successfully negotiated TLS connection between a Web server and a Web browser.
SSL/TLS is an easy-to-use technology, especially for your users. However, there are some scenarios that make it complex to administer, some of which are discussed in the following sections.
SSL/TLS and Multiple Web Sites
IIS can host hundreds of virtual Web servers on a single computer, but doing so can lead to interesting problems when using virtual hosting and SSL/TLS together. First, let's look at virtual hosting in detail.
IIS supports virtual Web sites in one of three ways:
- By using multiple IP addresses, each having its own network card in the computer
- By having each Web site listen on a different port but use the same IP address
- By assigning multiple domain names and IP addresses to a single network card in the computer and using HTTP 1.1 Host headers to differentiate Web sites
For example, Figure 5-22 illustrates a server running Windows 2000 named \\exair; hence, the computer has one default Web site named http://exair. In addition, Exploration Air's administrators have created three other virtual Web sites in IIS for the Marketing, Development, and Human Resources departments named http://Marketing, http://Development, and http://HumanResources, respectively.

Figure 5-22. A Windows 2000 server running IIS hosting one default Web site and three virtual Web sites.
In this example, the \\exair computer could have an IP address of 157.65.122.22 and each other Web site could listen on the same address but a different port, on a different IP address and the same port, or on the same IP address and the same port while using HTTP 1.1 Host headers to differentiate which server a client request is for.
Tables 5-3, 5-4, and 5-5 show the possible combinations.
Table 5-3. The \\exair server configured to use the same IP address but differing port numbers for each virtual Web site.
| Server | IP Address | HTTP Port | SSL/TLS Port | Host Header |
|---|---|---|---|---|
| Default (http://exair) | 157.65.122.22 | 80 | 443 | Not used |
| http://Marketing | 157.65.122.22 | 81 | 444 | Not used |
| http://Development | 157.65.122.22 | 82 | 445 | Not used |
| http://HumanResources | 157.65.122.22 | 83 | 446 | Not used |
Table 5-4. The \\exair server configured to use differing IP addresses but the same port numbers for each virtual Web site.
| Server | IP Address | HTTP Port | SSL/TLS Port | Host Header |
|---|---|---|---|---|
| Default (http://exair) | 157.65.122.22 | 80 | 443 | Not used |
| http://Marketing | 157.65.122.23 | 80 | 443 | Not used |
| http://Development | 157.65.122.24 | 80 | 443 | Not used |
| http://HumanResources | 157.65.122.25 | 80 | 443 | Not used |
Table 5-5. The \\exair server configured to use the same IP address and the same port numbers but different Host headers for each virtual Web site.
| Server | IP Address | HTTP Port | SSL/TLS Port | Host Header |
|---|---|---|---|---|
| Default (http://exair) | 157.65.122.22 | 80 | 443 | Exair or None |
| http://Marketing | 157.65.122.22 | 80 | 443 | Marketing |
| http://Development | 157.65.122.22 | 80 | 443 | Development |
| http://HumanResources | 157.65.122.22 | 80 | 443 | HumanResources |
Why SSL/TLS fails when using host headers
The first two scenarios, in which the IP addresses or port numbers differ, will work correctly with SSL/TLS. When IIS processes the request from the client, it uses the IP address and port number to look up which certificate and private key to use for the connection. When Host headers are used, the IP address and port number are the same for each Web site—the only differentiator is the Host header sent in the HTTP request. However, the client cannot send the HTTP data to the Web server until the SSL/TLS connection has been established, and the Web server can determine which certificate and private key to use to establish the secure connection based only on something that uniquely identifies the Web site. That something happens to be the Host header, and it hasn't been sent yet. It's a classic chicken and egg scenario.
In short, if you want to use SSL/TLS with multiple virtual Web sites, you need to use unique IP addresses or unique port numbers. Multiple Web sites with the same IP address and the same port number will fail.
SSL/TLS and Multiple Web Servers
It's quite common for multiple Web servers to act as a single instance. Various technologies are used to provide scalability and reliability in this scenario, but they do run into some interesting SSL/TLS problems. Figure 5-23 shows an example Web site—the first bank of servers are load-balanced servers, each of which responds to the same DNS name and can take an HTTP request and send the request to one or more clustered database servers.
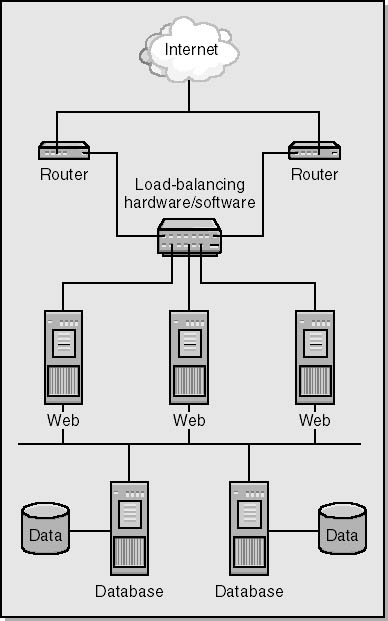
Figure 5-23. Example Web site using load balancing and clustering.
NOTE
Windows 2000 Advanced Server offers two node clusters, and Windows 2000 Datacenter Server provides four node clusters to provide redundancy and failover. Windows 2000 also supports network load balancing (NLB) to balance loads of up to 32 Windows 2000 Web servers.
Two problems, one concerning Web server certificates and the other SSL/TLS affinity, arise when SSL/TLS is required on a load-balanced Web site. The following sections described these problems.
Web server certificates
Each computer needs a certificate (and private key) that has the same common name (CN) as all the other Web servers. This might require that you have a unique certificate and key per server or that you get one certificate and replicate it (and the associated private key) for each computer in the Web farm. You should consult the appropriate licensing documentation issued by your certification authority before you copy the certificate and private key to each computer.
In IIS 5, you can replicate the certificate from one computer to another by following these steps:
- Click Start.
- Choose Run and type mmc /a.
- Choose Add/Remove Snap-in from the Console menu.
- Click Add, and select Certificates from the list of snap-ins.
- Click Add.
- Click the Computer Account option, and click Next.
- Click Finish.
- Click Close.
- Click OK.
- Expand the Certificates (Local Computer) node.
- Expand the Personal node, and click Certificates.
- Right-click the appropriate certificate in the right pane.
- Select All Tasks.
- Choose Export.
- Click Next when the Certificate Export wizard appears.
- Click the Yes, Export The Private Key radio button.
- Click Personal Information Exchange - PKCS #12 (.PFX).
- Enable the Include All Certificates In The Certification Path If Possible option.
- Click Next.
- Enable the Enable Strong Protection (Requires Internet Explorer 5, Windows NT 4 SP4 Or Above) option.
- Enter and confirm a password to protect the exported certificate and private key.
- Click Next.
- Enter the name of the file you want to export.
- Click Next, and then click Finish.
NOTE
You must be able to copy the private key to the other computer for SSL/TLS to work. If this option is disabled, the private key cannot be exported from the computer and the process will fail.
It's recommended that you copy the exported data to a floppy disk and delete the export file from the Web server.
You can import the key into each Web server by using the Web Server Certificate wizard. Once you've installed the private key and certificate on each computer in the Web farm, store the floppy disk in a highly secure area to prevent theft or duplication.
SSL/TLS affinity
SSL/TLS connections should be affinitized. For example, if a Web client connects to your Web site and has its request processed by the second server in the farm, subsequent requests should go to the same Web server. Otherwise, a new, expensive SSL/TLS connection must be established with another computer. Hence, determine whether this feature exists in your load-balancing software. The load-balancing software in Windows 2000 Server and Windows 2000 Advanced Server supports this capability.
Setting SSL/TLS Ciphers
In Windows 2000, you can configure which SSL and TLS cryptographic protocols (ciphers) are supported, as well as whether SSL2, SSL3, or TLS is used when establishing a secure channel between the Web server and the browser.
WARNING
Do not change any of these settings without understanding the implications of the changes.
To choose which ciphers to allow, navigate to the following location in the Registry by using the Registry editor:
HKEY_LOCAL_MACHINE \System \CurrentControlSet \Control \SecurityProviders \SCHANNEL \Ciphers |
Figure 5-24 shows what this part of the Registry looks like.

Figure 5-24. Configuring SSL/TLS ciphers in the Registry.
Each cipher has an Enabled value. If this value is set to 0, the cipher is disabled. If it's set to 0xffffffff, the cipher is enabled. You must reboot the computer for Registry changes to take effect.
NOTE
Any SSL/TLS changes you make will affect all applications on the computer, not just IIS.
For further information on setting ciphers in Windows 2000, refer to the following Knowledge Base articles at http://support.microsoft.com:
- Article number Q216482, "How to Control the Ciphers for SSL and TLS"
- Article number Q241447, "How to Restrict the Use of Certain Ciphers in IIS5"
- Article number Q245030, "How to Restrict the Use of Cryptographic Algorithms and Protocols"
Let's look at another important aspect of Web security: authorization.
EAN: N/A
Pages: 138
- Chapter V Consumer Complaint Behavior in the Online Environment
- Chapter VII Objective and Perceived Complexity and Their Impacts on Internet Communication
- Chapter VIII Personalization Systems and Their Deployment as Web Site Interface Design Decisions
- Chapter XIV Product Catalog and Shopping Cart Effective Design
- Chapter XV Customer Trust in Online Commerce