Using Beans to Build an Application
|
| Before we get into the mechanics of writing beans, we want you to see how you might use or test them. ImageViewerBean is a perfectly usable bean, but outside a builder environment it can't show off its special features. In particular, the only way to use it in an ordinary program in the Java programming language would be to write code that constructs an object of the bean class, places the object into a container, and calls the setFileName method. That's not rocket science, but it is more code than an overworked programmer may want to write. Builder environments aim to reduce the amount of drudgery that is involved in wiring together components into an application. Each builder environment uses its own set of strategies to ease the programmer's life. We cover one environment, the NetBeans integrated development environment, available from http://netbeans.org. We don't want to claim that NetBeans is better than other productsin fact, as you will see, it has its share of idiosyncrasies. We simply use NetBeans because it is a fairly typical programming environment and because it is freely available. If you prefer another builder environment, you can still follow the steps of the next sections. The basic principles are the same for most environments. Of course, the details differ. In this example, we use two beans, ImageViewerBean and FileNameBean. You have already seen the code for ImageViewerBean. The code for FileNameBean is a bit more sophisticated. We analyze it in depth later in this chapter. For now, all you have to know is that clicking the button with the ". . ." label opens a standard File Open dialog box where you can select a file. Before we can go any further with showing you how to use these beans, we need to explain how to package the bean for import into a builder tool. Packaging Beans in JAR FilesTo make any bean usable in a builder tool, package into a JAR file all class files that are used by the bean code. Unlike the JAR files for an applet that you saw previously, a JAR file for a bean needs a manifest file that specifies which class files in the archive are beans and should be included in the Toolbox. For example, here is the manifest file ImageViewerBean.mf for ImageViewerBean. Manifest-Version: 1.0 Name: com/horstmann/corejava/ImageViewerBean.class Java-Bean: True Note the blank line between the manifest version and bean name. NOTE
If your bean contains multiple class files, you just mention in the manifest those class files that are beans and that you want to have displayed in the Toolbox. For example, you could place ImageViewerBean and FileNameBean into the same JAR file and use the manifest Manifest-Version: 1.0 Name: com/horstmann/corejava/ImageViewerBean.class Java-Bean: True Name: com/horstmann/corejava/FileNameBean.class Java-Bean: True CAUTION
To make the JAR file, follow these steps:
You can also add other items, such as GIF files for icons, to the JAR file. We discuss bean icons later in this chapter. CAUTION
Builder environments have a mechanism for adding new beans, typically by loading JAR files. Here is what you do to import beans into NetBeans. Compile the ImageViewerBean and FileNameBean classes and package them into JAR files. Then start NetBeans and follow these steps.
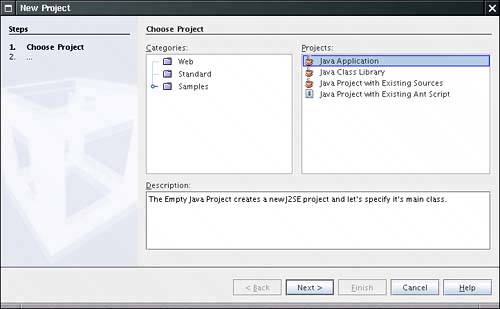
Repeat these steps with FileNameBean. Now you are ready to compose these beans into an application. Composing Beans in a Builder EnvironmentIn NetBeans, select File -> New Project from the menu. A dialog box pops up. Select Standard, then Java Application (see Figure 8-3). Figure 8-3. Creating a new project
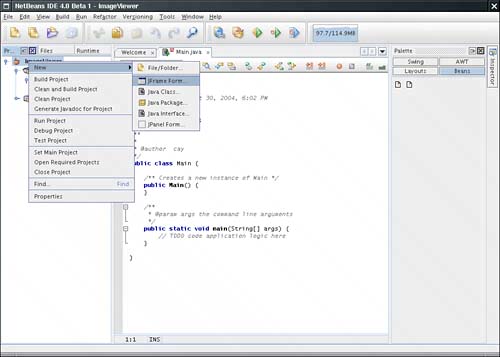
Click the Next button. In the following screen, set a name for your application (such as ImageViewer), and click the Finish button. Now you see a project viewer on the left and the source code editor in the middle. Right-click on the project name in the project viewer and select New -> JFrame Form from the menu (see Figure 8-4). Figure 8-4. Creating a form view
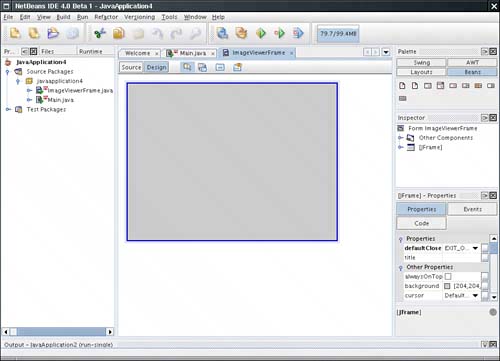
A dialog box pops up. Enter a name for the frame class (such as ImageViewerFrame), and click the Finish button. You now get a form editor with a blank frame. To add a bean to the form, select the bean in the palette that is located to the right of the form editor. Then click on the frame. By default, the frame has a border layout, and NetBeans is smart enough to add the component to the center, north, south, east, or west position, depending on your click location. You can always change the layout position in the property editor. NOTE
Figure 8-5 shows the result of adding an ImageViewerBean at the center position of the frame. Figure 8-5. Adding a bean
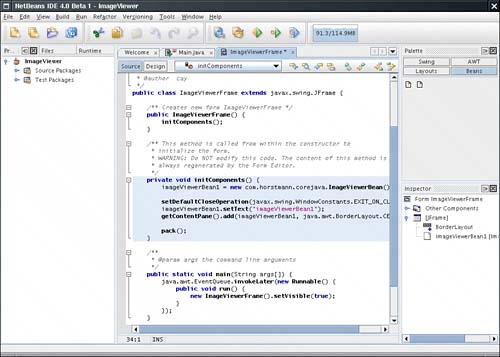
If you look into the code editor window, you will find that the source code now contains the Java instructions to add the bean objects to the frame (see Figure 8-6). The source code is bracketed by dire warnings that you should not edit it. Any edits would be lost when the builder environment updates the code as you modify the form. Figure 8-6. The source code for adding the bean
NOTE
Now go back to the form view and click ImageViewerBean in the form. On the right-hand side is a property inspector that lists the bean property names and their current values (see Figure 8-7). This is a vital part of component-based development tools since setting properties at design time is how you set the initial state of a component. Figure 8-7. A property inspector
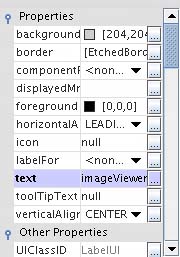
For example, you can modify the text property of the label used for the image bean by simply typing a new name into the property inspector. Changing the text property is simpleyou just edit a string in a text field. Try it outset the label text to "Hello". The form is immediately updated to reflect your change. NOTE
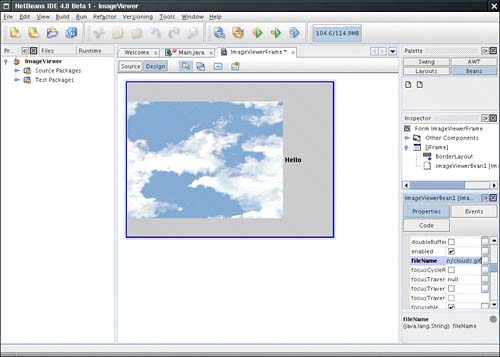
Properties don't have to be strings; they can be values of any Java type. To make it possible for users to set values for properties of any type, builder tools use specialized property editors. (Property editors either come with the builder or are supplied by the bean developer. You see how to write your own property editors later in this chapter.) To see a simple property editor at work, look at the foreground property. The property type is Color. You can see the color editor, with a text field containing a string [0,0,0] and a button labeled ". . ." that brings up a color chooser. Go ahead and change the foreground color. Notice that you'll immediately see the change to the property valuethe label text changes color. More interestingly, choose a file name for an image file in the property inspector. Once you do so, ImageViewerBean automatically displays the image (see Figure 8-8). Figure 8-8. The ImageViewerBean at work
NOTE
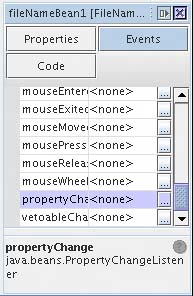
To complete our application, place a FileNameBean object at the south end of the frame. Now we want the image to be loaded when the fileName property of FileNameBean is changed. This happens through a PropertyChange event; we discuss these kinds of events later in this chapter. To react to the event, select FileNameBean and select the Events tab from its property inspector (see Figure 8-9). Then click the "..." button next to the propertyChange entry. A dialog box appears that shows that no handlers are currently associated with this event. Click the Add button of the dialog box. You are prompted for a method name. Type loadImage. Figure 8-9. The events tab of the property inspector
Now look at the code editor. Event handling code has been added, and there is a new method: private void loadImage(java.beans.PropertyChange evt) { // TODO add your handling code here } Add the following line of code to that method: imageViewerBean1.setFileName(fileNameBean1.getFileName()); Then compile and execute the frame class. You now have a complete image viewer application. Click the button with the ". . ." label and select an image file. The image is displayed in the image viewer. This process demonstrates that you can create a Java application from beans by setting properties and providing a small amount of code for event handlers. |
|
EAN: 2147483647
Pages: 156