Component Organizers
|
| We conclude the discussion of advanced Swing features with a presentation of components that help organize other components. These include the split pane, a mechanism for splitting an area into multiple parts whose boundaries can be adjusted, the tabbed pane, which uses tab dividers to allow a user to flip through multiple panels, and the desktop pane, which can be used to implement applications that display multiple internal frames. Split PanesSplit panes split a component into two parts, with an adjustable boundary in between. Figure 6-44 shows a frame with two split panes. The outer pane is split vertically, with a text area on the bottom and another split pane on the top. That pane is split horizontally, with a list on the left and a label containing an image on the right. Figure 6-44. A frame with two nested split panes
You construct a split pane by specifying the orientation, one of JSplitPane.HORIZONTAL_SPLIT or JSplitPane.VERTICAL_SPLIT, followed by the two components. For example, JSplitPane innerPane = new JSplitPane(JSplitPane.HORIZONTAL_SPLIT, planetList, planetImage); That's all you have to do. If you like, you can add "one-touch expand" icons to the splitter bar. You see those icons in the top pane in Figure 6-44. In the Metal look and feel, they are small triangles. If you click one of them, the splitter moves all the way in the direction to which the triangle is pointing, expanding one of the panes completely. To add this capability, call innerPane.setOneTouchExpandable(true); The "continuous layout" feature continuously repaints the contents of both components as the user adjusts the splitter. That looks classier, but it can be slow. You turn on that feature with the call innerPane.setContinuousLayout(true); In the example program, we left the bottom splitter at the default (no continuous layout). When you drag it, you only move a black outline. When you release the mouse, the components are repainted. The straightforward program in Example 6-19 populates a list box with planets. When the user makes a selection, the planet image is displayed to the right and a description is placed in the text area on the bottom. When you run the program, adjust the splitters and try out the one-touch expansion and continuous layout features. Example 6-19. SplitPaneTest.java 1. import java.awt.*; 2. import java.awt.event.*; 3. import java.util.*; 4. import javax.swing.*; 5. import javax.swing.event.*; 6. 7. /** 8. This program demonstrates the split pane component 9. organizer. 10. */ 11. public class SplitPaneTest 12. { 13. public static void main(String[] args) 14. { 15. JFrame frame = new SplitPaneFrame(); 16. frame.setDefaultCloseOperation(JFrame.EXIT_ON_CLOSE); 17. frame.setVisible(true); 18. } 19. } 20. 21. /** 22. This frame consists of two nested split panes to demonstrate 23. planet images and data. 24. */ 25. class SplitPaneFrame extends JFrame 26. { 27. public SplitPaneFrame() 28. { 29. setTitle("SplitPaneTest"); 30. setSize(DEFAULT_WIDTH, DEFAULT_HEIGHT); 31. 32. // set up components for planet names, images, descriptions 33. 34. final JList planetList = new JList(planets); 35. final JLabel planetImage = new JLabel(); 36. final JTextArea planetDescription = new JTextArea(); 37. 38. planetList.addListSelectionListener(new 39. ListSelectionListener() 40. { 41. public void valueChanged(ListSelectionEvent event) 42. { 43. Planet value = (Planet) planetList.getSelectedValue(); 44. 45. // update image and description 46. 47. planetImage.setIcon(value.getImage()); 48. planetDescription.setText(value.getDescription()); 49. } 50. }); 51. 52. // set up split panes 53. 54. JSplitPane innerPane 55. = new JSplitPane(JSplitPane.HORIZONTAL_SPLIT, planetList, planetImage); 56. 57. innerPane.setContinuousLayout(true); 58. innerPane.setOneTouchExpandable(true); 59. 60. JSplitPane outerPane 61. = new JSplitPane(JSplitPane.VERTICAL_SPLIT, innerPane, planetDescription); 62. 63. add(outerPane, BorderLayout.CENTER); 64. } 65. 66. private Planet[] planets = 67. { 68. new Planet("Mercury", 2440, 0), 69. new Planet("Venus", 6052, 0), 70. new Planet("Earth", 6378, 1), 71. new Planet("Mars", 3397, 2), 72. new Planet("Jupiter", 71492, 16), 73. new Planet("Saturn", 60268, 18), 74. new Planet("Uranus", 25559, 17), 75. new Planet("Neptune", 24766, 8), 76. new Planet("Pluto", 1137, 1), 77. }; 78. private static final int DEFAULT_WIDTH = 300; 79. private static final int DEFAULT_HEIGHT = 300; 80. } 81. 82. /** 83. Describes a planet. 84. */ 85. class Planet 86. { 87. /** 88. Constructs a planet. 89. @param n the planet name 90. @param r the planet radius 91. @param m the number of moons 92. */ 93. public Planet(String n, double r, int m) 94. { 95. name = n; 96. radius = r; 97. moons = m; 98. image = new ImageIcon(name + ".gif"); 99. } 100. 101. public String toString() 102. { 103. return name; 104. } 105. 106. /** 107. Gets a description of the planet. 108. @return the description 109. */ 110. public String getDescription() 111. { 112. return "Radius: " + radius + "\nMoons: " + moons + "\n"; 113. } 114. 115. /** 116. Gets an image of the planet. 117. @return the image 118. */ 119. public ImageIcon getImage() 120. { 121. return image; 122. } 123. 124. private String name; 125. private double radius; 126. private int moons; 127. private ImageIcon image; 128. } javax.swing.JSplitPane 1.2
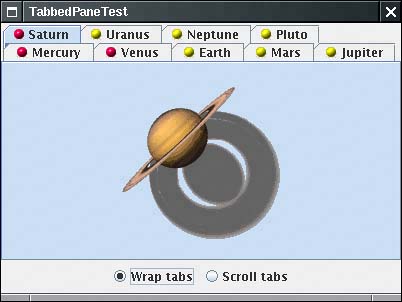
Tabbed PanesTabbed panes are a familiar user interface device to break up a complex dialog box into subsets of related options. You can also use tabs to let a user flip through a set of documents or images (see Figure 6-45). That is what we do in our sample program. Figure 6-45. A tabbed pane
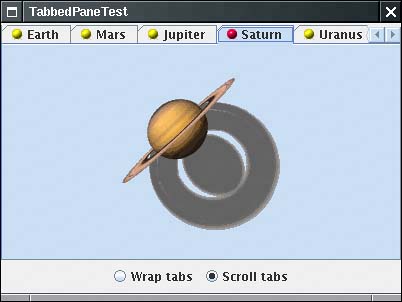
To create a tabbed pane, you first construct a JTabbedPane object, then you add tabs to it. JTabbedPane tabbedPane = new JTabbedPane(); tabbedPane.addTab(title, icon, component); The last parameter of the addTab method has type Component. To add multiple components into the same tab, you first pack them up in a container, such as a JPanel. The icon is optional; for example, the addTab method does not require an icon: tabbedPane.addTab(title, component); You can also add a tab in the middle of the tab collection with the insertTab method: tabbedPane.insertTab(title, icon, component, tooltip, index); To remove a tab from the tab collection, use tabPane.removeTabAt(index); When you add a new tab to the tab collection, it is not automatically displayed. You must select it with the setSelectedIndex method. For example, here is how you show a tab that you just added to the end: tabbedPane.setSelectedIndex(tabbedPane.getTabCount() - 1); If you have a lot of tabs, then they can take up quite a bit of space. Starting with JDK 1.4, you can display the tabs in scrolling mode, in which only one row of tabs is displayed, together with a set of arrow buttons that allow the user to scroll through the tab set (see Figure 6-46). Figure 6-46. A tabbed pane with scrolling tabs
You set the tab layout to wrapped or scrolling mode by calling tabbedPane.setTabLayoutPolicy(JTabbedPane.WRAP_TAB_LAYOUT); or tabbedPane.setTabLayoutPolicy(JTabbedPane.SCROLL_TAB_LAYOUT); The example program shows a useful technique with tabbed panes. Sometimes, you want to update a component just before it is displayed. In our example program, we load the planet image only when the user actually clicks on a tab. To be notified whenever the user clicks on a new tab, you install a ChangeListener with the tabbed pane. Note that you must install the listener with the tabbed pane itself, not with any of the components. tabbedPane.addChangeListener(listener); When the user selects a tab, the stateChanged method of the change listener is called. You retrieve the tabbed pane as the source of the event. Call the getSelectedIndex method to find out which pane is about to be displayed. public void stateChanged(ChangeEvent event) { int n = tabbedPane.getSelectedIndex(); loadTab(n); } In Example 6-20, we first set all tab components to null. When a new tab is selected, we test whether its component is still null. If so, we replace it with the image. (This happens instantaneously when you click on the tab. You will not see an empty pane.) Just for fun, we also change the icon from a yellow ball to a red ball to indicate which panes have been visited. Example 6-20. TabbedPaneTest.java 1. import java.awt.*; 2. import java.awt.event.*; 3. import java.util.*; 4. import javax.swing.*; 5. import javax.swing.event.*; 6. 7. /** 8. This program demonstrates the tabbed pane component organizer. 9. */ 10. public class TabbedPaneTest 11. { 12. public static void main(String[] args) 13. { 14. JFrame frame = new TabbedPaneFrame(); 15. frame.setDefaultCloseOperation(JFrame.EXIT_ON_CLOSE); 16. frame.setVisible(true); 17. } 18. } 19. 20. /** 21. This frame shows a tabbed pane and radio buttons to 22. switch between wrapped and scrolling tab layout. 23. */ 24. class TabbedPaneFrame extends JFrame 25. { 26. public TabbedPaneFrame() 27. { 28. setTitle("TabbedPaneTest"); 29. setSize(DEFAULT_WIDTH, DEFAULT_HEIGHT); 30. 31. tabbedPane = new JTabbedPane(); 32. // we set the components to null and delay their loading until the tab is shown 33. // for the first time 34. 35. ImageIcon icon = new ImageIcon("yellow-ball.gif"); 36. 37. tabbedPane.addTab("Mercury", icon, null); 38. tabbedPane.addTab("Venus", icon, null); 39. tabbedPane.addTab("Earth", icon, null); 40. tabbedPane.addTab("Mars", icon, null); 41. tabbedPane.addTab("Jupiter", icon, null); 42. tabbedPane.addTab("Saturn", icon, null); 43. tabbedPane.addTab("Uranus", icon, null); 44. tabbedPane.addTab("Neptune", icon, null); 45. tabbedPane.addTab("Pluto", icon, null); 46. 47. add(tabbedPane, "Center"); 48. 49. tabbedPane.addChangeListener(new 50. ChangeListener() 51. { 52. public void stateChanged(ChangeEvent event) 53. { 54. 55. // check if this tab still has a null component 56. 57. if (tabbedPane.getSelectedComponent() == null) 58. { 59. // set the component to the image icon 60. 61. int n = tabbedPane.getSelectedIndex(); 62. loadTab(n); 63. } 64. } 65. }); 66. 67. loadTab(0); 68. 69. JPanel buttonPanel = new JPanel(); 70. ButtonGroup buttonGroup = new ButtonGroup(); 71. JRadioButton wrapButton = new JRadioButton("Wrap tabs"); 72. wrapButton.addActionListener(new 73. ActionListener() 74. { 75. public void actionPerformed(ActionEvent event) 76. { 77. tabbedPane.setTabLayoutPolicy(JTabbedPane.WRAP_TAB_LAYOUT); 78. } 79. }); 80. buttonPanel.add(wrapButton); 81. buttonGroup.add(wrapButton); 82. wrapButton.setSelected(true); 83. JRadioButton scrollButton = new JRadioButton("Scroll tabs"); 84. scrollButton.addActionListener(new 85. ActionListener() 86. { 87. public void actionPerformed(ActionEvent event) 88. { 89. tabbedPane.setTabLayoutPolicy(JTabbedPane.SCROLL_TAB_LAYOUT); 90. } 91. }); 92. buttonPanel.add(scrollButton); 93. buttonGroup.add(scrollButton); 94. add(buttonPanel, BorderLayout.SOUTH); 95. } 96. 97. /** 98. Loads the tab with the given index. 99. @param n the index of the tab to load 100. */ 101. private void loadTab(int n) 102. { 103. String title = tabbedPane.getTitleAt(n); 104. ImageIcon planetIcon = new ImageIcon(title + ".gif"); 105. tabbedPane.setComponentAt(n, new JLabel(planetIcon)); 106. 107. // indicate that this tab has been visited--just for fun 108. 109. tabbedPane.setIconAt(n, new ImageIcon("red-ball.gif")); 110. } 111. 112. private JTabbedPane tabbedPane; 113. 114. private static final int DEFAULT_WIDTH = 400; 115. private static final int DEFAULT_HEIGHT = 300; 116. } javax.swing.JTabbedPane 1.2
Desktop Panes and Internal FramesMany applications present information in multiple windows that are all contained inside a large frame. If you minimize the application frame, then all of its windows are hidden at the same time. In the Windows environment, this user interface is sometimes called the multiple document interface or MDI. Figure 6-47 shows a typical application that uses this interface. Figure 6-47. A multiple document interface application For some time, this user interface style was popular, but it has become less prevalent in recent years. Nowadays, many applications simply display a separate top-level frame for each document. Which is better? MDI reduces window clutter, but having separate top-level windows means that you can use the buttons and hotkeys of the host windowing system to flip through your windows. In the world of Java, where you can't rely on a rich host windowing system, it makes a lot of sense to have your application manage its frames. Figure 6-48 shows a Java application with three internal frames. Two of them have decorations on the border to maximize and iconify them. The third is in its iconified state. Figure 6-48. A Java application with three internal frames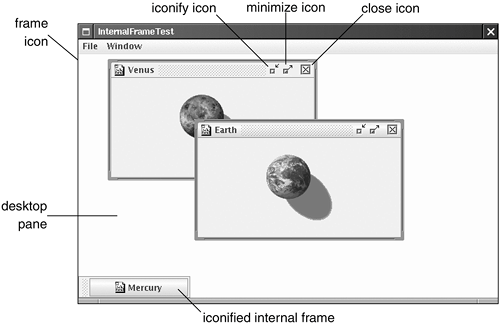 In the Metal look and feel, the internal frames have distinctive "grabber" areas that you use to move the frames around. You can resize the windows by dragging the resize corners. To achieve this capability, follow these steps:
Cascading and TilingIn Windows, there are standard commands for cascading and tiling windows (see Figures 6-49 and 6-50). The Java JDesktopPane and JInternalFrame classes have no built-in support for these operations. In Example 6-21, we show you how to implement these operations yourself. Figure 6-49. Cascaded internal frames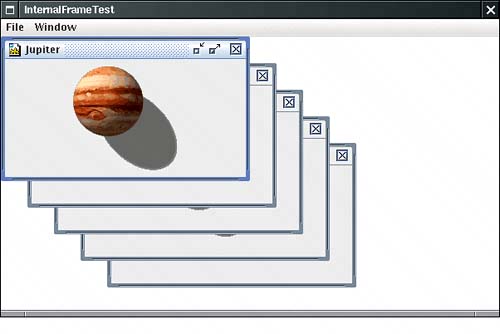 Figure 6-50. Tiled internal frames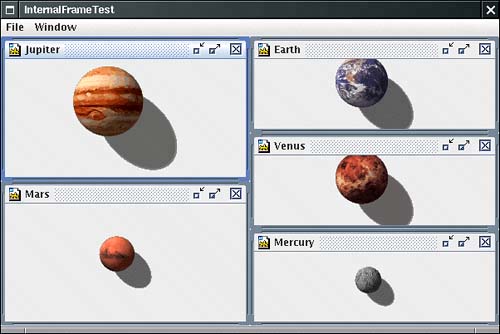 To cascade all windows, you reshape windows to the same size and stagger their positions. The getAllFrames method of the JDesktopPane class returns an array of all internal frames. JInternalFrame[] frames = desktop.getAllFrames(); However, you need to pay attention to the frame state. An internal frame can be in one of three states:
You use the isIcon method to find out which internal frames are currently icons and should be skipped. However, if a frame is in the maximum state, you first set it to be resizable by calling setMaximum(false). This is another property that can be vetoed, so you must catch the PropertyVetoException. The following loop cascades all internal frames on the desktop: for (JInternalFrame frame : desktop.getAllFrames()) { if (!frame.isIcon()) { try { // try to make maximized frames resizable; this might be vetoed frame.setMaximum(false); frame.reshape(x, y, width, height); x += frameDistance; y += frameDistance; // wrap around at the desktop edge if (x + width > desktop.getWidth()) x = 0; if (y + height > desktop.getHeight()) y = 0; } catch (PropertyVetoException e) {} } } Tiling frames is trickier, particularly if the number of frames is not a perfect square. First, count the number of frames that are not icons. Then, compute the number of rows as int rows = (int) Math.sqrt(frameCount); Then the number of columns is int cols = frameCount / rows; except that the last int extra = frameCount % rows columns have rows + 1 rows. Here is the loop for tiling all frames on the desktop. int width = desktop.getWidth() / cols; int height = desktop.getHeight() / rows; int r = 0; int c = 0; for (JInternalFrame frame : desktop.getAllFrames()) { if (!frame.isIcon()) { try { frame.setMaximum(false); frame.reshape(c * width, r * height, width, height); r++; if (r == rows) { r = 0; c++; if (c == cols - extra) { // start adding an extra row rows++; height = desktop.getHeight() / rows; } } } catch (PropertyVetoException e) {} } } The example program shows another common frame operation: moving the selection from the current frame to the next frame that isn't an icon. The JDesktopPane class has no method to return the selected frame. Instead, you must traverse all frames and call isSelected until you find the currently selected frame. Then, look for the next frame in the sequence that isn't an icon, and try to select it by calling frames[next].setSelected(true); As before, that method can throw a PropertyVetoException, in which case you keep looking. If you come back to the original frame, then no other frame was selectable, and you give up. Here is the complete loop: JInternalFrame[] frames = desktop.getAllFrames(); for (int i = 0; i < frames.length; i++) { if (frames[i].isSelected()) { // find next frame that isn't an icon and can be selected int next = (i + 1) % frames.length; while (next != i) { if (!frames[next].isIcon()) { try { // all other frames are icons or veto selection frames[next].setSelected(true); frames[next].toFront(); frames[i].toBack(); return; } catch (PropertyVetoException e) {} } next = (next + 1) % frames.length; } } } Vetoing Property SettingsNow that you have seen all these veto exceptions, you may wonder how your frames can issue a veto. The JInternalFrame class uses a general JavaBeans mechanism for monitoring the setting of properties. We discuss this mechanism in full detail in Chapter 8. For now, we just want to show you how your frames can veto requests for property changes. Frames don't usually want to use a veto to protest iconization or loss of focus, but it is very common for frames to check whether it is okay to close them. You close a frame with the setClosed method of the JInternalFrame class. Because the method is vetoable, it calls all registered vetoable change listeners before proceeding to make the change. That gives each of the listeners the opportunity to throw a PropertyVetoException and thereby terminate the call to setClosed before it changed any settings. In our example program, we put up a dialog box to ask the user whether it is okay to close the window (see Figure 6-51). If the user doesn't agree, the window stays open. Figure 6-51. The user can veto the close property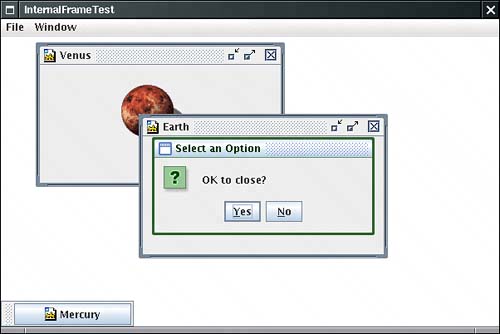 Here is how you achieve such a notification.
Dialogs in Internal FramesIf you use internal frames, you should not use the JDialog class for dialog boxes. Those dialog boxes have two disadvantages:
Instead, for simple dialog boxes, use the showInternalXxxDialog methods of the JOptionPane class. They work exactly like the showXxxDialog methods, except they position a lightweight window over an internal frame. As for more complex dialog boxes, construct them with a JInternalFrame. Unfortunately, you then have no built-in support for modal dialog boxes. In our sample program, we use an internal dialog box to ask the user whether it is okay to close a frame. int result = JOptionPane.showInternalConfirmDialog( iframe, "OK to close?", "Select an Option", JOptionPane.YES_NO_OPTION);; NOTE
Outline DraggingOne criticism that developers have leveled against internal frames is that performance has not been great. By far the slowest operation is to drag a frame with complex content across the desktop. The desktop manager keeps asking the frame to repaint itself as it is being dragged, which is quite slow. Actually, if you use Windows or X Windows with a poorly written video driver, you'll experience the same problem. Window dragging appears to be fast on most systems because the video hardware supports the dragging operation by mapping the image inside the frame to a different screen location during the dragging process. To improve performance without greatly degrading the user experience, you can set "outline dragging" on. When the user drags the frame, only the outline of the frame is continuously updated. The inside is repainted only when the user drops the frame to its final resting place. To turn on outline dragging, call desktop.setDragMode(JDesktopPane.OUTLINE_DRAG_MODE); This setting is the equivalent of "continuous layout" in the JSplitPane class. NOTE
In the sample program, you can use the Window -> Drag Outline checkbox menu selection to toggle outline dragging on or off. NOTE
Example 6-21 populates a desktop with internal frames that show HTML pages. The File -> Open menu option pops up a file dialog box for reading a local HTML file into a new internal frame. If you click on any link, the linked document is displayed in another internal frame. Try out the Window -> Cascade and Window -> Tile commands. This example concludes our discussion of advanced Swing features. Example 6-21. InternalFrameTest.java[View full width] 1. import java.awt.*; 2. import java.awt.event.*; 3. import java.beans.*; 4. import java.io.*; 5. import java.net.*; 6. import java.util.*; 7. import javax.swing.*; 8. import javax.swing.event.*; 9. 10. /** 11. This program demonstrates the use of internal frames. 12. */ 13. public class InternalFrameTest 14. { 15. public static void main(String[] args) 16. { 17. JFrame frame = new DesktopFrame(); 18. frame.setDefaultCloseOperation(JFrame.EXIT_ON_CLOSE); 19. frame.setVisible(true); 20. } 21. } 22. 23. /** 24. This desktop frame contains editor panes that show HTML 25. documents. 26. */ 27. class DesktopFrame extends JFrame 28. { 29. public DesktopFrame() 30. { 31. setTitle("InternalFrameTest"); 32. setSize(DEFAULT_WIDTH, DEFAULT_HEIGHT); 33. 34. desktop = new JDesktopPane(); 35. add(desktop, BorderLayout.CENTER); 36. 37. // set up menus 38. 39. JMenuBar menuBar = new JMenuBar(); 40. setJMenuBar(menuBar); 41. JMenu fileMenu = new JMenu("File"); 42. menuBar.add(fileMenu); 43. JMenuItem openItem = new JMenuItem("New"); 44. openItem.addActionListener(new 45. ActionListener() 46. { 47. public void actionPerformed(ActionEvent event) 48. { 49. createInternalFrame( 50. new JLabel(new ImageIcon(planets[counter] + ".gif")), 51. planets[counter]); 52. counter = (counter + 1) % planets.length; 53. } 54. }); 55. fileMenu.add(openItem); 56. JMenuItem exitItem = new JMenuItem("Exit"); 57. exitItem.addActionListener(new 58. ActionListener() 59. { 60. public void actionPerformed(ActionEvent event) 61. { 62. System.exit(0); 63. } 64. }); 65. fileMenu.add(exitItem); 66. JMenu windowMenu = new JMenu("Window"); 67. menuBar.add(windowMenu); 68. JMenuItem nextItem = new JMenuItem("Next"); 69. nextItem.addActionListener(new 70. ActionListener() 71. { 72. public void actionPerformed(ActionEvent event) 73. { 74. selectNextWindow(); 75. } 76. }); 77. windowMenu.add(nextItem); 78. JMenuItem cascadeItem = new JMenuItem("Cascade"); 79. cascadeItem.addActionListener(new 80. ActionListener() 81. { 82. public void actionPerformed(ActionEvent event) 83. { 84. cascadeWindows(); 85. } 86. }); 87. windowMenu.add(cascadeItem); 88. JMenuItem tileItem = new JMenuItem("Tile"); 89. tileItem.addActionListener(new 90. ActionListener() 91. { 92. public void actionPerformed(ActionEvent event) 93. { 94. tileWindows(); 95. } 96. }); 97. windowMenu.add(tileItem); 98. final JCheckBoxMenuItem dragOutlineItem = new JCheckBoxMenuItem("Drag Outline"); 99. dragOutlineItem.addActionListener(new 100. ActionListener() 101. { 102. public void actionPerformed(ActionEvent event) 103. { 104. desktop.setDragMode(dragOutlineItem.isSelected() 105. ? JDesktopPane.OUTLINE_DRAG_MODE 106. : JDesktopPane.LIVE_DRAG_MODE); 107. } 108. }); 109. windowMenu.add(dragOutlineItem); 110. } 111. 112. /** 113. Creates an internal frame on the desktop. 114. @param c the component to display in the internal frame 115. @param t the title of the internal frame. 116. */ 117. public void createInternalFrame(Component c, String t) 118. { 119. final JInternalFrame iframe = new JInternalFrame(t, 120. true, // resizable 121. true, // closable 122. true, // maximizable 123. true); // iconifiable 124. 125. iframe.add(c, BorderLayout.CENTER); 126. desktop.add(iframe); 127. 128. iframe.setFrameIcon(new ImageIcon("document.gif")); 129. 130. // add listener to confirm frame closing 131. iframe.addVetoableChangeListener(new 132. VetoableChangeListener() 133. { 134. public void vetoableChange(PropertyChangeEvent event) 135. throws PropertyVetoException 136. { 137. String name = event.getPropertyName(); 138. Object value = event.getNewValue(); 139. 140. // we only want to check attempts to close a frame 141. if (name.equals("closed") && value.equals(true)) 142. { 143. // ask user if it is ok to close 144. int result = JOptionPane.showInternalConfirmDialog( 145. iframe, "OK to close?", "Select an Option", JOptionPane javax.swing.JDesktopPane 1.2
javax.swing.JInternalFrame 1.2
javax.swing.JComponent 1.2
java.beans.VetoableChangeListener 1.1
java.beans.PropertyChangeEvent 1.1
java.beans.PropertyVetoException 1.1
|

|
EAN: 2147483647
Pages: 156