Editing Data with Data-Bound Controls
The final topic for this chapter shows a rather more specialized technique for use with the DataList and DataGrid controls. Both these controls provide built-in editing features. They allow you to change the way that a row or item is displayed to indicate to a user that one of the rows is 'selected' (is the 'current row'), or that one of the rows is being used to edit the values in the data source. We'll show an example of editing data with both the DataGrid and DataList controls next .
Editing Data with a DataGrid Control
The DataGrid provides the most automated developer support for inline editing. You can define an EditCommandColumn within the grid, which will automatically handle most of your plumbing and navigation. The Editing Data in a DataGrid Control ( edit-datagrid.aspx ) example page, shown in Figure 7-20, demonstrates what this control can do. When you first open the page, it displays a list of books. However, there is an extra column on the right that contains an Edit hyperlink for each row. When you click on the link, that row goes into edit mode, and the Title and Published columns show textboxes rather than just the values for that row:

Figure 7-20:
After editing the details, click the Update link to save the changes, or the Cancel link to abandon them. As we haven't looked at data management techniques so far, the example page simply creates a suitable SQL statement that would perform the update and displays it. It doesn't actually update the original data (see Figure 7-21):
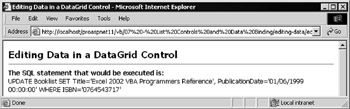
Figure 7-21:
Let's see how this works. The HTML section of this page contains a <form> element, which contains the DataGrid control. The definition of the DataGrid specifies that the background color of the item being edited is yellow. It also specifies that the DataKeyField in the source dataset is the ISBN column. This useful feature of the list controls means that even if you need to access it to perform data updates, you don't have to include the primary key of the source dataset in your columns (as long as it's in the source rowset you are binding the control to). For any row, you can access the primary key from this collection, as seen later in this example.
The next three attributes in the opening DataGrid tag are used to specify the names of the event handlers that will be executed in response to the user clicking the Edit, Update, and Cancel links that the EditCommandColumn will generate for you. Finally, you set the AutoGenerateColumns property to False as you want to create your own column structure for the grid:
<form runat="server"> <ASP:DataGrid id="MyDataGrid" runat="server" CellPadding = "2" EditItemStyle-BackColor="yellow" EditItemStyle-ForeColor="black" DataKeyField="ISBN" OnEditCommand="DoItemEdit" OnUpdateCommand="DoItemUpdate" OnCancelCommand="DoItemCancel" AutoGenerateColumns="False">
As the automatic generation of the columns is turned off, you must specify the columns that you want to appear within the <ASP:DataGrid> definition. Include a BoundColumn that displays values from the ISBN column in your data source, a custom TemplateColumn that displays the Title , followed by another BoundColumn that displays the PublicationDate . Include the attribute ReadOnly="True" for the ISBN column; you wouldn't want the user to be able to edit values in this column (as it is the primary key of the source table).
A custom TemplateColumn is used instead of a BoundColumn for the Title column for a couple of reasons. Firstly, the automatic editing feature displays a textbox instead of a simple text value in all the columns that are not read-only. However, this textbox isn't large enough to comfortably accommodate a long string, so you need to specify the editing control yourselves and make it 60 characters long.
Secondly, this gives you the chance to see how you can provide non-standard edit controls for a column if required. Just specify an <ItemTemplate> element to be used to display the column values in normal mode, and an <EditItemTemplate> element that defines the control to be used in edit mode. All the template declarations are as follows :
<Columns> <ASP:BoundColumn DataField="ISBN" HeaderText="ISBN" ReadOnly="True" /> <ASP:TemplateColumn HeaderText="Title"> <ItemTemplate> <ASP:Label Text='<%# Container.DataItem("Title") %>' runat="server" /> </ItemTemplate> <EditItemTemplate> <ASP:TextBox id="txtTitle" Size="60" Text='<%# Container.DataItem("Title") %>' runat="server" /> </EditItemTemplate> </ASP:TemplateColumn> <ASP:BoundColumn DataField="PublicationDate" HeaderText="Published" /> <ASP:EditCommandColumn EditText="Edit" CancelText="Cancel" UpdateText="Update" /> </Columns> </ASP:DataGrid> </form>
As you can see, the last column is the EditCommandColumn mentioned earlier. While there are many attributes that can be applied to this column to control the formatting (basically the same as for the list controls themselves such as the font style, column heading, wrapping behavior, and so on), you've just specified the text you want to use for the three commands that can appear in this column. That completes the definition of your DataGrid control.
The Page_Load Event Handler
When the page first loads, you must create the data set being used as the source of the DataGrid control. As shown in the following code, this is done in the Page_Load event handler “ but only if this is not a postback (as you've seen in plenty of earlier examples):
Sub Page_Load() If Not Page.IsPostback Then BindDataGrid() 'create dataset and bind to grid control End If End Sub
The BindDataGrid routine is responsible for fetching the data from the database through a DataReader object, binding it to the control, and then calling the DataBind method of the DataGrid to display the data. Again, this is the same routine as used in previous examples:
Sub BindDataGrid() ... 'create a DataReader object to retrieve the data ... MyDataGrid.DataSource = objDataReader MyDataGrid.DataBind() End Sub
Displaying the UPDATE SQL Statement
Another subroutine that's used in this page is responsible for displaying the SQL statement that you generate, and display it in a Label control in the HTML section at the top of the page:
<ASP:Label id="lblSQL" runat="server" /> This routine, named ExecuteSQLStatement , would normally be responsible for executing the SQL statement against the back-end database or other data source in order to update the values in line with the edits made in the DataGrid . However, in this example page, we just display the SQL statement as shown:
Sub ExecuteSQLStatement(strSQL) lblSQL.Text = "The SQL statement is: <br />" & strSQL End Sub
Handling Item Edit Events
All that remains is to handle the three events you specified in the definition of the DataGrid control. You have to react to the EditCommand , UpdateCommand , and CancelCommand events.
The EditCommand event is raised when the user clicks the Edit link in any row within the grid. For this event, you specified the DoItemEdit event handler routine. Within this routine, first clear any existing SQL statement from the Label at the top of the page (to avoid any confusion). Then set the EditItemIndex property of the DataGrid control to the index of the row that contained the Edit link the user clicked.
You get this index from the parameters of the event handler “ the code is passed a DataGridCommandEventArgs object that exposes the ItemIndex property of the item that was selected. Finally, the grid is rebound to display the new layout:
Sub DoItemEdit(objSource As Object, objArgs As DataGridCommandEventArgs) lblSQL.Text = "" 'clear text from label that shows SQL statement 'set the EditItemIndex property of the grid to this item's index MyDataGrid.EditItemIndex = objArgs.Item.ItemIndex BindDataGrid() 'bind the data and display it End Sub
The default value of the EditItemIndex property is -1 , which indicates that none of the rows is in edit mode. When the DataGrid control comes to render the grid, it will detect that the EditItemIndex has been set to a different value, and will automatically render the specified row with the contents of your <EditItemTemplate> element, or with textboxes instead of plain text for ordinary bound columns where you haven't specified a custom <EditItemTemplate> element.
Handling the Update and Cancel Events
Now that the grid is in edit mode, you just need to handle the Update and Cancel events. A click on the Cancel link should execute the DoItemCancel event handler. In this event handler, all you need to do is switch the grid back out of edit mode by setting the EditItemIndex property back to -1 :
Sub DoItemCancel(objSource As Object, objArgs As DataGridCommandEventArgs) 'set EditItemIndex property of grid to -1 to switch out of Edit mode MyDataGrid.EditItemIndex = -1 BindDataGrid() 'bind the data and display it End Sub
However, if the user clicks the Update link, the DoItemUpdate event handler will be called. Here, you have to create a suitable SQL statement, or execute some stored procedure or other code to update the original source data. We're just generating a simple SQL UPDATE statement in the example, and for this it's necessary to get the edited values from the DataGrid row that the user is working on.
Two different techniques are used in this example (in order to illustrate the options and demonstrate how it can be done). After declaring two variables to hold references to the textboxes that contain the edited values, first access the Title textbox (named txtTitle ) using the FindControl method of the item that is contained in the DataGridCommandEventArgs object (which was passed to the event handler as a parameter). You have to convert (cast) the return value to the correct type “ in this case a TextBox object.
For the second textbox, access the Cells collection for the item contained in the DataGridCommandEventArgs object. From the third cell in the row (the PublicationDate column), you can use the Controls collection of that cell to get a reference to the textbox it contains. This technique is best used when the column is a normal BoundColumn or auto-generated column “ it doesn't work with a custom column created with templates (which is why you used the FindControl technique with your Title column).
Sub DoItemUpdate(objSource As Object, objArgs As DataGridCommandEventArgs) 'get a reference to the title and publication date textboxes Dim objTitleCtrl, objPubDateCtrl As TextBox objTitleCtrl = CType(objArgs.Item.FindControl("txtTitle"), TextBox) objPubDateCtrl = objArgs.Item.Cells(2).Controls(0)
Once you've got references to the two controls, you can create the SQL UPDATE statement and call the ExecuteSQLStatement routine to execute it against the data source (or just display it in the example page). You get the value of the primary key for the current row (the ISBN) from the DataKeys collection. Recall that you included the DataKeyField="ISBN" attribute in the definition of your DataGrid control, so you can get the value of the ISBN column for this row using the row index against the DataKeys collection. Finish off by switching the grid out of edit mode by setting the EditItemIndex property of the DataGrid control back to -1 , and rebind the control to display the result:
'create a suitable SQL statement and execute it Dim strSQL As String strSQL = "UPDATE Booklist SET Title='" & objTitleCtrl.Text & "', " _ & "PublicationDate='" & objPubDateCtrl.Text & "' " _ & "WHERE ISBN='" & MyDataGrid.DataKeys(objArgs.Item.ItemIndex) & "'" ExecuteSQLStatement(strSQL) 'set EditItemIndex property of grid to -1 to switch out of Edit mode MyDataGrid.EditItemIndex = -1 BindDataGrid() 'bind the data and display it End Sub
It's taken a while to explain this example, but there really isn't a lot of code in it. The code that is required is relatively simple and well structured. We are just reacting to events that the DataGrid control raises, so debugging and modifying the page is far less error-prone than with any technique used for the same thing in previous versions of ASP.
Selecting and Editing Data with a DataList Control
The second control that provides inline editing capabilities automatically is the DataList . In fact, you can do more with this control as far as selecting or editing data goes, but it requires more code and greater effort to use. One additional feature is its ability to easily switch the control into selected mode, where one row becomes the current row and is highlighted by applying different styles or formatting to that row.
The example page shown in Figure 7-22, Selecting and Editing Data in a DataList Control ( select-edit datalist.aspx ), demonstrates both selecting and editing rows in a DataList control. When first opened, it displays a list of book titles. Each one has an Info button at the left-hand end of the row. If you click one of these buttons , that row becomes selected “ and both the format and content change to reflect the following:
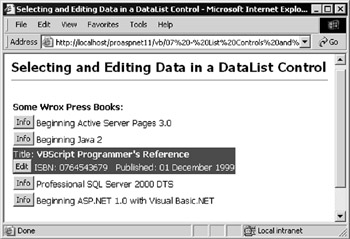
Figure 7-22:
An Edit button also appears in the selected row. When you click this button, that row goes into edit mode, as shown in Figure 7-23. The book title and publication date appear in textboxes in which they can be edited. At the same time, three other buttons appear in the row “ allowing you to update the row with your changes, delete the current row, or cancel your updates:
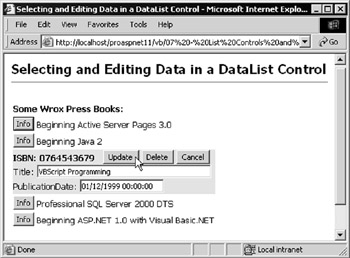
Figure 7-23:
When you select the Update or Delete option, a suitable SQL UPDATE or DELETE statement is generated and displayed in the page as shown in Figure 7-24. As in the previous example, it doesn't actually execute the statement against the data store:
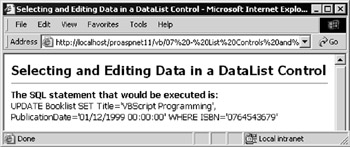
Figure 7-24:
While this example looks quite different from the previous DataGrid example, they have a lot of similarities and they share a lot of code. The HTML section of the page contains a <form> , and within this is the definition of the DataList control. In this case, you have some extra style properties, because you now have a selected mode as well as an edit mode. As before, set the DataKeyField attribute to "ISBN" (the name of the primary key column in your data source). You also have to specify the event handlers for your edit commands. In this case, you have to react to the ItemCommand event as well, so that you can detect a click on the Info button and put that row into selected mode:
<ASP:DataList id="MyDataList" runat="server" CellSpacing = "2" SelectedItemStyle-BackColor="red" SelectedItemStyle-ForeColor="white" EditItemStyle-BackColor="yellow" EditItemStyle-ForeColor="black" DataKeyField="ISBN" OnItemCommand="DoItemSelect" OnEditCommand="DoItemEdit" OnUpdateCommand="DoItemUpdate" OnDeleteCommand="DoItemDelete" OnCancelCommand="DoItemCancel">
The remainder of the control definition contains the four templates needed. The <HeaderTemplate> element defines what appears at the top of the control, followed by the <ItemTemplate> element that defines the normal content for rows that are not selected or being edited. An ordinary ASP:Button control is used for the Info button in each row, with the CommandName property set to Select , and this button and the book title are displayed:
<HeaderTemplate> <b>Some Wrox Press Books:</b><br /> </HeaderTemplate> <ItemTemplate> <ASP:Button CommandName="Select" Text="Info" runat="server" /> <%# Container.DataItem("Title") %> </ItemTemplate>
Next is the <SelectedItemTemplate> element, which is used for the row that is currently in selected mode. This is the row specified by the SelectedIndex property of the DataList (as with the EditItemIndex property of the DataGrid control, the value of this property is -1 if no row is selected). As shown in the following code, we display the book title, a button with the caption and CommandName value of Edit , the ISBN for this book, and the publication date, for the selected row:
<SelectedItemTemplate> Title: <b><%# Container.DataItem("Title") %></b><br /> <ASP:Button CommandName="Edit" Text="Edit" runat="server" /> ISBN: <%# Container.DataItem("ISBN") %> Published: <%# DataBinder.Eval(Container.DataItem, "PublicationDate", "{0:D}") %> </SelectedItemTemplate>
This provides the selected row appearance you saw earlier, repeated here in Figure 7-25:
Figure 7-25:
The Edit button will be used to put the DataList row into edit mode. When this happens, the control will use the contents of the <EditItemTemplate> element to render the content for this row. As shown in the following code, display the ISBN followed the Update, Delete, and Cancel, buttons. Then, on the next line, display two textboxes that are bound to the Title and PublicationDate columns in the data source.
<EditItemTemplate> <b>ISBN: <%# Container.DataItem("ISBN") %></b> <ASP:Button CommandName="Update" Text="Update" runat="server" /> <ASP:Button CommandName="Delete" Text="Delete" runat="server" /> <ASP:Button CommandName="Cancel" Text="Cancel" runat="server" /><br /> Title: <ASP:TextBox id="txtTitle" Text='<%# Container.DataItem("Title") %>' size="46" runat="server" /><br /> PublicationDate: <ASP:TextBox id="txtPubDate" size="20" runat="server" Text='<%# Container.DataItem("PublicationDate") %>' /> </EditItemTemplate> </ASP:DataList>
This is a deliberate design feature of our example page, and is not a requirement. In your applications, you are free to put a row into edit mode without having to put it into selected mode first.
Figure 7-26 shows how the row we're editing looks like when edit mode, in this example:
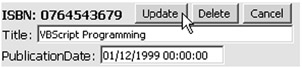
Figure 7-26:
The Page_Load event handler is the same as used for the previous DataGrid example, as is the BindDataGrid routine. The page also contains the same ExecuteSQLStatement routine that displays the SQL statement you'll build when the Update or Delete buttons are clicked. What are slightly different are the routines that perform the switch to select mode and edit mode, and those that generate the SQL statements.
Selecting a Row
The ItemCommand event handler, for which you specified the DoItemSelect routine, is executed when any command button or link within the rows of the control is clicked. All you need to do to select a row in your DataList is set the SelectedIndex property of the control. Before you do this, clear any existing text from the Label control at the top of the page that displays your SQL UPDATE or DELETE statements.
However, there is an important issue to be aware of here. We specified other command buttons in the templates for the DataList “ those that activate the Update , Delete , and Cancel commands when the grid is in edit mode. These three events will automatically call the event handlers that you specified when you defined the control. But they also call the ItemCommand event handler “ they raise the ItemCommand event as well as their own event.
This means that you must check which control was used to raise the event in the ItemCommand event handler (the DoItemEvent routine). Select the row only if it is the Info button, which has the CommandName value of Select . Now, the grid will automatically render your <SelectedItemtemplate> contents for the row indicated by the SelectedIndex property.
Sub DoItemSelect(objSource As Object, objArgs As DataListCommandEventArgs) lblSQL.Text = "" 'clear any content from SQL statement Label 'see if it was the Select button that was clicked If objArgs.CommandName = "Select" Then 'set the SelectedIndex property of the list to this item's index MyDataList.SelectedIndex = objArgs.Item.ItemIndex BindDataGrid() 'bind the data and display it End If End Sub
Editing a Row
Once you put a row into selected mode in your example, it displays a button that can be used to put that row into edit mode The Edit button has the CommandName value Edit , which means that it will raise the EditCommand event (as well as the ItemCommand event) when clicked. Specify your DoItemEdit routine (shown in the following code) as the event handler for the EditCommand event, and in it first unselect this row by setting the SelectedIndex property of the control to -1 , and then set the EditIndex property to this row index and rebind the grid. The contents of the <EditItemTemplate> will be used when this row is rendered.
Sub DoItemEdit(objSource As Object, objArgs As DataListCommandEventArgs) 'set the SelectedIndex propery of the list to -1 to "unselect" it MyDataList.SelectedIndex = -1 'set the EditItemIndex property of the list to this item's index MyDataList.EditItemIndex = objArgs.Item.ItemIndex BindDataGrid() 'bind the data and display it End Sub
Updating a Row
Once in edit mode, the row displays the Update, Delete, and Cancel buttons. The Update button has the CommandName value Update , and so it will raise the UpdateCommand event when clicked. This will execute the DoItemUpdate routine, which was specified as the handler for this event in the definition of the DataList control.
In this routine, as in the previous DataGrid example, get a reference to the txtTitle and txtPubDate textboxes in this row, and use their values to build a SQL statement to update the row in the original data source. Again, you get the ISBN (the primary key for the row) from the DataKeys collection.
Then, after executing the SQL statement (or, in this example, just displaying it), switch the row out of edit mode by setting the EditItemIndex of the DataList control to -1 , and rebind the control to display the updated results:
Sub DoItemUpdate(objSource As Object, objArgs As DataListCommandEventArgs) 'get a reference to the title and publication date textboxes Dim objTitleCtrl, objPubDateCtrl As TextBox objTitleCtrl = CType(objArgs.Item.FindControl("txtTitle"), TextBox) objPubDateCtrl = CType(objArgs.Item.FindControl("txtPubDate"), TextBox) 'create a suitable SQL statement and execute it Dim strSQL As String strSQL = "UPDATE Booklist SET Title='" & objTitleCtrl.Text & "', " _ & "PublicationDate='" & objPubDateCtrl.Text & "' " _ & "WHERE ISBN='" & MyDataList.DataKeys(objArgs.Item.ItemIndex) & "'" ExecuteSQLStatement(strSQL) 'set EditItemIndex property of grid to -1 to switch out of Edit mode MyDataList.EditItemIndex = -1 BindDataGrid() 'bind the data and display it End Sub
Deleting a Row
The DeleteCommand event handler specified in the definition of the DataList control is the routine named DoItemDelete . This is a relatively simple routine when compared to the update event handler. As shown in the following code, you can build a SQL DELETE statement, using the ISBN value obtained from the DataKeys collection, execute it, switch the row back out of edit mode, and rebind the grid to display the results:
Sub DoItemDelete(objSource As Object, objArgs As DataListCommandEventArgs) 'create a suitable SQL statement and execute it Dim strSQL As String strSQL = "DELETE FROM Booklist WHERE ISBN='" _ & MyDataList.DataKeys(objArgs.Item.ItemIndex) & "'" ExecuteSQLStatement(strSQL) 'set EditItemIndex property of grid to -1 to switch out of Edit mode MyDataList.EditItemIndex = -1 BindDataGrid() 'bind the data and display it End Sub
Canceling Edit Mode
Canceling edit mode is the same as that on the DataGrid example previously. In the definition of the DataList control we'd specified the DoItemCancel routine as the event handler for the CancelCommand event. In this routine, just set the EditItemIndex property of the DataList control to -1 and rebind the grid:
Sub DoItemCancel(objSource As Object, objArgs As DataListCommandEventArgs) 'set EditItemIndex property of grid to -1 to switch out of Edit mode MyDataList.EditItemIndex = -1 BindDataGrid() 'bind the data and display it End Sub
That's it. You've built a responsive , intuitive, and attractive data update page with only a handful of controls and relatively few lines of code. To do the same using ASP 3.0 would take a great deal longer, and require a great deal more effort and a lot more code.
We haven't looked very deeply at how the relational data management processes are carried out. We've used fairly simple data access code to get sets of data from a database, and displayed the explicit SQL statements you could use to perform updates. However, the next four chapters of this book are devoted to data management, using both relational data and XML.
EAN: 2147483647
Pages: 243