ASP.NET Process Account and Trust Levels
There are several different ways that you can configure reduced permissions in ASP.NET. They all revolve around the ultimate decision that you have to make “ which account should you run the pages under? Once you know which account is being used, or specify the one that you want to use, you can use the Windows ACLs on all the resources on your machine to limit and control access.
Specifying the Process Account
The <processModel> element in machine.config (or in a web.config file placed in the application directory) specifies which account is used when impersonation is not enabled:
<processModel enable="[true false]" userName="[user]" password="[AutoGenerate password]" />
The default settings in machine.config are:
<processModel enable="true" userName="machine" password="AutoGenerate" />
So, by default, all your ASP.NET pages and resources will be executed under the special process account “ the account with the moniker of ASPNET in Windows 2000, Windows XP, and Windows NT4, or NETWORK SERVICE in Windows Server 2003. However, there is another moniker value you can use here instead, namely system, and with the password also set to AutoGenerate. This causes ASP.NET to run under a local SYSTEM account:
<processModel enable="true" userName="system" password="AutoGenerate" />
An alternative is to specify that ASP.NET pages and resources should be processed under the context of some other Windows account by changing the userName and password values in the <processModel> element “ either for the entire machine (in machine.config ), or for a specific application directory. As a trivial example, you can run your ASP.NET pages and resources under an account (that you create) named "MyProcess" with the password "secret" by specifying this account:
<processModel enable="true" userName="MyProcess" password="secret" />
This approach is useful in a hosting scenario. It allows you to lock down individual applications to the specific accounts of the administrators for each application or site, and prevent them from being able to access other applications or sites. Note that the settings specified in the <processModel> element are only applicable to ASP.NET, and do not affect other types of application or service running under the .NET Framework.
The Identity Element and Impersonation
The <processModel> element provides account details that are used only when impersonation is not enabled. Recall from our discussions near the start of this chapter that turning on impersonation means that ASP.NET will run under the context of the account that is authenticated by IIS when a request is received. If IIS is configured to allow anonymous access (the default for a web site), then the context is that of the IUSR account (or the account you specified that IIS use for anonymous access if you changed this).
Simply adding the <identity impersonate="true"> element within the <system.web> section of the machine.config or web.config files means that anonymous access will take place under the IIS anonymous account (IUSR_machinename):
<system.web> ... <identity impersonate="true" /> ... </system.web>
Another possibility is to use the userName and password attributes of the <identity> element to specify the account that you want ASP.NET resources to be executed under. In this case you also set the impersonate attribute to true :
<system.web> ... <identity impersonate="true" userName=" account-name " password=" account-password " /> ... </system.web>
Note that the settings specified in the <identity> element are applicable only to ASP.NET, and not to the rest of the .NET Framework. You also might like to consider the wisdom of using this last option where the password must be stored in the file as plain text.
| Note | In fact there is a little more to it than this. The <processModel> element specifies the account under which the worker process is run when it's enabled (it's not in IIS6 in native mode, for example). All threads start as the specified account. When impersonation is enabled, they temporarily take on the impersonated context. Calling the RevertToSelf method will always get back to the process account. There are a couple of events that fire without a Request context being available, such as Application_OnEnd , and these always run under the context of the process account. |
ASP.NET Process Account Permissions
We've mentioned several times in this chapter how ASP.NET pages and associated resources such as web services, user controls, components , etc., run under the special process accounts ASPNET or NETWORK SERVICE (depending on the operating system version) by default. These accounts have broadly the same privileges as the IUSR_machinename account that is created when IIS is installed (and as used with ASP 3.0). However they require extra privileges beyond that of the IUSR account, due to the fact that ASP.NET takes advantage of dynamic compilation and disk caching features.
If you configure an application to use impersonation (i.e. run under a different account), or change the process account within the <processModel> section of web.config , the account you use must have the following permissions:
-
The ASP.NET installation folder hierarchy ( %installroot% ):This is where the .NET Framework assemblies and machine configuration files reside. The process account you use must have read access to these folders.
-
The folder used for dynamic compilation of ASP.NET pages and resources :The root folder for this is %installroot%\ASP.NET Temporary Files . Application code generation occurs in a discrete directory beneath this folder for each application (the location of this root folder can be configured using the tempDir attribute of the <compilation> section of web.config ). The process account you use must have read/write access to these folders.
-
The Global Assembly Cache (GAC) folder :This is where shared assemblies are located (usually %windir%\assembly ). The process account you use must have read access to this folder.
-
The folder used by web services to generate serialization proxies :By default this is %windir%\temp . The process account you use must have read/write access to this folder.
-
The Default web site root folder (usually % systemdrive %\inetpub\ wwwroot ):The process account you use must have READ access to the root folder and its subfolders . If you want to write to the disk from an ASP.NET page or other resource, you must enable WRITE permission for the target folder as well (in the same way as was required under ASP 3.0).
-
Your own application directories :where the application content resides. The process account you use must have READ access to these folders. If you want to write to the disk from an ASP.NET page or other resource, you must enable WRITE permission for the target folder as well (in the same way as was required under ASP 3.0).
Specifying the Trust Level
By default, ASP.NET runs in a mode called Full Trust level, which applies few security limits on the code that can be executed. This is fine for an Intranet scenario or a development machine, but once you place the server on the Internet you should consider reducing the permissions available to the process that the ASP.NET pages are running under.
There is another option for controlling the permissions for ASP.NET to process resources. This takes advantage of the <trust> element in machine.config , and it can be used to set a more stringent trust level . The default setting is Full , specified by this line from the default machine.config file:
<trust level="Full" originUrl="" /> The other options are High , Low , and None , and these apply progressively more stringent limitations on the permissions that code running under the .NET Framework will have. The <securityPolicy> element specifies which security configuration file applies to each of the trust levels:
<securityPolicy> <trustLevel name="Full" policyFile="internal" /> <trustLevel name="High" policyFile="web_hightrust.config" /> <trustLevel name="Low" policyFile="web_lowtrust.config" /> <trustLevel name="None" policyFile="web_notrust.config" /> </securityPolicy>
Each of these files has sections that describe the permissions that are available to .NET Framework applications and code. Some examples of the permissions that can be set are:
-
Which environment variables the code can query.
-
Which directories the code can write to through the file I/O classes.
-
Whether DNS enquiries are allowed.
-
Whether blank passwords can be used with the ADO.NET data providers.
-
Whether messages can be sent to, and received from, the Message Queue Service.
-
Whether access to a printer is permitted.
-
Which performance counters can be accessed.
You can change the trust level and edit the trust configuration files to finely control the permissions available to your code and resources. Remember that the settings specified in the <trust> element are applicable to the whole of the .NET Framework, not just ASP.NET.
A simple configuration Wizard is provided with the Frameworks that can be used to change the trust level. Select Programs Administrative Tools Microsoft .NET Framework 1.1 Wizards, and select the Adjust .NET Security icon, as shown in Figure 14-43:
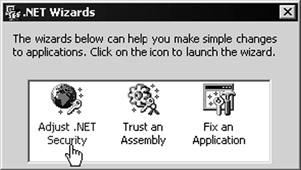
Figure 14-43:
The Adjust .NET Security Wizard allows you to specify which trust level each zone should run under. The defaults are shown in Figure 14-44:
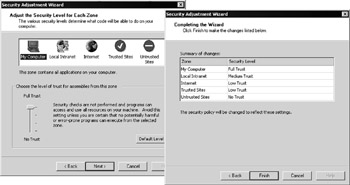
Figure 14-44:
For a detailed explanation of the trust model, code-access security, and other related topics check out the SDK that is provided with the .NET Framework. The section Programming with the .NET Framework includes a whole subsection Securing Applications that is devoted to all the topics we've mentioned in this chapter.
EAN: 2147483647
Pages: 243