ASP.NET Security Examples
So far in this chapter we've discussed the theory of authentication and access control in ASP.NET applications. This section looks at some examples that use the different aspects of security we've been exploring. The samples cover:
-
Configuring a web application using Windows authentication.
-
Accessing the user 's identity within this application.
-
Accessing the user's role within this application.
-
Configuring a web application using forms-based authentication.
-
Using different types of user credentials lists.
-
Accessing the user's identity within this application.
-
A simple personalization example.
Obtaining the Example Files
The example files for this chapter can be downloaded from http://www.daveandal.net/books/8900/. You can also run many of them online at the same URL. The default.htm menu page shown in Figure 14-26 provides links to the example pages.
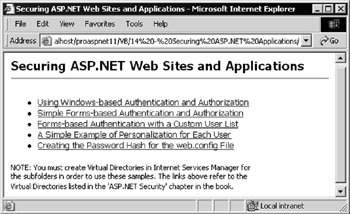
Figure 14-26:
Setting Up the Examples on Your Server
Before you can use the examples we provide, there are a couple of things you need to do. First, you must create a virtual root to each of the subfolders containing the example pages within Internet Services Manager. In the Default Web Site entry for your server, create new virtual roots by right clicking and selecting New Virtual Directory, as shown in Figure 14-27:
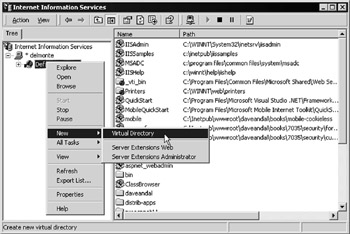
Figure 14-27:
In the Wizard that appears, enter the appropriate alias from the following list, select the corresponding directory where you installed the example files, and then ensure that you leave the Read and Run Scripts permissions selected. The four aliases used (and which are included in the links on the default.htm menu page) are:
-
Secure-forms :Pointing to the folder in the examples named security\forms-based .
-
Secure-custom-forms :For the folder named security\custom-forms-based .
-
Secure-windows :For the folder in security\windows .
-
Secure-personalization :For the folder named security\personalization .
Creating the Windows Test Account and Groups
Our Windows authentication example uses a local user account named TestUser, and two local groups named TestGroup and NoMembers. You should create these using the Computer Management utility on your server “ avoid using a domain controller machine as it will create domain-level accounts rather than local accounts.
As shown in Figure 14-28, right-click the Users entry in Local Users and Groups, and select New User. Enter the account name TestUser, a simple password that you can remember, uncheck User must change password at next logon, and check User cannot change password:
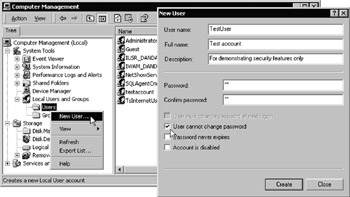
Figure 14-28:
Then click Create followed by Close. Now select the Groups entry, right-click, and select New Group, as shown in Figure 14-29. Name the new group TestGroup, click Add, and select the TestUser account and then your own domain or local user account as members of the group. Click Create to create this group, and then enter the name NoMembers for another group and click Create again followed by Close. As the name suggests, you shouldn't add any members to the NoMembers group.
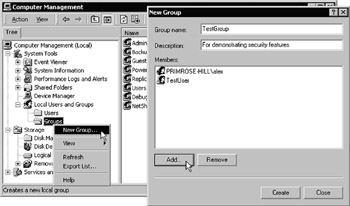
Figure 14-29:
Creating the UserList Database
The only other task is to create the database of users for the custom-forms-based and personalization examples. We've provided a SQL script file named make-security-db.sql in the security folder of the samples that will do this for you. Full instructions on creating the database are included in the file database-readme.txt in the same folder as the SQL script. You may need to edit the web.config files that are located in the two folders security\custom-forms-based and security\personalization to specify the name of your database server (if it is not the default on your machine) in the connection string for the UserList database:
<appSettings> <add key="DsnUserList" value="Provider=SQLOLEDB; server=.; database=UserList; uid=sa; pw=" /> </appSettings>
Finally, you will have to recreate the password hash values and update the database for the final example, as the hash is machine-dependent (it depends on the value of the machineKey element in web.config , for which the default value is AutoGenerate,IsolateApps “ as you saw earlier). You can use the sample page described later in this section to create the new hashes for your machine.
Windows Authentication Example
The first example, Using Windows-based Authentication and Authorization, demonstrates how to use Windows authentication and authorization with a web site or web application directory. It uses the web.config file.
This instructs the server to authenticate the user through IIS and Windows so they must login using a valid Windows account. It is also specified that you want to use impersonation, so the application will run under the context of this account. Then, in the <authorization> section, specify that only members of the built-in Administrators group, the local Administrator account on the machine named DANDARE , and the local test user account named TestUser (on the same machine) can access the folder and its contents.
<configuration> <system.web> <authentication mode="Windows" /> <identity impersonate="true" /> <authorization> <allow roles="BUILTIN\Administrators" users=" DANDARE \Administrator, DANDARE \TestUser" /> <deny users="*" /> </authorization> </system.web> </configuration>
| Important | Remember to edit the machine name when you run the example on your own server. |
If you try and open the page under the context of a different account, access is denied . In Figure 14-30, the page is accessed from a machine that is not on the domain and a username and password combination is specified for an account that does exist on the target server, but which is not included in the list of users specified within the web.config file:
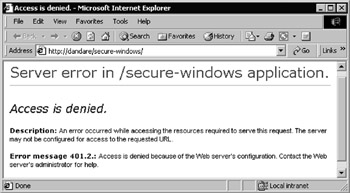
Figure 14-30:
If you now log in using a suitable account that is included in the list in the web.config file, you'll see a page that shows your account login name (your username), and a selection of other information about your account.
In Figure 14-31, we've logged in using the TestUser account created earlier, and our own domain account that has the username alex. You can see the account name, complete with the machine or domain name, the authentication method used, the type of account, and the groups that the account is a member of.

Figure 14-31:
To experiment, you can edit the web.config file to specify different accounts and account groups that are to be permitted access to the folder, and see the effects. Remember to close and reopen your browser each time you edit web.config so that you are not trying to access the pages using the previous logon credentials.
How This Example Works
Simply placing the web.config file into the virtual directory containing your restricted pages is enough to look after authentication and authorization. The page you see when you do successfully log into the application ( default.aspx ) is just responsible for displaying the details of the account you used.
The page includes the Import directives required to use the Windows-based security features. This is needed because you want to be able to access the account information using a WindowsIdentity object:
<%@Import Namespace="System.Security.Principal" %> The HTML part of the page contains a single <div> element that is used to display the account details:
<div id="msgHello" runat="server" /> Checking for Authentication and Accessing the User's Identity
The code that gets information about the current user is in the Page_Load event, so it runs as the page is being created. The first thing to do is check that the user has in fact been authenticated. This will always be the case with the web.config file you're using, but it's a good idea to include this check.
Access the User object via the current context of the page (it is a property of the integral HttpContext object), and get a reference to the user's Identity object from it. The IsAuthenticated property returns True if the user has been authenticated:
Now you can get a reference to the actual WindowsIdentity object for this user. The Identity property returns an Identity object, and you cast this to a WindowsIdentity object (in VB this is done with the CType method). This is why you need to import the System.Security.Principal namespace, as it contains the definition of the WindowsIdentity class. From this WindowsIdentity object you can get more detailed information by calling the GetCurrent method, which also returns a WindowsIdentity object.
Sub Page_Load() 'see if the user has been authenticated If User.Identity.IsAuthenticated Then 'create a reference to a WindowsIdentity object that 'represents this user's Indentity object Dim objIdentity = CType(User.Identity, WindowsIdentity) 'get the current WindowsIdentity object for this user 'this contains more specific information Dim objWinIdentity = objIdentity.GetCurrent() ...
| Note | You can use the original WindowsIdentity object returned by the Users property instead of creating the second one using the GetCurrent method. However, the GetCurrent method builds the identity using the operating system-level process token rather than just using the current HTTPContext object, and so contains information about the logon account that is not available when impersonation is turned off and you are running under the IIS anonymous account. |
Displaying the Account Details
You can now access your WindowsIdentity object to display information about this user's account. As shown in the following code, display the username and authentication type from the appropriate properties, and you can tell if the account is a System , Anonymous , or Guest account using three more of the properties of the WindowsIdentity object:
... 'display the properties msgHello.InnerHtml = "Hello " & objWinIdentity.Name & "<br />" _ & "The authentication method used was " _ & objWinIdentity.AuthenticationType & "<br />" _ & "Is this a System account: " _ & objWinIdentity.IsSystem & "<br />" _ & "Is this an Anonymous account: " _ & objWinIdentity.IsAnonymous & "<br />" _ & "Is this a Guest account: " _ & objWinIdentity.IsGuest & "<br />" _ ...
Accessing the User's Role
Now you can investigate which roles (that is, which Windows account groups) this user account belongs to. For this, you can use the IsInRole method of the User object, and specify the account group you're checking against.
Of course, you'll have to edit the code here to specify your own machine name “ and you can add checks to see if the account is in other groups that exist on your own server and domain. However, it's easy to see from this how you can use programmatic security techniques to modify the behavior of an application based on the details of the user that are exposed by the WindowsIdentity object. We demonstrate a few of these techniques in conjunction with forms-based authentication in the final example of this chapter.
The final few lines in the page complete the If .. Then construct, and (just for completeness) display a message if the user accessed this page without being authenticated.
... & "Is this account a member of 'Administrators' group: " _ & User.IsInRole("BUILTIN\Administrators") & "<br />" _ & "Is this account a member of the 'Users' group: " _ & User.IsInRole("BUILTIN\Users") & "<br />" & "Is this account a member of ' DANDARE \TestGroup' group: " _ & User.IsInRole(" DANDARE \TestGroup") & "<br />" _ & "Is this account a member of 'DANDARE \NoMembers' group: " _ & User.IsInRole(" DANDARE \NoMembers") Else msgHello.InnerHtml = "Hello, you were not authenticated" End If End Sub
Forms-Based Authentication Examples
The next two examples in this chapter demonstrate forms-based authentication. The first one, Simple Forms-Based Authentication and Authorization, uses the web.config file. You can see that we've specified the page named login.aspx as the loginUrl , so this is the page that will be loaded when a user attempts to access the application when they have not been authenticated.
We also include a <credentials> section that specifies the username and passwords for three users that will be permitted access to the application. The <authorization> section that follows this specifies that these three users are the only ones that will be permitted access. Include a <deny users="?"> element to prevent any anonymous access to the application.
<configuration> <system.web> <authentication mode="Forms"> <forms name="MyApp02" path="/" loginUrl="login.aspx" protection="All" timeout="30"> <credentials passwordFormat="Clear"> <user name="billjones" password="test" /> <user name="marthasmith" password="test" /> <user name="joesoap" password="test" /> </credentials> </forms> </authentication> <authorization> <allow users="billjones,marthasmith,joesoap" /> <deny users="?" /> </authorization> </system.web> </configuration>
When you first access the default.aspx page in the protected folder, you are redirected to the login page, as shown in Figure 14-32. You must enter the credentials of one of the users specified in the web.config file, such as marthasmith and test:
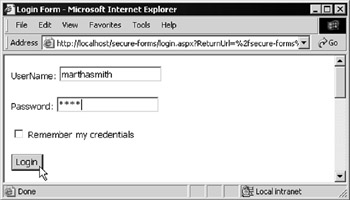
Figure 14-32:
For the time being, leave the Remember my credentials checkbox unchecked, and click Login. If you got the username and password right, you'll be redirected to the default.aspx page. It displays the username that you entered and the type of authentication used, as shown in Figure 14-33.

Figure 14-33:
If you didn't get them right, you'll see a message appear below the Login button indicating that your credentials were invalid, as shown in Figure 14-34:
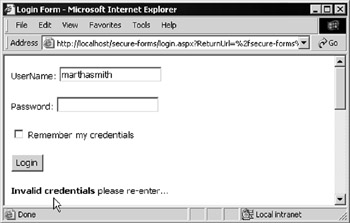
Figure 14-34:
Using a Persistent Logon
Now close and reopen you browser and reload the default.aspx page. You will be redirected to the login page again. This time, check the Remember my credentials checkbox before you click Login to store a persistent cookie on your machine. Then close and reopen you browser (do not click the Log Off button), and reload the default.aspx page again. This time you are not redirected to the login page, and the server can extract and display your username and authentication method as before.
This is because you have the authentication cookie stored on your machine. To see the cookie that is used, open the Temporary Internet Files folder. The easiest way is to select Internet Options from the Tools menu in Internet Explorer, click Settings and View Files. Find the file named Cookie:[Windows-user-name]@[your-machine-name] and double-click to open it and view the contents. You'll see something like Figure 14-35, showing the encrypted ticket that allows you access to the page without requiring an explicit login:
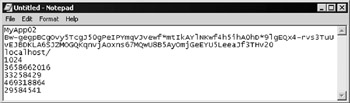
Figure 14-35:
Logging Off
Now go back to the page that displays your name and authentication type (the default.aspx page), and click the Log Off button. You are immediately redirected back to the logon page. The cookie holding your authentication details has been destroyed (not sent back to the browser), and so you must log in again to recreate it before you can access any restricted pages. You can also check your browser's Temporary Internet Files folder to confirm that the cookie is no longer there (press F5 to refresh the list).
How This Example Works
When users first access an ASP.NET page in this folder, they are redirected to the page login.aspx . The HTML section of the login.aspx page contains a <form> with textboxes for the username and password, a checkbox where the user can specify a persistent logon, and a button to submit the form to the server. There is also a <div> element where you can display a message if the user cannot be authenticated.
The remainder of this page contains a single subroutine that is executed on the server when the user clicks the Login button. This is the same code as we discussed earlier in the chapter. First it checks the credentials provided against the list of users in web.config by calling the Authenticate method of the FormsAuthentication object, and passing it the username and password. If this returns True , it redirects the user back to the page they originally requested “ in your example this is default.aspx .
If the user cannot be authenticated, the Else section of the If..Then construct displays a message to this effect in the <div> element at the bottom of the page.
<form runat="server"> UserName: <input id="txtUsr" type="text" runat="server" /><p /> Password: <input id="txtPwd" type="password" runat="server" /><p /> <ASP:CheckBox id="chkPersist" runat="server" /> Remember my credentials<p /> <input type="submit" Value="Login" runat="server" onserverclick="DoLogin" /><p /> <div id="outMessage" runat="server" /> </form> Sub DoLogin(objSender As Object, objArgs As EventArgs) If FormsAuthentication.Authenticate(txtUsr.Value, txtPwd.Value) Then FormsAuthentication.RedirectFromLoginPage(txtUsr.Value, _ chkPersist.Checked) Else outMessage.InnerHtml = "<b>Invalid credentials</b> please re-enter." End If End Sub
The default.aspx Page
If the user has been successfully authenticated, they will be redirected to the page that they attempted to load originally ( default.apx in your example). The page contains a <div> element where we'll display some details about the user, and an HTML <form> on which there is a single submit button labeled Log Off :
<div id="msgHello" runat="server" /><p /> <form runat="server"> <input type="submit" Value="Log Off" runat="server" onserverclick="DoSignOut" /> </form>
Accessing the User's Identity
Getting the user's name and authentication method is easy when using forms-based authentication. First check that they were authenticated (as in the previous Windows authentication example) and if so, you can access the properties of the User.Identity object. And again, as before, you can display a message if the user was not authenticated.
Sub Page_Load() 'see if the user has been authenticated If User.Identity.IsAuthenticated Then 'display the properties msgHello.InnerHtml = "Hello " & User.Identity.Name & "<br />" _ & "The authentication method used was " _ & User.Identity.AuthenticationType Else msgHello.InnerHtml = "Hello, you were not authenticated" End If End Sub
Logging a User Out of an Application
The log off button on this page has its onserverclick event set to DoSignOut . This is the name of the event handler that is executed when the user clicks this button. The code itself is trivial, as you can see from the following code:
Sub DoSignOut(objSender As Object, objArgs As EventArgs) 'destroy the users authentication cookie FormsAuthentication.SignOut() 'and redirect them to the login page Response.Clear() Response.Redirect(Request.UrlReferrer.ToString()) End Sub
And once you've executed the SignOut method, you can redirect the browser back to the referring page (in this case the login page). They can then experiment and log on using a different account.
Encrypting the Passwords in web.config
One thing you may have noticed in the web.config file used in this example is that the user's passwords are stored in plain text. The following code was used:
<credentials passwordFormat="Clear"> <user name="billjones" password="test" /> <user name="marthasmith" password="test" /> <user name="joesoap" password="test" /> </credentials>
This would be a security risk if anyone could get to see the web.config file. They cannot download the file from the site, as all requests for this file are blocked automatically by ASP.NET. However, local users might access it, and could then see the complete list of username/password combinations that are valid for the site. To prevent this, you can encrypt the passwords within the web.config file.
The delightfully named HashPasswordForStoringInConfigFile method (exposed by the FormsAuthentication object used earlier) provides an easy way to do this. We've included an example page that takes a password and encrypts it using either the SHA1 or MD5 algorithm. These are the two encryption methods supported by ASP.NET.
Password Hashing Example
The page is named hash-password.aspx and is in the security folder of the samples we provide for this chapter. You can open it from the main menu page ( default.htm ) in the same folder. Simply select the encryption type as shown in Figure 14-36, enter the password, and click the Create Hash button.
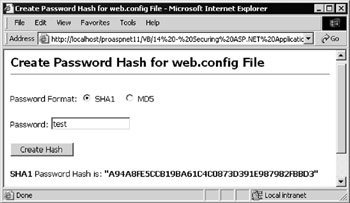
Figure 14-36:
Now you can copy the password hash into the appropriate user's entry in web.config , and change the setting for the passwordFormat in the <credentials> element to suit the encryption method used, as shown in the following code:
<credentials passwordFormat="SHA1"> <user name="billjones" password="87F8ED9157125FFC4DA9E06A7B8011AD80A53FE1" /> <user name="marthasmith" password="2E1FA0D4D3B6CA2623EA6AF07624C3CD29D47344" /> <user name="joesoap" password="36854FAFECB73E79DC3DFF61E76CF24CF8B490CC" /> </credentials>
How the Password Hashing Example Works
The HTML section of this example page is just a simple <form> containing the two radio buttons , the textbox for the password, and a Create Hash button. There is also a <div> element that is used to display the result.
Next is the code to create the hash, which runs when the Create Hash button is clicked. It gets the encryption type from the selected radio button (using the Request.Form collection), and passes it and the password to the HashPasswordForStoringInConfigFile method. The result is then displayed in the <div> element.
<form runat="server"> Password Format: <input type="radio" value="SHA1" name="chkFormat" checked="true" runat="server" /> SHA1 <input type="radio" value="MD5" name="chkFormat" runat="server" /> MD5<p /> Password: <input id="txtPwd" type="text" runat="server" /><p /> <input type="submit" value="Create Hash" runat="server" onserverclick="DoHashPassword" /><p /> <div id="outMessage" runat="server" /> </form> Sub DoHashPassword(objSender As Object, objArgs As EventArgs) Dim strHash, strFormat As String 'get the format name as a string from the radio button value strFormat = Request.Form("chkFormat") 'create the hash using the password value provided strHash = FormsAuthentication.HashPasswordForStoringInConfigFile _ (txtPwd.Value, strFormat) 'and display the result outMessage.InnerHtml = strFormat & " Password Hash is: " & strHash End Sub
Using Different Credential Lists
When looking at how forms-based authentication works, we mentioned that you can substitute your own custom list of logon details for the list held in the web.config file. This is often a more robust solution “ for example it allows you to store the list of users in a relational database or an XML document.
In particular, if you allow users to register before being allowed access to resources, or if you're only using authentication to personalize the web site or application, a relational database is an obvious choice for the user list. You can update it with SQL statements or stored procedures on demand.
The example page, Forms-Based Authentication with a Custom User List, demonstrates custom authentication against both an XML file and a relational database. It uses the web.config file shown in the following code:
<configuration> <system.web> <authentication mode="Forms"> <forms name="MyApp01" path="/" loginUrl="login.aspx" protection="All" timeout="30"> </forms> </authentication> <authorization> <deny users="?" /> </authorization> </system.web> </configuration>
In this case, you have no list of users (there is no <credentials> section). In the <authorization> section you have omitted the user list as well, simply leaving the <deny users="?" /> element there.
This means that anyone who has been authenticated can access the pages. Remember that the default machine.config file allows all users to access all resources unless you override this in an application.
An XML User List Document
A simple format is chosen for the XML user list document to minimize the code required to access it. As shown in the following code, there is a root element <userlist> , within which is a list of elements that are the usernames. The value of each element is that user's password.
<?xml version="1.0" ?> <userlist> <billjones>test</billjones> <marthasmith>test</marthasmith> <joesoap>test</joesoap> </userlist>
This file, named userlist.xml , is placed in the same folder as the login page. You'll see how to use it when you look at the code in that page shortly.
A User List in a Relational Database
We've also set up a simple table named Users in a relational database named UserList , as shown in Figure 14-37. It contains the same users, with varchar -type columns named UserName and Password. This table is used in the next example as well, so it contains an extra column named BGColor .
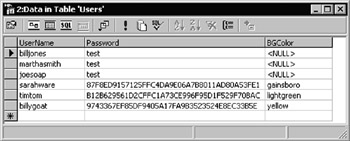
Figure 14-37:
There are also three more users, and you can see that the Password column values are encrypted for these users. Just ignore all this for the time being.
Running the Example
When you first access the example folder to load default.aspx , the forms-based security system detects that you haven't been authenticated and redirects you to the login page as shown in Figure 14-38. This is similar to the previous example, but now it contains a pair of radio buttons where you can select the user store you want to be authenticated against.
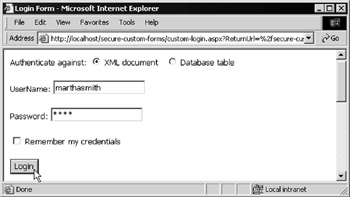
Figure 14-38:
| Note | You will have to install the database as described in the section 'Creating the UserList Database' earlier in this chapter to be able to use the Database table option. |
Enter the credentials of a suitable account (one with a plain-text password from the database table shown earlier “ marthasmith with the password test will do). If you get it wrong, a message is displayed as in the previous example. If you get it right, as shown in Figure 14-39, you can then access the default.aspx page. Again, as in the previous example, this page displays your username and the type of authentication used. It also contains the same Log Off button as the previous example:
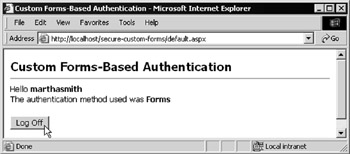
Figure 14-39:
How This Example Works
In the login.aspx page (where you are redirected if you haven't already been authenticated) first import the namespaces you'll need. As code in this page contains references to classes for accessing relational data and XML documents, you need to add these namespaces to the page.
The HTML section of the page contains a <form> within which the same controls are placed as the previous example “ textboxes for the username, password, persistent cookie checkbox, and Login button. However, at the top of the form also add the two radio buttons that allow you to choose the user list against which you want to be authenticated.
<%@Import Namespace="System.Data" %> <%@Import Namespace="System.Data.OleDb" %> <%@Import Namespace="System.Xml" %> <form runat="server"> Authenticate against: <input type="radio" id="chkXML" name="chkReadFrom" checked="true" runat="server" /> XML document <input type="radio" id="chkSQL" name="chkReadFrom" runat="server" /> Database table<p /> UserName: <input id="txtUsr" type="text" runat="server" /><p /> Password: <input id="txtPwd" type="password" runat="server" /><p /> <ASP:CheckBox id="chkPersist" runat="server" /> Remember my credentials<p /> <input type="submit" Value="Login" runat="server" onserverclick="DoLogin" /><p /> <div id="outMessage" runat="server" /> </form>
The Login Code
When the Login button is clicked, the event handler named DoLogin is executed. In this first create a suitable connection string to access the database you're using. This value is extracted from the web.config file in the root folder of the samples, and you may have to edit this to suit your own setup.
After that, collect the values for the username and password from the form controls, and declare a flag variable to indicate if validation of the user's credentials was successful. Set the default value of this variable to False .
Sub DoLogin(objSender As Object, objArgs As EventArgs) 'get the connection string from web.config file Dim strConnect As String strConnect = ConfigurationSettings.AppSettings("DsnUserList") 'get username and password from form Dim strUsr As String = txtUsr.Value Dim strPwd As String = txtPwd.Value 'set a flag to indicate successful authentication Dim blnIsAuthenticated As Boolean = False 'default value ...
Validating the Credentials against the User List XML Document
Now you can check to see which list of users was selected in the form by checking value of the radio button with the ID of chkXML . If this is Checked , you are authenticating against an XML document, so you can create the physical path to the document and load it into a new instance of an XmlDocument object.
Providing that the file is loaded without an error, you can use the GetElementsByTagname method to return an XmlNodeList containing the node for this username. From that, you can access the value of the #text child node of the element to get the password. If this matches the value entered by the user, you know that they are a valid user so set the blnIsAuthenticated flag variable to True .
... 'see which method we're using to authenticate the user If chkXML.Checked Then 'load the XML document containing the user credentials Dim strCurrentPath As String = Request.PhysicalPath Dim strXMLPath As String = Left(strCurrentPath, _ InStrRev(strCurrentPath, "\")) & "userlist.xml" 'create a new XmlDocument object Dim objXMLDoc As New XmlDocument() Try 'load the XML file into the XmlDocument object objXMLDoc.Load(strXMLPath) Catch objError As Exception 'display error details outMessage.innerHTML = "Error accessing XML document.<br />" _ & objError.Message & "<br />" & objError.Source Exit Sub ' and stop execution End Try 'create a NodeList collection of all matching child nodes 'there should be only one for this user Dim colUser As XmlNodeList colUser = objXMLDoc.GetElementsByTagname(strUsr) 'see if we found an element with this username If colUser.Count > 0 Then 'check if the value of the element (the child #text node) 'is equal to the password that the user entered If strPwd = colUser(0).FirstChild().Value Then blnIsAuthenticated = True End If End If ...
Validating the Credentials against the Users' Database Table
If authentication against your database table is selected, the section of code in the Else part of the If..Then construct will be executed instead of the code that checks against the XML file. However, like that code, checking against a database is quite simple. It follows the techniques we demonstrated in the data access chapters earlier in this book.
So, you can create a suitable SQL statement that will extract the users' password from the row that contains their username and password (you'll see why we chose to return the password shortly). Then create and open a connection to the database and execute the SQL statement returning a DataReader object that contains the password if a matching row was found in the database.
Most relational databases are set up to do case-insensitive text matching in a WHERE clause unless you use a specific function or set options before executing the query. It's easier to return the password from the database and do a case-sensitive comparison in the event handler code (unless you aren't bothered about matching case). If the match succeeds, you can set your flag to indicate that this username and password combination is valid, then close the DataReader object and the database connection.
... Else 'create a suitable SQL statement to retrieve the values Dim strSQL As String strSQL = "SELECT Password FROM UserTable WHERE UserName='" _ & strUsr & "' AND Password='" & strPwd & "'" Try 'create a new Connection object and open it Dim objConnect As New OleDbConnection(strConnect) objConnect.Open() 'create a new Command using connection object and SQL statement Dim objCommand As New OleDbCommand(strSQL, objConnect) 'declare a variable to hold a DataReader object Dim objDataReader As OleDbDataReader 'execute SQL statement against Command to fill the DataReader objDataReader = objCommand.ExecuteReader() 'if we get a row back, check password for same letter case '(usually a SQL SELECT WHERE clause is not case sensitive) If objDataReader.Read() Then If objDataReader("Password") = strPwd Then blnIsAuthenticated = True End If End If 'close the DataReader and Connection objDataReader.Close() objConnect.Close() Catch objError As Exception 'display error details outMessage.InnerHtml = "Error accessing database.<br />" _ & objError.Message & "<br />" & objError.Source Exit Sub ' and stop execution End Try End If ...
Authenticating the User
Now you can actually tell ASP.NET that you have validated the user's credentials and that they should be authenticated and receive the appropriate cookie so that they can access your application. If your flag variable is True , simply call the RedirectFromLoginPage method, and specify the username and whether to persist the authentication cookie on their machine:
... If blnIsAuthenticated Then FormsAuthentication.RedirectFromLoginPage(txtUsr.Value, _ chkPersist.Checked) Else outMessage.InnerHtml = Invalid credentials, please re-enter." End If End Sub
Encrypting the Passwords
Like your first example, you've used un-encrypted passwords in both the database table and the XML document. If there is a risk of these being viewed by unauthorized personnel, you may prefer to encrypt the passwords.
You'll have a problem with this approach if you need to provide passwords for users who forget them, as hashing can't be reversed to get the original value. Of course, if this feature isn't a requirement (or if you'll just issue a new password), the problem goes away.
With encrypted password hashes, the authentication process changes. The steps you would take are:
-
Encrypt all the user passwords and replace the plain text ones in the database table and/or XML document with the encrypted version.
-
In your login pages, get the password that the user provides from the login form controls and encrypt this using the same encryption algorithm.
-
Compare the resulting hash with the encrypted password hash in your database or XML file.
We'll use this technique in the next example.
Simple Personalization Example
The Simple Personalization Example demonstrates how you can implement personalization features much more easily in ASP.NET than in previous versions of ASP. At the same time, it demonstrates more uses for programmatic security.
When you open the example page, as shown in Figure 14-40, it immediately redirects you to the login page, as in the previous examples. You should login using the username timtom and password letmein:
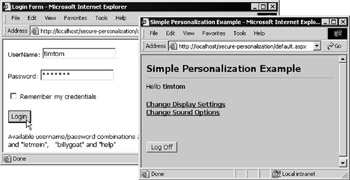
Figure 14-40:
After being authenticated, you'll see a simple default.aspx page that contains a couple of (dummy) hyperlinks and the customary Log Off button. Now log off and login again using the username sarahware and password test. This time, as shown in Figure 14-41, you get a different colored background and more ( dummy ) hyperlinks :
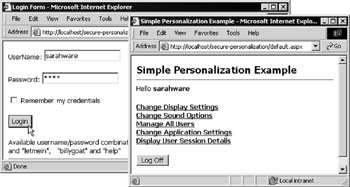
Figure 14-41:
The login and default.aspx pages used here are basically the same as those used in the previous example, but with a few new twists . A relational database is still used to hold the user's credentials, but now (as you've seen) you can also personalize the pages for each user. Try the username billygoat with the password help to see another example.
We also use encrypted passwords in the database in this example, as you can see in Figure 14-42 which repeats the screenshot of the database table contents. We include a column that contains the page background color for this user. Remember that you must recreate the password hash values for the final three users (see the section on encrypting the passwords in web.config earlier in this chapter), and update the database with the values specific to your machine.
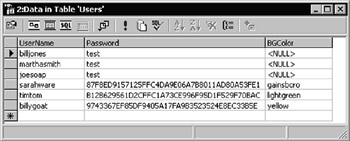
Figure 14-42:
How This Example Works
The HTML section of the login page is identical to the earlier forms-based examples, but it contains slightly different code in the DoLogin event handler. This time, after you create the connection string and collect the values entered by the user from the form controls, create an SHA1 hash of the password:
Sub DoLogin(objSender As Object, objArgs As EventArgs) 'get connection string from web.config file Dim strConnect As String strConnect = ConfigurationSettings.AppSettings("DsnUserList") 'get username and password from form Dim strUsr As String = txtUsr.Value Dim strPwd As String = txtPwd.Value 'create the SHA1 hash of the password provided by the user Dim strHash As String strHash = FormsAuthentication.HashPasswordForStoringInConfigFile( _ strPwd, "SHA1") 'set a flag to indicate successful authentication Dim blnIsAuthenticated As Boolean = False 'default value Next, declare a variable to hold the value for the page background that you'll be extracting from the database table. Obviously, in your own applications, you'll add code here and in the following SQL statement to extract other values that you store in the table “ and use to personalize the application in other ways:
Dim strBGColor As String 'user's saved background color Authenticating the User
To see if the username/password that the user entered is valid, you only have to look up the appropriate row in the database table. If it exists, you know that they can be authenticated. If not, deny them access. In this case, because you've created an SHA1 hash for the password, so you don't have to worry about matching letter case. The actual hash that the algorithm creates takes into account the case of the letters , and a different case for one or more characters will create a different password hash. So, there's no need to extract the password from the database table “ your SQL statement just needs to retrieve the personalization value (or values if you've added more personalization settings). If you get a row back, you know that the username/password combination is valid:
'create a SQL statement to retrieve personalization values Dim strSQL As String strSQL = "SELECT BGColor FROM Users WHERE UserName='" _ & strUsr & "' AND Password='" & strHash & "'"
| Note | One point to watch out for here is that users can spoof your page by entering values into the UserName and Password textboxes that will always evaluate to True when the SQL statement is executed. For example, if they enter the text b'or'1'='1 for the user name and password, the result could produce matching rows. To protect from this, you should either parse the strings they enter and remove all single quotes, or use the technique of retrieving the password from the database and comparing it with the value that the user entered. |
Now execute the SQL statement and get the results back in a DataReader . Providing that there is a row returned, you can set your authentication flag and collect the personalization value(s) into the string variable(s) you created earlier:
Try ... 'code as used in previous examples to create and open 'the connection and execute the SQL statement here ... 'if we get a row back we know that the user is authenticated If objDataReader.Read() Then blnIsAuthenticated = True 'get user's preferred background color strBGColor = objDataReader("BGColor") 'get other preference values as required '... etc ... End If ... End Try
You can now save the personalization value(s) in the user's Session object so you can access them within the application pages without having to keep going back to the database. Also tell ASP.NET to create the authentication cookie and redirect the user back to the page they originally requested.
If blnIsAuthenticated Then 'save background color in Session object Session("BGColor") = strBGColor '... save other personalization settings here 'redirect user to original page FormsAuthentication.RedirectFromLoginPage(strUsr, chkPersist.Checked) Else outMessage.InnerHtml = "<b>Invalid credentials</b> please re-enter..." End If End Sub
The Personalized default.aspx Page
Following a successful login, the user is redirected to the page default.aspx . In it, you can display their user name. Also include the same Log Off button “ we won't be describing those features again here.
What is different is the way that you apply any personalization features appropriate to this user. In the example, you set the background color of the page and display an appropriate set of hyperlinks depending on the current username.
The opening <body> tag in the page includes a bgcolor attribute, with the value set to a variable named strColor . This variable is declared in the <script> section of the page, and so is globally available throughout the page. Five ASP.NET Hyperlink controls were also placed within the body of the page to create the HTML hyperlinks you saw in Figure 14-41. The last three of these have their Visible property set to False so they won't normally be visible in the final page.
<script language="VB" runat="server"> Dim strColor As String ... rest of script code goes here ... </script> <body bgcolor="<% = strColor %>"> ... <ASP:Hyperlink id="lnkUser1" Text="Change Display Settings" NavigateUrl="http://dummy" runat="server" /><br /> <ASP:Hyperlink id="lnkUser2" Text="Change Sound Options" NavigateUrl="http://dummy" runat="server" /><br /> <ASP:Hyperlink id="lnkAdmin1" Text="Manage All Users" Visible="False" NavigateUrl="http://dummy" runat="server" /><br /> <ASP:Hyperlink id="lnkAdmin2" Text="Change Application Settings" Visible="False" NavigateUrl="http://dummy" runat="server" /><br /> <ASP:Hyperlink id="lnkAdmin3" Text="Display User Session Details" Visible="False" NavigateUrl="http://dummy" runat="server" /><br />
The <script> section of the page also contains an event handler that executes as the page is being created in response to the Page-Load event. This first checks that the user has been authenticated, and if so displays the authenticated user name.
Next, it extracts the BGColor value from the user's Session (stored there when they submitted their login details) and sets the strColor variable so that the background color of the page is set to the appropriate color for this user. Finally, you can use the current login username to see if you should display the administration hyperlinks. In this example, only display them if the user is sarahware.
Sub Page_Load() If User.Identity.IsAuthenticated Then 'display welcome message msgHello.InnerHtml = "Hello <b>" & User.Identity.Name & "</b>" 'set preferred background color to the value that was 'saved in this user's Session object by the "login" page strColor = Session("BGColor") 'if user is "sarahware" display admin hyperlinks in page If User.Identity.Name = "sarahware" Then lnkAdmin1.Visible = True lnkAdmin2.Visible = True lnkAdmin3.Visible = True End If End Sub
Other Personalization and Programmatic Security Options
This is a very simple example of personalization and programmatic security, but you can see how it can easily be extended. For example you could:
-
Include more personalization options, such as the text color, font size and style, page layout, page content, and so on.
-
Include a page containing form controls where the user can select the personalization options and values, and then use a SQL statement or stored procedure to update these in the database.
-
Store a custom role name for each user in the database table, giving you the ability to allocate users to separate roles (rather like Windows account groups). You could then extract the role name for each user as they log in and perform programmatic security checks using this role name rather than the username.
EAN: 2147483647
Pages: 243