Site Maps, Menus, and Navigation Path Controls
| ASP.NET 2.0 includes several features that make it easy to implement a central system for navigation within your Web sites and Web applications. There are several server controls, combined with an XML-format configuration file, that provide a way to define site structure and display navigation information. Like the rest of ASP.NET, the architecture for navigation has been broken down into logical parts, allowing customization. First, there is a configurable provider supplying the site map information, and a set of controls that can take advantage of the data supplied by the provider. The provider not only exposes the site structure to other controls, but also keeps track of the current locationallowing each page to identify where in the hierarchy of the site it is located. You can expose the entire structure and the current page details to users by binding controls to the provider. This pluggable architecture means that data defining the structure of a site can come from any data sourcethe site map provider is the link between the data and the navigation within a site. Site Map ProvidersA site map provider exposes the site structure by way of a set interface, and the details of the site map providers are stored in the <system.web> section of the Web.Config file. The default is the XmlSiteMapProvider, which uses a site navigation structure stored in an XML file. However, you can create your own providers if you wish, perhaps to read the site structure from a database, by inheriting from the abstract class SiteMapProvider. A discussion of this is outside the scope of the book, but the documentation for the .NET Framework contains more details. Site Map Configuration FilesListing 10.20 shows an example of a site map file. This file named Web.sitemap resides in the root of the ASP.NET application. You can see that the structure consists of a single <sitemap> root element, which contains a single <siteMapNode> element. This <siteMapNode> is the "base" location for the site, and traditionally will be your site's Home page. Inside this "base" node is a hierarchical set of nodes that represent the other pages in your site. Listing 10.20. An Example Site Map File
Note that the structure does not reflect the actual physical folder structure of the site but only the relationship and grouping of the pages. For example, in the file shown in Listing 10.20, all of the pages except for the Admin page are in the root folder of the site, even though the file implements a nested structure to the pages. Also note that all the URLs you declare within the site map file must be unique, because this is how the control knows where it is within the hierarchy. The "Admin" link shown in the last <siteMapNode> element in Listing 10.20 contains the roles attribute. This comes into effect when you enable the membership and security features of ASP.NET and means that only users who are accessing the site within that role will be able to view this link. For example, if you enable Forms authentication and specify a list of Windows Account Groups that can access your pages (such as Users\JohnSmith), the items in the site map with the corresponding roles attribute value will only be visible when the specified users access the page. You will see how the membership features work in the next chapter. The siteMapNode element can also take other attributes not shown in Listing 10.20. The SiteMapFile attribute can be set to the name of an external file containing additional site map nodes, while the Provider attribute can be set to the name of a site map provider that will supply additional nodes. You can also add custom ("extended") attributes to the elements in a site map file, and access these in your code. For an example, see the section Reacting to Events in the Menu, TreeView, and SiteMapPath Controls later in this chapter.
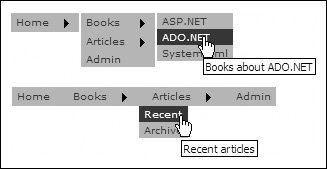
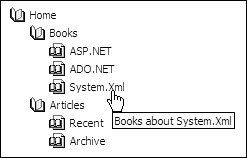
For more details about the way that ASP.NET uses site map files, see http://msdn2.microsoft.com/en-us/library/yy2ykkab. Using a Site Map FileHaving defined the structure of your site in a site map file, you can use it as the input to a SiteMapDataSource control. This works much like the other data source controls you saw in Chapters 3 and 4. It reacts to events in the page to load the data and exposes it in a structured way that other controls can use. Then you simply drag a Menu control onto the page and set the DataSourceID property to the ID of the SiteMapDataSource control, as shown in Figure 10.9. Figure 10.9. Using a SiteMapDataSource and Menu control in Visual Studio 2005 When you view the page, you will see that the Menu control is extremely powerful. It automatically creates by default a dynamic "fly-out" menu structure, whichif you apply an auto-format using the Menu Tasks panegives an attractive result with almost no effort. Of course, you can customize the appearance using the many style properties of the control, if you wish. You can also specify that the Menu control will provide a static display or a combination of static and dynamic modes. Only the first node is static by default and always appears on the page. All other nodes are dynamic and appear as fly-out or drop-down items. However, the StaticDisplayLevels property defines the number of levels that appear as static nodes, indented so the hierarchical structure is still visible. To support this mixed mode of operation, there are style elements for the static and dynamic portions of the menu as well as for the individual items that appear on those menus. Another option is to change the direction of the menu to a drop-down style by setting the Orientation property to "Horizontal", though you must also set the StaticDisplayLevels property to 2 so that the menu items at this level are laid out horizontally. Figure 10.10 shows the results of a vertical and horizontal menu. Figure 10.10. The Menu control in both horizontal and vertical modes Using a TreeView Control with a SiteMapDataSourceYou can use a SiteMapDataSource to power different types of controls, but the hierarchical nature of the data means that is it best suited to the special navigation controls. The Menu control you have just seen is an obvious example, but you can also use a treeView control if you prefer an expandable display rather than the fly-out or drop-down style of the Menu control. Figure 10.11 shows a treeView control with the "Windows Help File" autoformat (as provided in Visual Studio 2005) applied. Chapter 8 also looks at the treeView control. Figure 10.11. The TreeView control with an auto-format applied Using a NavigationPath Control with a SiteMapDataSourceWhen a Web site hierarchy becomes much more than three levels deep, such as you see in many sites that categorize links or products into multiple nested groups, it can be hard for users to remember where they are within the hierarchy. From this problem came the concept of a "breadcrumb trail" consisting of a list of the parent and ancestor categories of the current pageeffectively laying down a trail or path back to the root of the site. ASP.NET provides the SiteMapPath control that makes it easy to implement this feature from a site map file. You do not even need a SiteMapDataSource control (though you will probably have one to power the other navigation controls on your pages), because the SiteMapPath control works directly with the site map provider and the Web.Sitemap file. The current page name (taken from the title attribute in the site map file) appears as simple text, and parent and ancestor page names appear as hyperlinks, allowing easy navigation back up the page hierarchy. The popup tool-tip text comes from the description attribute of the elements in the site map file. The SiteMapPath control is highly configurable. As well as applying styles in the usual way, using the wide range of properties it exposes, you can do the following:
Figure 10.12. The SiteMapPath control in action One other technique for styling the SiteMapPath control is through templates. You can template the complete control or just the separator between the links. For example, you can replace the separators with custom images using the PathSeparatorTemplate section as shown in Listing 10.21. Listing 10.21. Using an Image as the Path Separator in a SiteMapPath Control
Figure 10.13 shows the result. Figure 10.13. A SiteMapPath control using an image as the separator
For more information on the SiteMapDataSource control see http://msdn2.microsoft.com/en-us/library/y4575aw7(en-US,VS.80).aspx. For more information on the Menu control see http://msdn2.microsoft.com/en-us/library/9c43aab8(en-US,VS.80).aspx. For more information on the treeView control see http://msdn2.microsoft.com/en-us/library/f74eswe6(en-US,VS.80).aspx. For more information on the SiteMapPath control see http://msdn2.microsoft.com/en-us/library/8w8dksw3(en-US,VS.80).aspx. Site Maps in DepthThe previous sections looked at the basic techniques for using the navigation controls in ASP.NET. However, there is a lot more you can do with them. You can use the properties of the SiteMapDataSource control to change the nodes displayed or set the current node. You can also write code to access the site map directly, and to react to the events exposed by the various navigation controls, in much the same way as with the data source controls you saw earlier in the book. Using the Properties of the SiteMapDataSource ControlFour properties of the SiteMapDataSource control allow you to specify which nodes are visible to the user. You can set these properties at design time using attributes, or at runtime in code, as follows:
Accessing the SiteMap in CodeYou can access the current site map structure in your code through the SiteMap object, allowing you to get information about the current page and the other nodes in the site map. The RootNode and CurrentNode properties return a reference to the SiteMapNode objects at the root of the site map and for the current page, respectively. For example, you can get the path of the current page using: sCurrentPath = SiteMap.CurrentNode.Url The SiteMapNode exposes a series of properties that allow you to navigate the site map hierarchy in code, including the following:
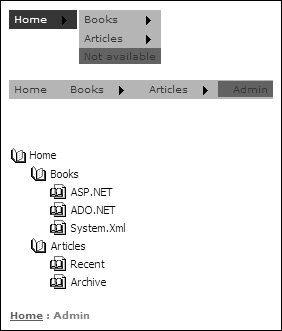
For a full list of the members of the SiteMapNode class, see http://msdn2.microsoft.com/en-us/library/7wcs23wf(en-US,VS.80).aspx. As a simple example of using these properties, you could provide a link to navigate to the previous level in the hierarchy using this code in your Page_Load event handler to set the NavigateUrl of a hyperlink control on the page: MyLink.NavigateUrl = SiteMap.CurrentNode.ParentNode.Url Reacting to Events in the Menu, TreeView, and SiteMapPath ControlsThe Menu, treeView, and SiteMapPath controls dynamically generate their UI from the data held in the underlying site map provider. As they traverse the node hierarchy from the root, adding each item in the path, they raise events that you can handle to manage and change the output. There are many events available, and they vary depending on the type of control. For the Menu control, the most useful is the OnMenuItemDataBound event, while the TReeView control provides the OnTreeNodeDataBound event. The SiteMapPath control exposes the OnItemCreated and OnItemDataBound events. You can also handle the OnMenuItemClick event for the Menu control to react to the user navigating through the site. The example page shown in Figure 10.10 to Figure 10.13 handles these events. The first Menu control contains the attribute OnMenuItemDataBound="MenuDataBound", which causes the event handler shown in Listing 10.22 to execute. This code checks if the node currently binding to the control has the text "Admin." If so, it changes the node properties so that the node is not selectable, has the text "Not Available," and has no tool-tip. Listing 10.22. Handling the MenuItemDataBound event of the Menu Control
An alternative approach is to use an extended property in the site map file. For example, you could add an enabled attribute to the "Admin" node of the site map file like this: <siteMapNode title="Admin" url="admin\admin.aspx" description="Site administration" enabled="false" />Then, in the handler for the MenuItemDataBound event of the Menu control, you can access this extended property and hide the node, as shown in Listing 10.23. You get a reference to the attribute through the DataItem property of the item currently being bound to the menu control (cast to a SiteMapNode instance), and from this the enabled attribute. If the attribute exists (it may not exist on every node), and is set to false, you hide the node in the same way as in Listing 10.22. Back in the example page, the treeView control in the example page contains the attribute OnTreeNodeDataBound="TreeDataBound", and so executes the event handler named treeDataBound as each node is bound to the control. The event handler, shown in Listing 10.24, checks if this is the "Admin" node. Notice in this case that you check the Node property of the TReeNodeEventArgs argument passed to the handler, rather than the Item property of the MenuEventArgs object passed to the MenuItemDataBound event handler in Listing 10.22. Listing 10.23. Accessing an Extended Property in a Site Map File
If this is the "Admin" node, the code removes it from the treeView by accessing the parent of the current node, and from this the collection of child nodes that contains this node. Then it uses the Remove method of the ChildNodes collection to remove the current node. Listing 10.24. Handling the TreeNodeDataBound Event of the TreeView Control
Finally, the SiteMapPath control at the foot of the example page contains the attribute OnItemDataBound="SiteMapPathDataBound", so that the event handler shown in Listing 10.25 executes as each node binds to the SiteMapPath control. In this case, the code just changes the color of the "Admin" link to red. Notice that you can get the current node from the SiteMap object directly. Listing 10.25. Handling the OnItemDataBound Event of the SiteMapPath Control
Figure 10.14 shows the results of these three event handlers when you select the "Admin" link using the second Menu control (the only one where you can select it). You can see the effects on the other Menu control, the treeView control, and the SiteMapPath control (the monochrome screenshot does not, however, show the red color of the text "Admin" in the SiteMap Path control!). Figure 10.14. The effects of handling the DataBound events in the navigation controls Extending the SiteMapIt is worth bearing in mind that you can also extend the capabilities of the site map system by adding custom attributes to the Web.sitemap file. For example, you can add an attribute containing the URL of an image to display for each item, or an attribute containing some custom value you will use in your code. If your site map file contains nodes of this form: <siteMapNode url="mypage.aspx" title="sometitle" imageUrl="~/images/myimage.gif" /> you can use the value in the MenuItemDataBound event handler like this: e.Item.ImageUrl = (e.Item.DataItem as SiteMapNode)["imageUrl"]; |


EAN: 2147483647
Pages: 147