| The web server is running and now it's time to put it to use. At its simplest, you can use Eclipse to write JSP files, which don't require compilation. These files can enclose Java code in scriptlet , declaration , and expression elements. The most general of these are scriptlets, which can enclose multiline Java code. Scriptlets are enclosed with the markup <% and %> , as you can see in Example 9-1. You can use the out object's println method to send text back to the browser; in this case, we're simply sending the text "Using JSP" back to the browser in this JSP. Example 9-1. A sample JSP <HTML> <HEAD> <TITLE>A Web Page</TITLE> </HEAD> <BODY> <H1>Working With JSP</H1> <% out.println("Using JSP"); %> </BODY> </HTML> An easy way to create this JSP file is just to enter it into Eclipse, as you can see in Figure 9-2, where we've created a new project, Ch09_01 , and a new file, Ch09_01.jsp , to hold the JSP code. There's no syntax checking going on here; Eclipse is just using its standard default editor.  | If you do want to check syntax of JSP documents, give the free XML editor XML Buddy a try (available at http://www.xmlbuddy.com). | |
Figure 9-2. Entering JSP code 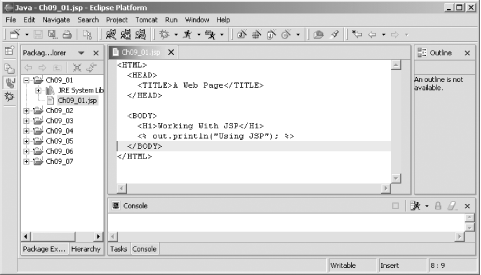 How can you install Ch09_01.jsp so Tomcat can serve it to client browsers? To handle the examples from this chapter, we're going to create a subdirectory of the Tomcat webapps directory, Ch09 . This new directory must itself have a subdirectory named WEB-INF , which must have two subdirectories, classes and lib : webapps _ _ch09 The folder for Chapter 9 examples _ _WEB-INF Information about Chapter 9s web applications _ _classes Java classes used by Chapter 9s web applications _ _lib JAR files used by Chapter 9s web applications At this point, the WEB-INF , classes , and lib directories are emptybut they must exist, or Tomcat won't consider Ch09 a valid directory for storing web documents. After creating these directories, store Ch09_01.jsp in the Ch09 directory. Then shut down Tomcat (if it's running) and restart it. | | When you add a new directory to the webapps directory, or install .class files anywhere in the webapps directory, you should shut down Tomcat and start it again. By default, Tomcat copies over what's in the webapps directory to the work directory and actually uses what's in the work directory to run, which means you should restart Tomcat when you make major changes in the webapps directory. Tomcat can be configured to detect those changes so it won't need to be restarted, but we're not going to do that here. | |
To see the JSP document at work, navigate to http://localhost:8080/Ch09/Ch09_01.jsp in a browser, as you see in Figure 9-3. Tomcat translates the Java code in the JSP into servlet form, compiles it, and runs it, and you can see the results in the figure. Figure 9-3. Viewing a JSP file 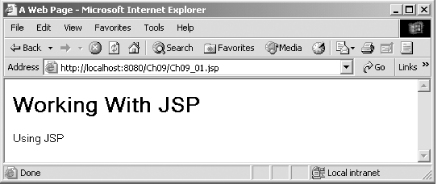 That got us started with Tomcat and our first JSP, but as you can see, Eclipse wasn't very deeply involved. We created Ch09_01.jsp using Eclipse, but not much more. It's time to bring Eclipse to the forefront. |