| Eclipse's debugging capabilities are impressive, even for a fully featured IDE. To get started, we'll take a look at an example with a logic error that we can then track down. After the example, we'll look at more advanced debugging topics, like setting debug launch configurations, using hot code replacement, suspending a running program that isn't terminating (such as when you have an infinite loop), and more. Being able to interactively debug your code is something you should expect to find in a good IDEand it's a brilliant improvement over trying to debug your code using only the tools that come with Javabut Eclipse has gone above and beyond the call. 3.2.1 A Buggy Program Our buggy program appears in Example 3-3. The debugger in Eclipse is especially good at working with stack frames , which hold the local variable set for method calls. To get a handle on debugging, we're going to create an example that creates several layers of stack frames: a factorial example (e.g., the factorial of 6, denoted 6!, is equal to 6 * 5 * 4 * 3 * 2 * 1 = 720), which calls itself recursively in order to calculate factorials. Example 3-3. The Ch03_02.java example package org.eclipsebook.ch03; public class Ch03_02 { public static void main(String[] args) { System.out.println(factorial(6)); } public static int factorial(int value) { if(value == 0){ return value; } else { return value * factorial(value - 1); } } } You calculate factorials like this: n! = n * (n - 1) * (n - 2) ... * 1 . In our example, to calculate factorial(n) , the factorial method multiplies n by factorial(n - 1) , calling itself to determine the factorial of (n-1). To determine factorial(n - 1) , the factorial method multiplies (n-1) by factorial(n - 2) , a process that continues all the way down until the factorial has been fully calculated. Here's the code we're using to do that: public static int factorial(int value) { if(value == 0){ return value; } else { return value * factorial(value - 1); } } In this example, we're trying to find the factorial of 6, 6!, which is 720. Here's what the main method looks like: public static void main(String[] args) { System.out.println(factorial(6)); } Unfortunately, the first time we run this example, it tells us that 6! = 0, as you can see in the Console view in Figure 3-9. Figure 3-9. First attempt with our buggy program  3.2.2 Setting a Breakpoint No exception was thrown, so we have a problem in the code's logic, which means it's time to debug. We'll start by examining our code as it's running, halting execution with breakpoints. To set a breakpoint in the JDT editor, just double-click the marker bar next to the line of executable code to which you want to add a breakpoint (alternately, select the line and use the Run  Add/Remove Breakpoint menu item). To remove the breakpoint later, just double-click it again. Add/Remove Breakpoint menu item). To remove the breakpoint later, just double-click it again. In this case, we'll install a new breakpoint next to the code line return value * factorial(value - 1) so we can watch the factorial being created during successive calls to the factorial method. You can see this new breakpoint, which appears as a blue dot in the marker bar, in Figure 3-10. Figure 3-10. Setting a breakpoint  To debug the code, select the Run Debug As Java Application menu item, which makes the debug perspective appear as you see in Figure 3-11. Figure 3-11. The Debug perspective   | Using Run Run will ignore all breakpoints. | |
The code executes up to the breakpoint and stops; the line of code where execution is paused appears in the Debug editor marked with an arrow. The Debug perspective is worth examining in depth. You can see entries for the programs you're debugging in the Debug view at the upper left. Note, in particular, the stack frames here, marked with three horizontal bars. In this case, we can see we're in the factorial method, which has been called by the main method. The three buttons next to the word Debug in the Debug view are (from left to right) the Resume (start executing code again), Suspend (pause code, as when you've got a runaway infinite loop), and Terminate (stop debugging) buttons .  | Successive debug sessions are added to the Debug view, which can make it pretty crowded over time (these sessions are retained so you can compare what's going on now with what happened before). To get rid of previous debug session's entries in this view, click the Remove All Terminated Launches button in this view's toolbar (the button displaying three overlapping rectangles). | |
To the right of the Debug view is a set of stacked viewsVariables, Breakpoints, Expressions, and Display. The Variables view lets you examine the value of local variables. You can edit these values (as we'll do later in this chapter) to change the value of variables as you debug your code, allowing you to tinker with what's going on in your program interactively. Eclipse will also watch the value in these variables and indicate when they have changed by changing the color of a variable's entry to red. The bottom part of the Variables view is called its detail pane , and it displays data in a fuller format. The Breakpoints view lets you manage the breakpoints in your code by right-clicking a breakpoint in the list and selecting items like Disable, Enable, Remove, or Remove All from the context menu. The Expressions view lets you evaluate expressions, as we'll see in a few pages. When you select an expression in the editor, right-click it, and select Inspectit'll be evaluated in the Expressions view. Similarly, when you select the Display item from the context menu, the results will appear in the Display view. The editor under the Debug perspective is essentially the same one you see in the Java perspective, and it allows you to examine the values of variables simply by letting the mouse hover over those variables. For example, in Figure 3-11, we're examining the value variable, which we see holds the value 6, since the factorial method was called with that value. Next to the editor is the Outline view at the lower right (also seen in Figure 3-11), which is the same as in the Java perspective. Below the editor is the Console view, which displays program output just as in the Java perspective.
3.2.3 Stepping Through Code The most fundamental way to move through paused code is by single-stepping . Eclipse offers four options here, corresponding to the four arrow buttons you see in the Debug view toolbar, beginning with the double-headed arrow and moving to the right (these items are also accessible in the Run menu when you're paused in a debugging session): -
- Step With Filters (also Shift + F5)
-
Steps into the selected statement using defined filters. If that statement is a method call, execution continues inside the called method unless you've filtered the method out (see below). -
- Step Into (also F5)
-
Steps into the selected statement. If that statement is a method call, execution continues inside the called method. -
- Step Over (also F6)
-
Steps over the selected statement. Does not step into method calls. -
- Step Return (also F7)
-
Executes until the end of the current method and then returns, pausing after the method returns (or when a breakpoint is encountered ). For example, our debugging session is currently paused at the line return value * factorial(value - 1) . Pressing F5 single-steps into that line, which means we begin executing the factorial(value - 1) call, as you can see in Figure 3-12, where the new value in the value variable is 5. Figure 3-12. Single-stepping  So far, we can see that the factorial method is progressing as it should. When it was first invoked, value was 6. In this second call to factorial , value is 5. You can also use step filters to indicate what code you want to filter out while single-stepping. When you filter out the code in a class or package, that code is not stepped into when you use the Step With Filters option, which is great if you want to avoid stepping through system code. To set step filters, you use Window Preferences to open the Preferences dialog, then select the Java Debug Step Filtering item, as you see in Figure 3-13. To filter out code, use the checkboxes next to the predefined filters you see in the figure, or create a new filter by clicking the Add Filter button. Figure 3-13. Setting step filters 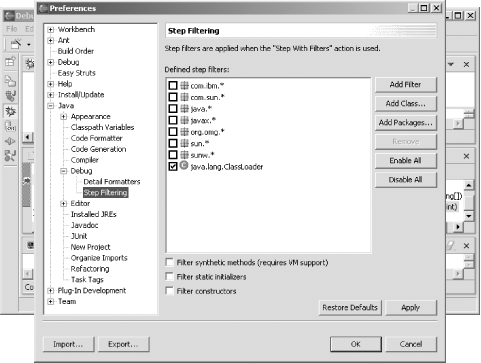 We could keep single-stepping through our code to try to find the problem with that code. Or we could use the breakpoint we've already set to make things move faster. 3.2.4 Resuming Execution Until Encountering a Breakpoint We've been single-stepping through our code, and we can continue doing that, but we'd have to keep going through each line of iteration of the factorial method, which can be a little tedious . Instead, we can simply let our code keep executing until it reaches our breakpoint. To do that, just click the Resume button in the Debug view (the arrow button to the right of the word Debug in the Debug view). Before doing that, however, we can also set up the Debug perspective to watch the value in our value variable. That way, Eclipse will automatically display the value in that variable, making life a little easier. To watch the value in the value variable, just right-click that variable in the editor and select the Watch item. Doing so will add value to the Expressions view. Now click the Resume button; when you do, execution resumes until a breakpoint is encountered, as you see in Figure 3-14. You can see that we're still in the same call to factorial by taking a look at the value of the value variable, which is 5. This is apparent because we're watching it in the Expressions view at the upper right. Figure 3-14. Running to a breakpoint 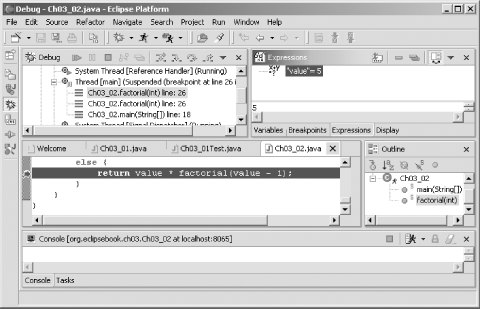 Now all we need to do is keep resuming execution by clicking the Resume button through all the iterations of factorial . But there's an even easier way still! 3.2.5 Setting Breakpoint Hit Counts There are supposed to be six iterations of the factorial method, so we'd have to hit the Resume button six times. That's not too bad, but you can also configure breakpoints in Eclipse with hit counts . When you use a hit count of n , the breakpoint won't be triggered until the n th time it's encountered, which can save you time. To set a breakpoint's hit count, right-click the breakpoint in the Breakpoints view and select the Properties item, opening the Java Line Breakpoint Properties dialog you see in Figure 3-15. In this case, select the Enable Hit Count checkbox and enter 6 as the hit count. Then click OK to close this dialog. Figure 3-15. Setting a breakpoint hit count 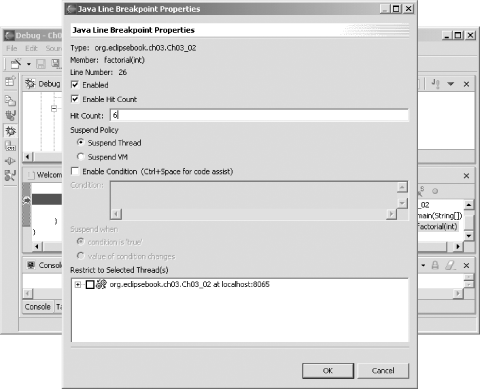 Now restart the debugging session (end the session by clicking the Terminate button or using the Run Terminate button and start the debugging session again). When you do, execution will be suspended the sixth time our breakpoint is encountered, as you can see in Figure 3-16. Note that value holds 1, as you see in the Expressions view, and that you can see all the stack frames for the successive calls to factorial in the Debug view at left. Figure 3-16. Using a breakpoint's hit count 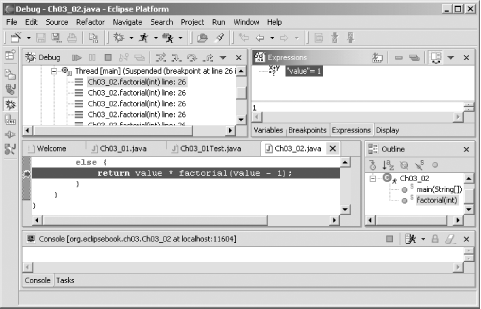 To examine any of the stack frames in the Debug view, and the values of local variables in them, just double-click a frame to make it the active frame. The factorial example generates plenty of stack framesjust double-click one and you'll see that all the local variables like value have been preserved frame-by-frame. In the current stack frame, value = 1, in the next frame under this one, value = 2, and so on. We've been able to skip to the final iteration of the factorial method just by setting our breakpoint's hit count, and everything still looks fine. We should be able to comfortably single-step to the end of the code at this point. However, when you click the Step Into button, execution unexpectedly enters the factorial method once again, and in the Expressions view you can see that value is set to 0, which is a problem because it should never be set to 0; factorials only work with positive whole numbers (multiplying by 0 always results in 0, of course). Figure 3-17. Discovering the error 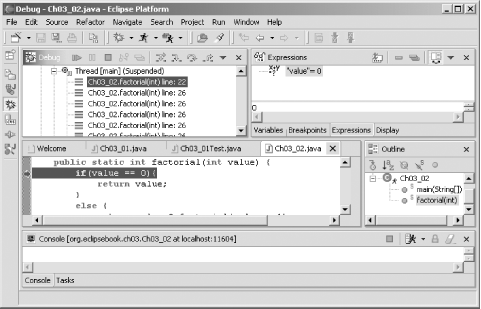 Looking at our code (note the highlighted line in Figure 3-17) reveals the problemwe keep the iterations going until value is set to 0 instead of stopping at 1: public static int factorial(int value) { if(value == 0){ return value; } else { return value * factorial(value - 1); } } We fix the problem like this: public static int factorial(int value) { if(value == 1){ return value; } else { return value * factorial(value - 1); } } You can see the new, debugged results in Figure 3-18, where we see that 6! is indeed 720. Figure 3-18. The fixed program 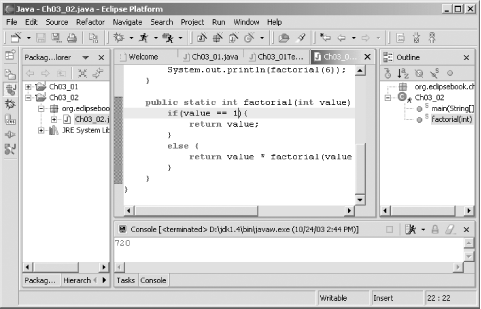 And that's all it takeswe've debugged the code. This example gave us a start with debugging, but there's much more available in the JDT. 3.2.6 Configuring Breakpoints We've used a breakpoint hit count to make life easier. Besides using hit counts, you can configure standard breakpoints in several other ways as well; to do that, right-click a breakpoint, bringing up the Breakpoint Properties dialog shown in Figure 3-19. If you select the Enable Condition checkbox, you can enter a condition in the Condition box that will cause the breakpoint to suspend the program. For example, you might be having problems every time a variable named inventory is set to 0; in that case, you might use the condition inventory == and select the "condition is `true'" checkbox. 3.2.6.1 Checking a condition You can also break when the value of a condition changesfor example, if some part of your code is changing the value in a variable named ipAddress and it shouldn't, you can type that variable name into the Condition box and click the "value of condition changes" checkbox (you can use any valid expression in the Condition box, of course, not just variable names ). 3.2.6.2 Multithreaded debugging You can also handle multithreaded debugging hereyou can list the threads you want to restrict a breakpoint to with the Restrict to Selected Thread(s) box, and you can also set the suspending policy to either Suspend Thread (the default, which still allows other threads in the application to continue) or Suspend VM (which suspends the entire virtual machine that Eclipse has launched and connected to in order to debug your code). Figure 3-19. Breakpoint properties 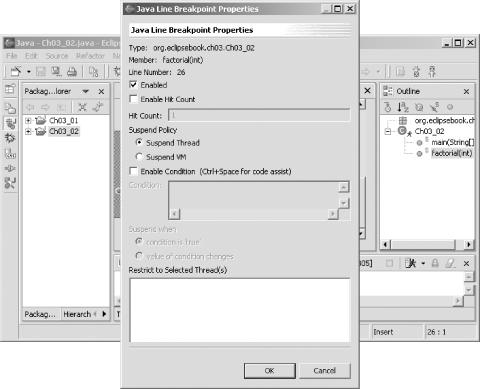 3.2.6.3 Watchpoints The standard breakpoints we've been using are called line breakpoints , and besides line breakpoints, the JDT supports other types of breakpointsfield ( watchpoints ), method, and exception. Field breakpoints, also called watchpoints, suspend execution when your code is going to access and/or modify the value of a field. Watchpoints may not be set on local variables (such as those you declare inside methods ), only on fields (data members of objects). Using a watchpoint is often much easier than trying to catch all the possible points in your code where the field you want to watch may be modified. To set a watchpoint, select a field in a Java view and select Run Add/Remove Watchpoint. The new watchpoint will appear in the Breakpoints view, and you can configure it by right-clicking it and selecting Properties, opening the Java Watchpoint Properties dialog you see in Figure 3-20. Note, in particular, that you can select two checkboxes hereAccess and Modificationthat let you indicate if you want to suspend execution when the field is accessed and/or when it is modified. You can also use a hit count, as with standard breakpoints. Figure 3-20. Configuring a watchpoint 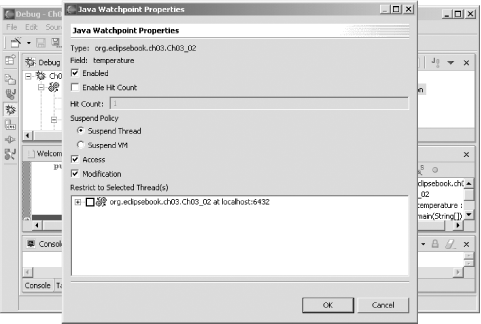 3.2.6.4 Method breakpoints Method breakpoints suspend execution when you enter or leave a method, depending on how you configure them, and you usually use these breakpoints on methods you don't have the source code for. To set a method breakpoint, highlight the call to that method in a Java view and select the Run Add/Remove Method Breakpoint menu item. You can configure these breakpoints by right-clicking them in the Breakpoints view, opening the Java Method Breakpoint Properties dialog you see in Figure 3-21. You can select whether the breakpoint happens on entry into the method, exit from the method, or both, using the checkboxes in this dialog. Figure 3-21. Configuring a method breakpoint 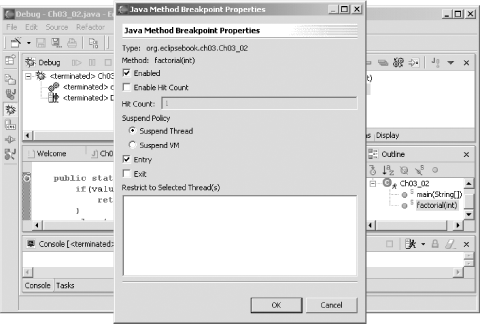 3.2.6.5 Exception breakpoints You can also work with exception breakpoints, which let you suspend execution when an exception happens. This is very useful if your code throws an exception, such as a null pointer exception, and you don't know where that exception is happening. You can suspend execution and see what's going on with your code when a thrown exception is caught (or not caught). To set an exception breakpoint, select Run Add/Remove Exception Breakpoint, opening the dialog you see in Figure 3-22, which allows you to select which breakpoints you are interested in, as well as whether you want to break when they are caught, not caught, or both. Figure 3-22. Configuring an exception breakpoint 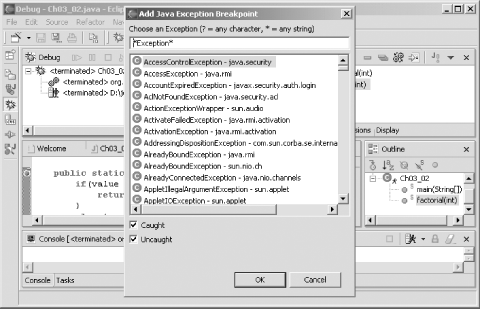 You can configure the properties for an exception breakpoint as you can for any other breakpoint; just right-click the breakpoint in the Breakpoints view and select the Properties menu item. For example, you can see how we're configuring a breakpoint for uncaught java.lang.NullPointerException exceptions in Figure 3-23. You can restrict the breakpoint to specific locations, and even use hit counts, but you can't specify any conditions for this breakpoint as you can with line breakpoints. Figure 3-23. Configuring a Java exception breakpoint 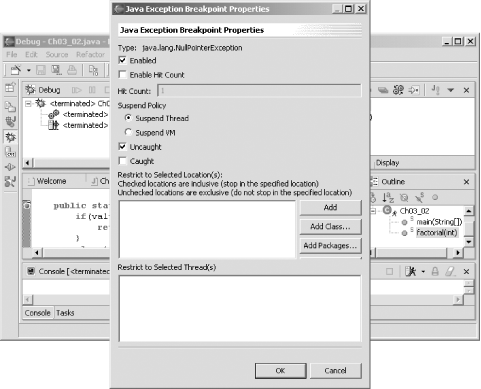 3.2.7 Evaluating Java Expressions and Changing Values While you're debugging, you can enter expressions into the detail pane of the Expressions view (the detail pane is just above the lower horizontal scrollbar in the Expressions view), selecting the expression, right-clicking it, and selecting the Inspect menu item. For example, if the variable value holds 6, you can enter the expression value + 1 in the detail pane, right-click it, and select the Inspect item. Doing that adds value + 1 to the list of expressions in the Expressions view and displays the value of that expression, 7, in the detail pane, as you see in Figure 3-24. Figure 3-24. Evaluating an expression 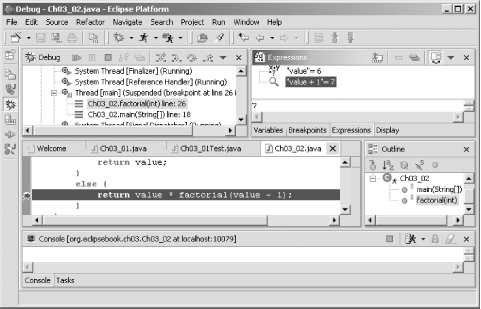 And, as mentioned earlier, you can also edit the values of fields and variables while debugging your codejust double-click a field or variable name in the Variables view, opening the dialog you see in Figure 3-25. In this case, we've double-clicked the variable named value in the Variables view; to change the value in this variable at runtime, just enter a new value and click OK. It's great if you want to check the impact on your code of different test valuesfor example, to check what happens if you set a variable named denominator to 0or if you want to avoid known problem values. Figure 3-25. Editing a variable's value 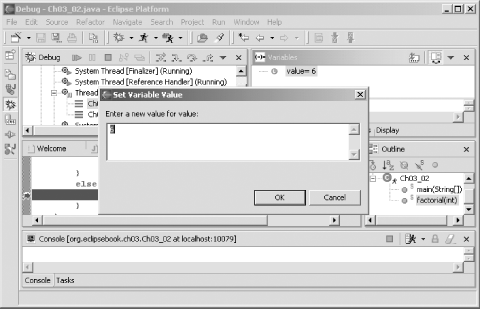 3.2.8 Using Hot Code Replacement You can even edit your code as you're debugging using the JDT debugger, as long as you're working with a JRE that supports it. This is called hot code replacement , and it requires a JRE Version 1.4 or later. The easiest way to use hot code replacement is to enable auto-building of your code each time it's saved (this is not necessary, it just rebuilds your code automatically every time it's been changed and saved). To do that, select the Window Preferences Workbench Perform build automatically on resource modification checkbox and click OK. Then debug your code until execution stops at a breakpoint. Now you're free to edit your code during a debugging session. After you've changed the code, save it and resume execution (if you haven't enabled auto-build , also select the Project Rebuild Project or Project Rebuild All menu item to rebuild the project). That's all it takes. | | You may at times end up with strange results when you edit your code while debugging it; in that case, restart your debugging session. | |
For example, we can edit our factorial code while debugging (as you see in the highlighted line in Figure 3-26), by changing this line in the factorial method: public static int factorial(int value) { if(value == 1){ return value; } else { return value * factorial(value - 1); } } The new line is shown here: public static int factorial(int value) { if(value == 1){ return value; } else { return 2 * value * factorial(value - 1); } } Then just save the code if you have auto-build turned on. That's all it takesnow you've altered the code and you can keep debugging, as you see in Figure 3-26. Figure 3-26. Using hot code replacements 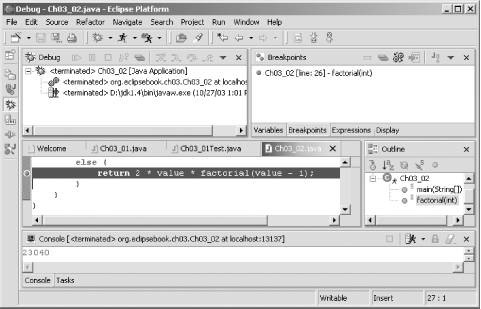 3.2.8.1 Targeting earlier JREs What if you're creating code that you want to let users with JREs all the way back to Version 1.2 use, but you still want to use hot code replacement, which requires Version 1.4 or later? You can use different JREs for running and debugging your code in Eclipse. To set the debug launch configuration so it uses a different JRE than the default, select Run Debug, then click the JRE tab and select the JRE you want to use for debugging purposes. And that's itthat finishes our look at JUnit and JDT debugging. As you can see, both are powerful tools. JUnit is good for creating a standard set of tests that can be applied to code with a few clicks. Debugging in Eclipse offers many options: configurable breakpoints, watchpoints, exception breakpoints, expression evaluation, single-stepping, variable and field modification, hot code replacement, and more. This is a far cry from what you may be used to if you've been using javac for your code development. |