| JUnit is an open source testing framework that comes with Eclipse. You can create JUnit-based classes in the same project as other classes, and use this JUnit code to test the other classes in your project. Using JUnit in this way, you can construct a set of standard tests for everyone working on an application, and if they change the application's code, all they'll need is a few clicks to verify that the application still passes the standard set of tests. JUnit is designed to test your code, and it's made up of assertion methods that can test various conditions. Here they are: -
- assertEquals(a, b)
-
Tests if a is equal to b ( a and b are either primitive values or must have an equals method for comparison purposes) -
- assertFalse(a)
-
Tests if a is false, where a is a Boolean value -
- assertNotNull(a)
-
Tests if a is not null , where a is either an object or null -
- assertNotSame(a, b)
-
Tests if a and b both do not refer to the identical object -
- assertNull(a)
-
Tests if a is null , where a is either an object or null -
- assertSame(a, b)
-
Tests if a and b both refer to the identical object -
- assertTrue(a)
-
Tests if a is true, where a is a Boolean value You construct JUnit tests using these methods; when you run a JUnit application, it opens its own view to give you an immediate indication of which tests have passed and which have failed. 3.1.1 Creating a Test Application We'll use JUnit in an example here to show how it works by creating an application that we can test, Ch03_01 . This application's purpose is simply to fill an array of integers with values and give you access to those values with get and set methods. In particular, we'll include three methods that return values that may be tested with JUnit: -
- allocate
-
Allocates an array of integers and fills it with data; returns the newly allocated array. -
- set
-
Sets a value in the array of integers; returns true if successful, false otherwise . -
- get
-
Gets a value from the array of integers; returns the requested value. You can see a first attempt at this code in Example 3-1. Example 3-1. The Ch03_01.java example package org.eclipsebook.ch03; public class Ch03_01 { private int[] array; public int[] allocate( ) { array[0] = 0; array[1] = 1; array[2] = 2; return array; } public int get(int index) { return array[index]; } public boolean set(int index, int value) { if (index < array.length && index >= 0) { array[index] = value; return true; } else { return false; } } } The allocate method allocates an integer array, fills it with data, and returns the array: private int[] array; public int[] allocate( ) { array[0] = 0; array[1] = 1; array[2] = 2; return array; } The get method retrieves the integer at a given location in the array: public int get(int index) { return array[index]; } The set method sets the integer at a given location, returning true or false as appropriate: public boolean set(int index, int value) { if (index < array.length && index >= 0) { array[index] = value; return true; } else { return false; } } The next step is to test all these methods allocate , set , and get with JUnit. 3.1.2 Installing JUnit To work with JUnit (see http://www.junit.org for more details), you have to add junit.jar to your project's classpath. In this case, we'll create a new classpath variable, JUNIT . Select the Window  Preferences menu item to open the Preferences dialog, expand the Java node, and select the Classpath Variables item. Then click the New button to open the New Variable Entry dialog, enter the name of the new variable, JUNIT , and the path to junit.jar . In Eclipse 2.1.1, you can find junit.jar in eclipse/plugins/org.junit_3.8.1/junit.jar . Then click OK. Preferences menu item to open the Preferences dialog, expand the Java node, and select the Classpath Variables item. Then click the New button to open the New Variable Entry dialog, enter the name of the new variable, JUNIT , and the path to junit.jar . In Eclipse 2.1.1, you can find junit.jar in eclipse/plugins/org.junit_3.8.1/junit.jar . Then click OK.  | As is often the case in Eclipse, a task like adding a new classpath variable can be done in more ways than one. Here's another way, with a few more steps: right-click the Ch03_01 project and select the Properties item to open the Properties for Ch03_01 dialog. Select the Java Build Path item and the Libraries tab, then click the Add Variable button to open the New Variable Classpath Entry dialog. Click the Edit button to open the Preferences dialog, and then the New button to open the New Variable Entry dialog. Enter the name of the new variable, JUNIT , the path to junit.jar , and click OK. If it can be done in Eclipse, there's usually more than one way to do it. | |
You may also want to add the JUnit package's source code, for debugging purposes (this is an optional step; we're not going to use the JUnit source in our samples). You'll find the JAR files for many packages' source code in the directory eclipse/plugins/org.eclipse.jdt.source_2.1.1/src . To create a new variable for the JUnit source, follow the directions for creating JUNIT , but name this variable JUNIT_SRC (you usually add the suffix _SRC for source code variables) and connect that variable to eclipse/plugins/org.eclipse.jdt.source_2.1.1/src/org.junit_3.8.1/junitsrc.zip . After creating this variable, right-click the Ch03_01 project, select Properties to open the Properties for Ch03_01 dialog, click the Java Build Path item and the Libraries tab, and then expand the node for the JUNIT entry as you see in Figure 3-1. Figure 3-1. Making source code accessible 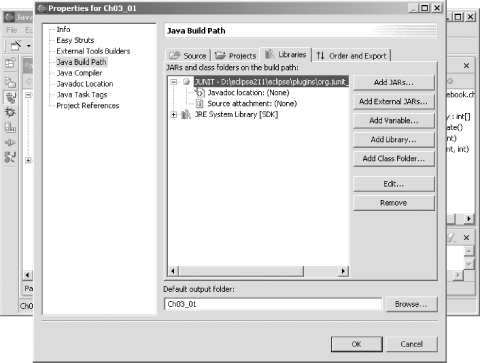 When you expand a JAR file's node in this way, you can specify where to find both the associated source code and Javadoc. To use JUNIT_SRC for the source code here, select the Source attachment item in the expanded node and click Edit to open the Source Attachment Configuration dialog. Click the Variable button, double-click JUNIT_SRC , and click OK to close this dialog. You can see the results in Figure 3-2, where we've made the source for JUnit accessible to Eclipse. Click OK to close the Properties for Ch03_01 dialog. Figure 3-2. Using the JUNIT_SRC variable 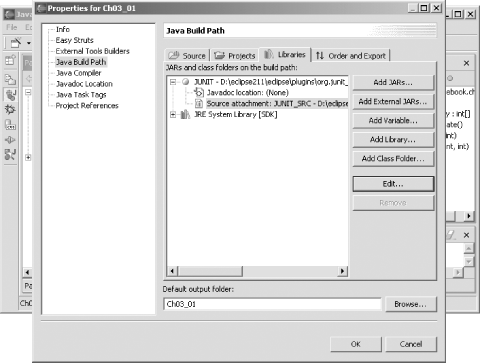 3.1.3 Testing an Application with JUnit We're ready to test the Ch03_01 application. To do so, we'll create a new class that extends the JUnit TestCase class using the JUnit Wizard. To invoke this wizard, you right-click the Ch03_01 class in the Package Explorer and select New Other to open the New dialog you see in Figure 3-3. Figure 3-3. Creating a new TestCase-based class 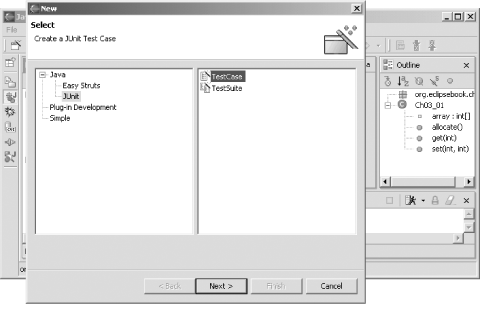 At this point you should be able to expand the Java node in the left pane and select the entry labeled JUnit. In the right pane, select the TestCase entry and click Next, displaying the pane you see in Figure 3-4. Figure 3-4. Naming a JUnit application 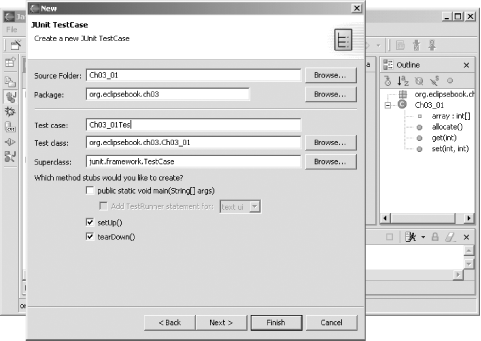 The usual practice is to name JUnit classes using the same name as the classes they test and then adding the word Test at the end, so, in this dialog, enter the name Ch03_01Test in the Test case box. Also, select the setUp and tearDown methods (as you see in Figure 3-4). These methods let you set up and clean up after data and/or objects in the test case (the JUnit term for these items is fixtures ). Then click Next to open the next pane, shown in Figure 3-5. Figure 3-5. Selecting methods to test 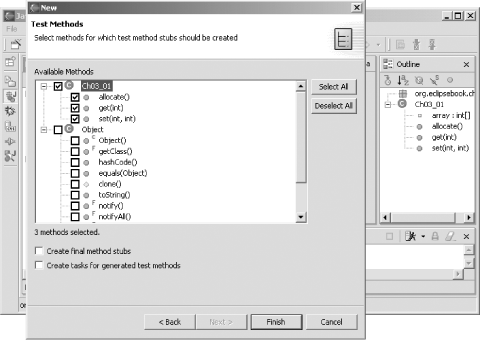 In this pane, select the methods you want to test so the JUnit Wizard can create stubs for them. Since we want to test allocate , set , and get , select them as you see in Figure 3-5 and click Finish to create the Ch03_01Test class, which you see in Example 3-2. You can see one method stub in the Ch03_01Test class for each of the allocate , set , and get methods: testAllocate , testSet , and testGet . Example 3-2. The Ch03_01Test.java example import junit.framework.TestCase; . . . public class Ch03_01Test extends TestCase { /** * Constructor for Ch03_01Test. * @param arg0 */ public Ch03_01Test(String arg0) { super(arg0); } /* * @see TestCase#setUp( ) */ protected void setUp( ) throws Exception { super.setUp( ); } /* * @see TestCase#tearDown( ) */ protected void tearDown( ) throws Exception { super.tearDown( ); } public void testAllocate( ) { } public void testGet( ) { } public void testSet( ) { } } The next step is to add code to these stubs that will call the Ch03_01 class's allocate , set , and get methods so we can use the JUnit assertions on the results. We'll need an object of the Ch03_01 class to call those methods, which we'll name testObject . To create testObject , use the setUp method in the JUnit code. This method is called just before a JUnit test starts, so we'll create testObject from the class we want to test, Ch03_01 : Ch03_01 testObject; . . . protected void setUp( ) throws Exception { super.setUp( ); testObject = new Ch03_01( ); } Now we're free to perform tests with this object. For example, the allocate method is supposed to create an array of integers and return that array, so we can test to make sure that array is not null using assertNotNull in testAllocate : public void testAllocate( ) { assertNotNull(testObject.allocate( )); } The get method is supposed to retrieve a value from the array, so we can test that method using assertEquals with a test value in testGet : public void testGet( ) { assertEquals(testObject.get(1), 1); } And the set method is supposed to return true if it's been successful, so we can test it with assertTrue like this: public void testSet( ) { assertTrue(testObject.set(2, 3)); } After you've added this code, select the Ch03_01Test class in the Package Explorer and the Run As JUnit Test menu item, opening the view you see at left in Figure 3-6. Figure 3-6. Running a JUnit test 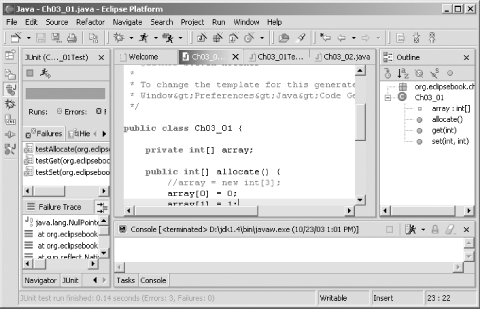 A red bar appears at the top of this view (displayed in glorious black and white in Figure 3-6), indicating that there were failures. As you can see in the Failures tab of the JUnit view, all three tests are marked with Xs, which means they've failed. We'll tackle the first test, testAllocate , which asserts that the created array not be null : public void testAllocate( ) { assertNotNull(testObject.allocate( )); } Taking a look at the allocate method reveals the problemalthough the code tries to add values to the array, it neglected to actually create the array in the first place. We'll fix that by adding this code to the Ch03_01 class: private int[] array; . . . public int[] allocate( ) { array = new int[3]; array[0] = 0; array[1] = 1; array[2] = 2; return array; } Now when you run Ch03_01Test , you see that only the testGet and testSet methods have failed, as shown in Figure 3-7. Figure 3-7. Only two tests fail now 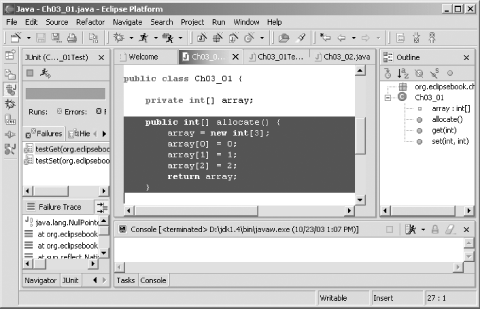 What's wrong with the testGet and testSet tests? The problem here is that all JUnit tests are performed independently . This means that even though the first test, testAllocate , called the allocate method, that method has not been called as far as the next two tests, testGet and testSet , are concerned . To initialize the array for these two tests, then, we have to call the allocate method in both testGet and testSet . Here's the code we'll add to do that: public void testGet( ) { testObject.allocate( ); assertEquals(testObject.get(1), 1); } public void testSet( ) { testObject.allocate( ); assertTrue(testObject.set(2, 3)); } And that's all that was needed. Now when you run the tests they all pass, as you see in Figure 3-8, where there are no failures. And although you can't see it in the black-and-white figure, the bar at the top of the JUnit view is green, which is Eclipse's way of telling you that all systems are go. Figure 3-8. All three tests succeed now 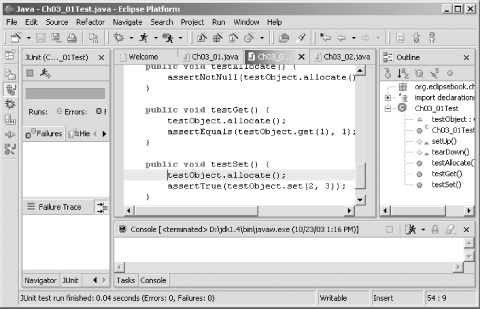 As you can see, JUnit provides a relatively simple way to create a standard set of tests that can be applied with a few mouse clicks. Once the tests have been created, you just have to run the JUnit class you've created. That, in itself, can be useful if you want to make sure a number of developers working on your code all apply the same tests. However, note that JUnit only tests compliance with a set of testsif there's a problem with your code and you don't know what's going on, you need to debug . |