| Transactions are the other operations that are handled partially by the Connection class. They are handled partially because in this version of ADO .NET, you only start transactions using the Connection class. Once a transaction is started, you keep it in a Transaction class object. The Transaction object is then used to commit or roll back the transactions. Since we are using SQL Server for our database of preference, we will use SQL Client classes to demonstrate transactions. Create a project and name it ADOBook05-02. Alternatively, you can get the project from the CD if you don't want to key in the code. Add a grid control and five buttons to the form. Dock the grid to the top of the form. Name the form frmTRX. Label the buttons as in Figure 5.10. Figure 5.10. Completed Transaction demo form. 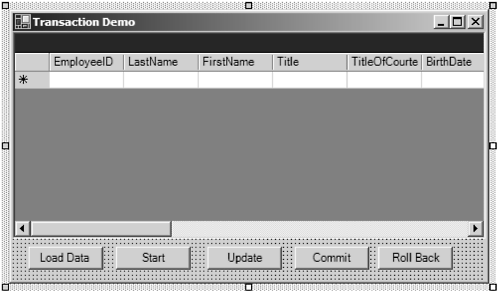 Drag a SqlDataAdapter and drop it on the form. When the configuration wizard opens, select the Northwind database from the list of connections as in Figure 5.11. Figure 5.11. The Data Adapter Configuration Wizard. 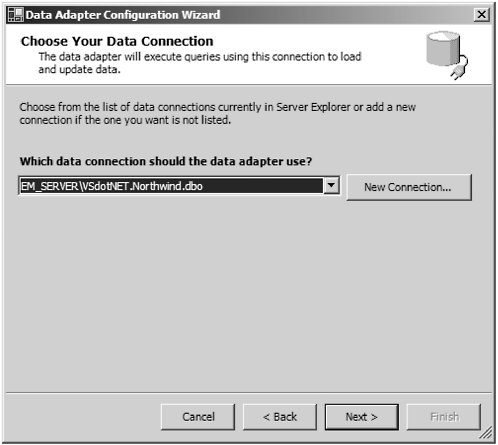 When you click next you will choose SQL Statements as the query type. The next page asks you to create the Select statement. Either type in the statement or use the Query Builder tool to create it. I would use the tool as it avoids errors. When you have finished, the wizard should look like Figure 5.12. Figure 5.12. The Configuration Wizard with the Select statement. 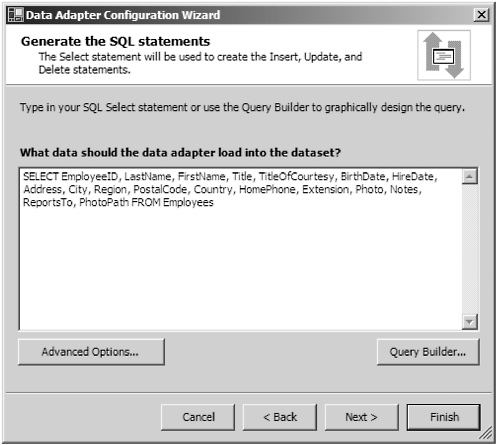 Click the Finish button. Now you have configured the Data Adapter. Next, right-click on the DataAdapter and select Generate Dataset The Generate Dataset dialog will open . Everything should be preselected for you. Just make sure that Add this Dataset to the Designer is checked as in Figure 5.13. Figure 5.13. The Generate Dataset dialog. 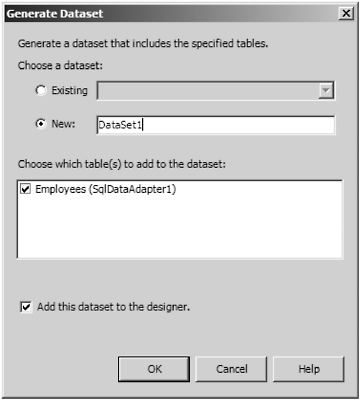 Now select the datagrid on the form. Scroll the Properties window until you see the DataSource property. Drop down the arrow. Select the DataSet we just created, named DataSet11 as in Figure 5.14. Figure 5.14. Selecting the DataSet11 as the grid's DataSource. 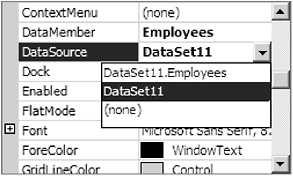 Now select Employees as the DataMember property using a similar approach. The grid's columns should now populate with the columns of the Employees table. We now have the basic layout of the form done. Now we have to add code to make it all work. First, let's make sure we can get data. In the Button1 click event, place this code: Private Sub Button1_Click(ByVal sender As System.Object, _ ByVal e As System.EventArgs) Handles Button1.Click If SqlConnection1.State = ConnectionState.Closed Then SqlConnection1.Open() End If SqlDataAdapter1.Fill(DataSet11, "Employees") End Sub We'll go back and analyze the code later. Compile and run the program. When you click the Load Data button (Button1) the grid should fill with data as in Figure 5.15. Figure 5.15. Transaction demo with data.  Next, let's fill in the code for the Update button, Button3. This button takes any changes to the DataSet made by editing the grid and updates the database with them. Private Sub Button3_Click(ByVal sender As System.Object, _ ByVal e As System.EventArgs) Handles Button3.Click Try If DataSet11.HasChanges Then Me.BindingContext.Item(DataSet11, _ "Employees").EndCurrentEdit() SqlDataAdapter1.Update(DataSet11) DataSet11.AcceptChanges() End If Catch errobj As Exception MsgBox(errobj.Message) End Try End Sub Again, we'll analyze the code later. Let's compile and run the program again. This time make a few changes to the grid. Click the Update button. Now close the application and run it again. The changes should still show. If we had made the changes and not clicked Update, no changes would have been written to the database. Now we will begin to add the code to manage the transactions. First let's look at the SqlTransaction class. Besides the Commt and RollBack methods , there is one other method and a property. The IsolationLevel Property The IsolationLevel property is used to set the isolation level of a transaction. Isolation level is to transactions what row locking is to an individual update. It controls how much the current transaction affects other transactions and other users of the database. Isolation levels are a feature of the underlying database system. SQL Server and Jet (MS Access) supports the isolation levels described later. Other database systems may or may not support these levels. Some databases do not support transactions at all. The following section, from the OLE DB Programmer's Reference , describes isolation levels very well. Since I couldn't do any better myself , I decided to include its description. Transaction isolation levels are a measure of the extent to which changes made outside a transaction are visible to that transaction. In particular, transaction isolation levels are defined by the presence or absence of the following phenomena: -
Dirty read A dirty read occurs when a transaction reads data that has not yet been committed. For example, suppose transaction 1 changes a row. Transaction 2 reads the changed row before transaction 1 commits the change. If transaction 1 aborts the change, transaction 2 will have read data that is considered to have never existed. -
Nonrepeatable read A nonrepeatable read occurs when a transaction reads the same row twice but gets different data each time. For example, suppose transaction 1 reads a row. Transaction 2 changes or deletes that row and commits this change or deletion. If transaction 1 attempts to reread the row, it retrieves different row values or discovers that the row has been deleted. -
Phantom A phantom is a row that matches the search criteria but is not initially seen. For example, suppose transaction 1 reads a set of rows that satisfy some search criteria. Transaction 2 inserts a new row that matches the search criteria for transaction 1. If transaction 1 reexecutes the statement that read the rows, it gets a different set of rows. According to these phenomena, the isolation levels defined by OLE DB are as follows : -
Read Uncommitted ( also called Browse) A transaction operating at the Read Uncommitted level can see uncommitted changes made by other transactions. At this level of isolation, dirty reads, nonrepeatable reads, and phantoms are all possible. -
Read Committed ( also called Cursor Stability) A transaction operating at the Read Committed level cannot see changes made by other transactions until those transactions are committed. At this level of isolation, dirty reads are not possible but nonrepeatable reads and phantoms are possible. -
Repeatable Read A transaction operating at the Repeatable Read level is guaranteed not to see any changes made by other transactions in values it has already read. At this level of isolation, dirty reads and nonrepeatable reads are not possible but phantoms are possible. -
Serializable ( also called Isolated) A transaction operating at the Serializable level guarantees that all concurrent transactions interact only in ways that produce the same effect as if each transaction were entirely executed one after the other. At this isolation level, dirty reads, nonrepeatable reads, and phantoms are not possible. ADO .NET adds two more levels: The default isolation level is ReadCommitted. This is consistent with optimistic concurrency. If changes are made to rows that other users have changed since they were read, an error will be thrown. When using transactions, it is necessary to maintain an open connection to the server during the course of the transaction (from BeginTransaction through Commit or Rollback). If you close the connection before the transaction is complete, you will lose isolation. For this reason, we will be explicitly opening and closing the connection in the demonstration. Just as a reminder, the SqlTransaction object is declared at the module level as follows: Private sqlTRX As SqlClient.SqlTransaction In the click event for Button2, place the following code: Private Sub Button2_Click(ByVal sender As System.Object, _ ByVal e As System.EventArgs) Handles Button2.Click Try If SqlConnection1.State = ConnectionState.Closed Then SqlConnection1.Open() End If sqlTRX = _ SqlConnection1.BeginTransaction(IsolationLevel.Serializable) SqlDataAdapter1.SelectCommand.Transaction = sqlTRX SqlDataAdapter1.InsertCommand.Transaction = sqlTRX SqlDataAdapter1.DeleteCommand.Transaction = sqlTRX SqlDataAdapter1.UpdateCommand.Transaction = sqlTRX Catch erroobj as Exception Msgbox(errobj.Message) End Try End Sub Change the code in the Button1 click event procedure to look like this: Try Button2_Click(Button2, New System.EventArgs()) DataSet11.Tables("Employees").Clear() SqlDataAdapter1.Fill(DataSet11, "Employees") Catch errobj As Exception MsgBox(errobj.Message) End Try This way we eliminate the redundant code that opens the connection and starts the transaction. Notice in the Button2 click event that we overrode the default and made the transaction isolation level serializable. In order to demonstrate transactions, we need two programs operating on the same data. Otherwise, the demonstration would be incomplete. The whole purpose of transactions is to ensure data integrity across multiple operations and among concurrent users. In our case, we will be running both users on the same machine. Since they are separate processes running in separate transactions, the effect is the same as if they were running on different client workstations. The code to commit and roll back transactions is pretty straightforward: Private Sub Button4_Click(ByVal sender As System.Object, ByVal e As System.EventArgs) Handles Button4.Click Try sqlTRX.Commit() Catch errobj As Exception MsgBox(errobj.Message) End Try End Sub Private Sub Button5_Click(ByVal sender As System.Object, ByVal e As System.EventArgs) Handles Button5.Click Try sqlTRX.Rollback() Catch errobj As Exception MsgBox(errobj.Message) End Try End Sub Note that once a transaction has been terminated (by calling Commit or Rollback), the transaction object is no longer valid and cannot be reused. A new SqlTransaction object must be created by calling the BeginTransaction method of the SqlConnection object again. Of course, the same object variable can be reused. Before we demonstrate concurrency by firing up two instances of the application, let's test it by itself just to make sure it all works as expected. First, run the application. Click the Load Data button. This will populate the grid control. It will also begin a transaction. The application should again appear as in Figure 5.15. Make changes to the grid. Now click the Update button. This updates the database, but we have a pending transaction open. Click the Roll Back button. Now click the Load Data button again to refresh the data. Notice that the changes have disappeared. Click the Start button. This will begin a new transaction. Add a new row to the grid and delete an old one. Click Roll Back and Load Data. The row you added should be gone and the deleted row should return. Click Start again. Add a new row and click Commit and Load Data. This time the row you added is retained. Let's add one more feature to our demo program. We will add radio buttons so we can control the isolation level of our transactions without recompiling the program. Add two more command buttons to the form. Label one Refresh. We want to be able to refresh the data without starting a new transaction. Label the other Close. This will close the connection and clear any locks without actually closing the program. Add a group box (formerly called a frame) to the form. You will have to resize the form and rearrange some of the buttons. Add five radio buttons to the group box. The form should look like Figure 5.16. Figure 5.16. Form with radio buttons added. 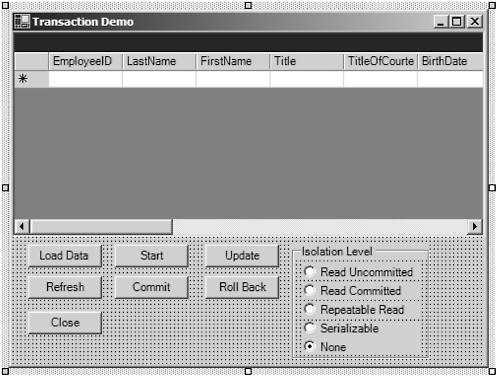 Name the five buttons, rdRU, rdRC, rdRR, rdSerial, and rdNone respectively. Add the following code to the Button2 click event: Private Sub Button2_Click(ByVal sender As System.Object, _ ByVal e As System.EventArgs) Handles Button2.Click Try If SqlConnection1.State = ConnectionState.Closed Then SqlConnection1.Open() End If If rdRR.Checked Then sqlTRX = SqlConnection1.BeginTransaction(IsolationLevel.RepeatableRead) ElseIf rdRU.checked Then sqlTRX = SqlConnection1.BeginTransaction(IsolationLevel.ReadUncommitted) ElseIf rdRC.Checked Then sqlTRX = SqlConnection1.BeginTransaction(IsolationLevel.ReadCommitted) ElseIf rdSerial.Checked Then sqlTRX = SqlConnection1.BeginTransaction(IsolationLevel.Serializable) Else SqlTrx = Nothing End If SqlDataAdapter1.SelectCommand.Transaction = sqlTRX SqlDataAdapter1.InsertCommand.Transaction = sqlTRX SqlDataAdapter1.DeleteCommand.Transaction = sqlTRX SqlDataAdapter1.UpdateCommand.Transaction = sqlTRX Catch errobj As Exception MsgBox(errobj.Message) End Try End Sub In the Button7 (Refresh) click event place the following code: Private Sub Button7_Click(ByVal sender As System.Object, _ ByVal e As System.EventArgs) Handles Button7.Click Try DataSet11.Tables("Employees").Clear() DataGrid1.CaptionText = "Reading Data" SqlDataAdapter1.Fill(DataSet11, "Employees") Catch errobj As Exception MsgBox(errobj.Message) End Try If Not sqlTRX Is Nothing Then DataGrid1.CaptionText = "Transaction Pending Type: " & sqlTRX.IsolationLevel.ToString Else DataGrid1.CaptionText = "Ready - No Trx" End If End Sub Change the Button1 click event to call this procedure: Private Sub Button1_Click(ByVal sender As System.Object, _ ByVal e As System.EventArgs) Handles Button1.Click Try Button2_Click(Button2, New System.EventArgs()) Button7_Click(Button7, New System.EventArgs()) Catch errobj As Exception MsgBox(errobj.Message) End Try End Sub Compile the program. The isolation level can only be set when the transaction is first started. There is an IsolationLevel property but it is read-only. We have shown that the transactions work for grouping multiple database operations and making them all be accepted or rejected. The real power with transactions though is the ability to tune how concurrent updates are handled. This is why we use isolation levels. Make sure the latest version of the code is compiled. To do the concurrency test, we will have to run two instances of the program. To do this we will use the executables instead of running from the IDE. The executables are created in a folder named "bin" directly below the folder containing the source files. Navigate there using Windows Explorer and run two instances of the program. Next, we will demonstrate each of the isolation levels. Read Uncommitted With this level, you should be able to see other user 's uncommitted updates. Let's try it and see. In one instance of the program, select the Read Uncommitted radio button. Do the same for the second instance. In the first instance, click Load Data. Then do the same for the second instance. We have started a transaction in the first instance, but we have not yet attempted to change data. That's okay because we are demonstrating that we can see uncommitted changes made by the second instance. Now change a row in the second instance and click Update, but do not click Commit. In the second instance, click Refresh. You should be able to see the uncommitted changes made by the second instance. I'm not sure why a programmer would want to do such a thing as view the uncommitted updates of another user. The whole purpose of not committing until all operations are complete is just so other users will not see any partially updated data that could be misinterpreted. The old example of the bank transaction where money is moved from one account to another comes to mind. Why would you want anyone to chance reading data where the money had been deducted from one account but not added to the other? It makes no sense. Suppose the first transaction was rolled back? Now you would see data that doesn't even exist! The only possibility I can think of is where you have two transactions open in the same user session and you want one to be able to see the uncommitted transactions of the other. There are better ways of accomplishing this. The danger of using transactions that way is that all other users also see the uncommitted data. Sound advice is to use this level sparingly, if at all. If anyone wants to suggest valid reasons for using this level, send them to bob@emanageservice.com. Read Committed The Read Committed isolation level gives you a little more safety. When you use this level, you cannot see uncommitted updates by other transactions. Let's use our demo program again. If you closed them, fire up two more instances or just click both Close buttons to clear them. On the one on the left, click the Read Committed radio button. On the one on the right, select the Serialized radio button. Click both Load Data buttons. This starts a transaction and populates the grid. In the grid on the right, change some data and then click the Update button. Do not click the Commit or Rollback buttons. Now, in the grid on the left, click Refresh. Notice you do not see the changes made in the right-hand grid. Now let's get dangerous. We have a change in a pending transaction in the right-hand grid. What happens if we change the same data in the left-hand grid? Let's try it! Change something in the left grid that you changed in the right grid, but don't make the same change. Use some other name of random string. This way we will see which changes were accepted. Now click Update on the left-hand grid. Hmm, it seems to have locked up. Wait out the 30-second command timeout. Eventually, an error dialog pops up saying that the timeout has expired and a red-circled exclamation point appears on the grid. It won't do the update because the other grid's pending transaction has the row locked. Click the Commit button on the right-hand grid and now click the Update button again on the left-hand grid. Now the update will be accepted. Click the Commit button on the left-hand grid. Now click both Refresh buttons. You should see the last changes updated which are those from the left-hand grid. For the next demonstrations , set the command timeout for the four command objects in the Data Adapter to five seconds. This will shorten the wait time. Read Repeatable The Read Repeatable isolation level ensures that once a transaction is started, the same set of selection criteria (the same where clause in a Select statement) will return the same number of rows and the same values in the columns. This is useful for reports and other analytical processing that requires a consistent view of the data, unaffected by other's changes. We will need to make a slight change in the program to make this demonstration work. Remember we said that Read Repeatable would return the same records using the same selection criteria? We need to add a feature to our program so that we can use a where clause in our Select statement. To do this, first add a text box to the form. Next, we'll make the text box multiline. Go to the Property window. Scroll down until you find the MultiLine property. Change its value to true. Scroll down further and find the ScrollBars property. Select Vertical. This adds a vertical scroll bar to the text box. Now you will be able to resize the text box vertically. Your revised form should appear as in Figure 5.17. Figure 5.17. Revised form with text box for where clause. 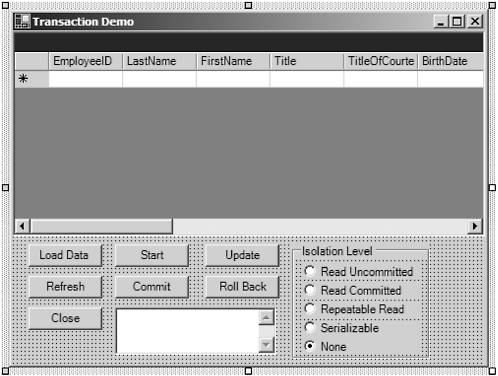 Next, we'll have to change the code to accommodate the where clause. In the code window, open the object list (left-hand combo box). Select Base Class Events. In the procedure box (on the right) scroll down until you find the Load event and select it. A load event procedure will be created. Create a module-level variable called strSQL. In the event procedure, assign the value of the SqlDataAdapter1.SelectCommand.CommandText to the variable strSQL. 128 Chapter 5 Connecting to Databases Private Sub frmTRX_Load(ByVal sender As Object, _ ByVal e As System.EventArgs) Handles MyBase.Load strSQL = SqlDataAdapter1.SelectCommand.CommandText End Sub This preserves the original Select statement so we can change the where clause freely . In the Refresh button's click event, concatenate the value of the text box to the end of the stored Select statement. It is the line in bold in the example. Private Sub Button7_Click(ByVal sender As System.Object, _ ByVal e As System.EventArgs) Handles Button7.Click Try DataSet11.Tables("Employees").Clear() SqlDataAdapter1.SelectCommand.CommandText() = Trim(strSQL & " " & TextBox1.Text) DataGrid1.CaptionText = "Reading Data" SqlDataAdapter1.Fill(DataSet11, "Employees") Catch errobj As Exception MsgBox(errobj.Message) End Try If Not sqlTRX Is Nothing Then DataGrid1.CaptionText = "Transaction Pending Type: " & sqlTRX.IsolationLevel.ToString Else DataGrid1.CaptionText = "Ready - No Trx" End If End Sub Now we're ready to demonstrate the Read Repeatable isolation level. Start up two new instances of the executable. Arrange them left and right as we did before. In the left-hand grid, select Read Repeatable isolation level. In the right-hand grid, select None. In the left-hand grid, type the where clause Where Title Like 'Sales%'. This will cause SQL Server to return only rows that have Sales as the first five characters of the title. Leave the right-hand grid where clause blank. Now load the data in both grids. Add a row to the right-hand grid. Make sure the row satisfies the where clause by including the words Sales Rep in the title field. Now refresh the left-hand grid. The new row appears. Notice that Read Repeatable does not mean that new rows, known as phantoms, will still be omitted. Now delete the new row from the right-hand grid and click Update. Refresh the left-hand grid. The deleted row still appears. This is what is meant by repeatable read. As long as the same transaction is pending, you will never lose any rows. You may gain new rows, however. What happens if we change the existing data? Try changing a row that appears in the left-hand grid in the right-hand grid. Click Update. The prompt says that it's updating but it appears to lock up. This is because the Read Repeatable transaction in the other grid has the row locked. In fact, all of the rows that were read inside the transaction are locked. Now click the Roll Back button in the left-hand grid. Suddenly the update in the right-hand grid completes. The two lower isolation levels will allow changes to be made to data inside the transaction from other users. They do not lock the rows. The Read Repeatable and Serializable levels put write locks on the rows that are inside the transaction. The Serializable level also puts a read lock on any row that has been updated but not committed. TIP  | I have found that an understanding of record locking and transaction isolation levels is among the weakest areas of knowledge of many Visual Basic programmers. For some reason, maybe it's the rogue nature of many programmers, they seem to write code as if the user of their program is the only person on the network. Unless pressed they almost never do any concurrency testing. This leads to much consternation later in the life cycle as users experience seeming lock ups and other problems. A good understanding of record locking and isolation levels is mandatory for anyone creating all but the simplest programs. |
Serializable This level is to be used where data integrity is the highest priority. This level puts read locks on updated rows within the transaction. To demonstrate this, open two instances of the demo program. Select Serializable isolation level for both grids. Use the same selection criteria (Where title like 'Sales%') in the left-hand grid. Make a change to one of the rows in the left-hand grid and click Update. Now try refreshing the rows in the right-hand grid. You will appear to lock up as the locked row is encountered . Click Commit in the left-hand grid and the refresh command will complete in the right-hand grid. There are innumerable possible combinations to try out with this demonstration, but we don't have the space to cover them all. If you are working on a program and want to test possible concurrency issues, you can easily modify this program to try different scenarios. Using Save Points Save points are named places within a transaction to where a series of updates can be partially rolled back. During the progress of a complex series of operations, it may be desirable to be able to roll back partial transactions and then retry the segment that failed without reexecuting the entire transaction. Save points provide this ability. The programmer can set a save point by calling the Save method of the Transaction object and providing a unique name that can later be used in a rollback method call. Some Practical Advice There are a number of items to mention, learned from experience: -
Do not start a transaction at the beginning of an interactive editing session. You don't have any control over how long a user might take to complete the session. The user may even start the transaction and then go to lunch or finish up for the day leaving rows locked indefinitely that others may need to access. -
Do not use transactions as an undo mechanism. Although it is possible to use them for this, it again locks rows for long periods that others may need. This can be the cause of apparent lock ups and other problems. -
Keep transactions short. Make sure the scope is as narrow as possible and have an exception mechanism in case the transaction encounters data locked by other users. It is best to use short command timeout values inside transactions so users are not frustrated by apparent lock ups. -
Remember the purpose of transactions: to make sure all of the operations inside either succeed or fail. Thus, it is best to use rollback as an exception process. If any part of the transaction fails, roll it back, wait a short amount of time ( milliseconds ), then retry the series of operations since the transaction was started or since the last save point. Only after all operations within the transaction have succeeded should it be committed. -
If after a certain number of retries the transaction cannot be completed, advise the user and provide a way to save the data temporarily (as an XML document, for example) so the user can come back later and try to save it again.  | 