Section 5.2. Running Test Cases
|
5.2. Running Test CasesTo run the JUnit test cases, add a test target to the build file introduced at the beginning of the chapter, and make the main target depend on the test target as part of the build process: <target name="main" depends="init, compile, test, compress, deploy"> <echo> ${message} </echo> </target>The test target will run the six targets you're going to create in this chapter: <property name="testsOK" value="Tested OK...." /> . . . <target name="test" depends="test1, test2, test3, test4, test5, test6"> <echo> ${testsOK} </echo> </target> If you're not using Ant or a Java IDE, you usually run JUnit tests from the command line and use the junit.textui.TestRunner class like this, testing the example class created earlier in the chapter, org.antbook.Project: %java junit.textui.TestRunner org.antbook.Project You can do essentially the same thing in Ant using the java task, and that looks like this in the build file for the first test task, test1. Note that I'm adding junit.jar to the classpath: <target name="test1" depends="compile"> <java fork="true" classname="junit.textui.TestRunner" classpath="${ant.home}/lib/junit.jar;."> <arg value="org.antbook.Project"/> </java> </target>Here's what this task looks like when it's running: test1: [java] ... [java] Time: 0.01 [java] OK (3 tests) Each dot (.) indicates a test case that's running, and three test cases are in the example. As you can see from the last line, the tests all passed OK, but this isn't exciting and it doesn't stop a build if there's a problem. 5.2.1. Using the Plain Formatter for ReportsThe second test, test2, will use junit to run the test. No results are printed out by successful JUnit tests unless you use a formatter, so the plain formatter is used here, set by a formatter element. classpath is used to specify where junit should search for the class to test, and the test nested element sets up the test, giving the name of the class to test and the directory in which to store the formatted results of the test: <target name="test2" depends="compile"> <junit printsummary="yes" errorProperty="test.failed" failureProperty="test.failed" haltonfailure="yes"> <formatter type="plain"/> <classpath path="."/> <test todir="${results}" name="org.antbook.Project"/> </junit> <fail message="Tests failed!" if="test.failed"/> </target>Note that if you set haltonfailure to true, the build will halt if the test failswhat to do if you want to avoid deploying a defective build.
Here's the output you see when this task runs: test2: [junit] Running org.antbook.Project [junit] Tests run: 3, Failures: 0, Errors: 0, Time elapsed: 0.011 sec The plain formatter creates the output file TEST-org.antbook.Project.txt, which holds these contents: Testsuite: org.antbook.Project Tests run: 3, Failures: 0, Errors: 0, Time elapsed: 0.01 sec Testcase: testTrue took 0 sec Testcase: testEquals took 0 sec Testcase: testNotNull took 0 sec All the tests succeeded, and the results look good. But what if you changed a test so the return4 method is supposed to return 5, rather than 4: public void testEquals( ) { assertEquals("assertEquals test", 5, return4( )); }In that case, you'd see this in the build: test2: [junit] Running org.antbook.Project [junit] Tests run: 2, Failures: 1, Errors: 0, Time elapsed: 0.02 sec You could read all about the problems in the output file TEST-org.antbook.Project.txt, which indicates the problem: Testsuite: org.antbook.Project Tests run: 2, Failures: 1, Errors: 0, Time elapsed: 0.02 sec Testcase: testTrue took 0.01 sec Testcase: testEquals took 0 sec FAILED assertEquals test expected:<5> but was:<4> junit.framework.AssertionFailedError: assertEquals test expected:<5> but was:<4> at org.antbook.Project.testEquals(Unknown Source) at sun.reflect.NativeMethodAccessorImpl.invoke0(Native Method) at sun.reflect.NativeMethodAccessorImpl.invoke(Unknown Source) at sun.reflect.DelegatingMethodAccessorImpl.invoke(Unknown Source)If there's a problem, you can use the formatter's output to track it down. 5.2.2. Using the Brief Formatter for ReportsThe brief formatter prints little unless there's been an error. Here's how to use it in a new test, test3: <target name="test3" depends="compile"> <junit printsummary="yes" fork="yes" haltonfailure="yes"> <formatter type="brief" usefile="true"/> <classpath path="."/> <test todir="${results}" name="org.antbook.Project"/> </junit> </target>If everything goes well, this formatter displays a brief message during the build: test3: [junit] Running org.antbook.Project [junit] Tests run: 2, Failures: 1, Errors: 0, Time elapsed: 0.01 sec And it puts a brief message in TEST-org.antbook.Project.txt: Testsuite: org.antbook.Project Tests run: 3, Failures: 0, Errors: 0, Time elapsed: 0.01 sec TEST-org.antbook.Project.txt: On the other hand, if you reproduce an error as in test2 (changing the expected value from 4 to 5), you'll see more information in TEST-org.antbook.Project.txt: Testsuite: org.antbook.Project Tests run: 2, Failures: 1, Errors: 0, Time elapsed: 0.01 sec Testcase: testEquals(org.antbook.Project): FAILED assertEquals test expected:<5> but was:<4> junit.framework.AssertionFailedError: assertEquals test expected:<5> but was:<4> at org.antbook.Project.testEquals(Unknown Source) at sun.reflect.NativeMethodAccessorImpl.invoke0(Native Method) at sun.reflect.NativeMethodAccessorImpl.invoke(Unknown Source) at sun.reflect.DelegatingMethodAccessorImpl.invoke(Unknown Source) 5.2.3. Using the XML Formatter for ReportsThe XML formatter gives you the most information of all formatters. Here's how you use it in a new task, test4: <target name="test4" depends="compile"> <junit printsummary="yes" fork="yes" haltonfailure="yes"> <formatter type="xml"/> <classpath path="."/> <test todir="${results}" name="org.antbook.Project"/> </junit> </target>This task creates a new file, TEST-org.antbook.Project.xml, which contains a tremendous amount of information, including the names and values of all properties, as well as the results of the tests: <?xml version="1.0" encoding="UTF-8" ?> <testsuite name="org.antbook.Project" tests="3" failures="0" errors="0" time="0.04"> <properties> <property name="java.runtime.name" value="Java(TM) 2 Runtime Environment, Standard Edition"></property> <property name="ant.java.version" value="1.4"></property> <property name="java.vm.vendor" value="Sun Microsystems Inc."></property> <property name="java.vendor.url" value="http://java.sun.com/"></property> <property name="path.separator" value=";"></property> <property name="java.vm.name" value="Java HotSpot(TM) Client VM"></property> <property name="file.encoding.pkg" value="sun.io"></property> <property name="user.country" value="US"></property> <property name="sun.os.patch.level" value="Service Pack 3"></property> . . . </properties> <testcase name="testTrue" classname="org.antbook.Project" time="0.0"></testcase> <testcase name="testEquals" classname="org.antbook.Project" time="0.0"></testcase> <testcase name="testNotNull" classname="org.antbook.Project" time="0.0"></testcase> <system-out><![CDATA[]]></system-out> <system-err><![CDATA[]]></system-err> </testsuite> This kind of output is primarily designed to be used with the junitreport task. 5.2.4. Creating Reports with the junitreport TaskYou can use the junitreport task to merge XML files generated by the JUnit task's XML formatter and apply a stylesheet on the resulting merged document to create a browseable report of results. This is an optional Ant task, and you need xalan.jar, version 2+, in the Ant lib directory to run it. You can get xalan.jar from http://xml.apache.org/xalan-j/. The attributes for this task appear in Table 5-7.
The junitreport task can contain nested fileset elements. junitreport collects XML files generated by the JUnit task as specified in the nested fileset elements. The junitreport task can contain nested report elements. These elements are the ones that generate the browseable report based on the merged XML documents. The attributes of the report element appear in Table 5-8.
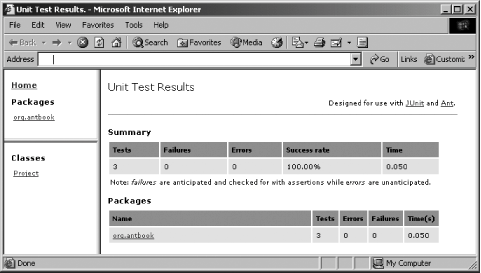
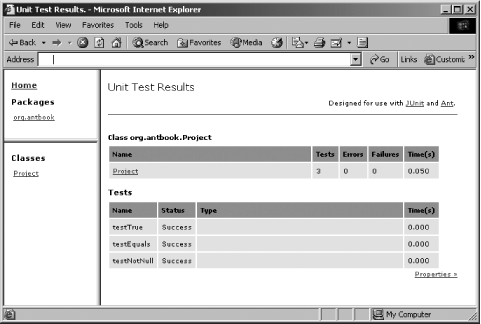
In the build file's test5 target, create an XML-formatted report for the JUnit tests: <target name="test5" depends="compile"> <junit printsummary="yes" fork="yes" haltonfailure="yes"> <formatter type="xml"/> <classpath path="."/> <test todir="${results}" name="org.antbook.Project"/> </junit> . . .Then use junitreport to merge and translate any XML reports into something you can look at in a browser. Here's what it looks like in the build file: <target name="test5" depends="compile"> <junit printsummary="yes" fork="yes" haltonfailure="yes"> <formatter type="xml"/> <classpath path="."/> <test todir="${results}" name="org.antbook.Project"/> </junit> <junitreport todir="${results}"> <fileset dir="${results}"> <include name="TEST-*.xml"/> </fileset> <report format="frames" todir="${results}"/> </junitreport> </target>The junit task creates TEST-org.antbook.Project.xml, and the junitreport task creates TESTS-TestSuites.xml and the browseable report. To see the report, open the created index.html, shown in Figure 5-1. Figure 5-1. A JUnit report You can browse through the results of your tests by clicking the Project link in the frame labeled Classes, opening the page you see in Figure 5-2, which reports on each test case. Figure 5-2. Browsing test case results Clicking the Properties link displays a page showing all property names and values. |
|
EAN: 2147483647
Pages: 115
