Ajax-Enabled Menus
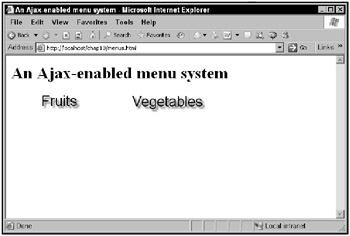
Take a look at the Ajax-enabled menu system you see in Figure 10.1, with two menus, Fruits and Vegetables.

Figure 10.1: The Ajax-enabled menu application
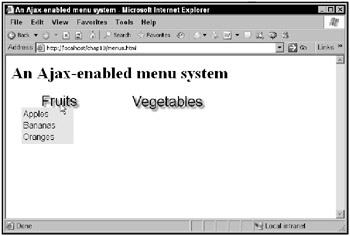
When the user positions the mouse over one of those menus, the items in a drop-down menu are downloaded using Ajax and displayed, as shown in Figure 10.2.

Figure 10.2: Displaying an Ajax-enabled menu
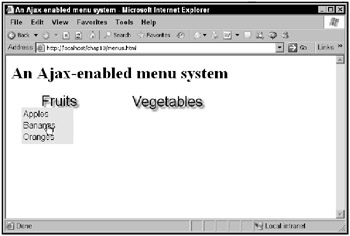
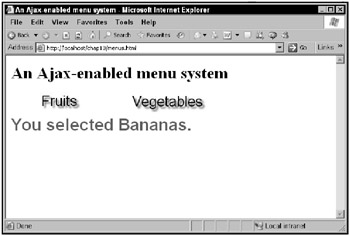
The user can select items from the menu, as you see in Figure 10.3. (Note that in Internet Explorer, the mouse cursor changes to a hand in the menu.) When the user does make a selection, that selection is displayed, as shown in Figure 10.4.

Figure 10.3: Selecting a menu item

Figure 10.4: Displaying a menu selection
This application lets you download Ajax data and display that data using CSS, and it’s a good example of CSS working with Ajax.
Creating the styles
You can use CSS styles in a number of ways, starting with inline styles using the HTML style attribute. For example, to position the first menu image, the “Fruits” menu, which is stored in the image file image1.jpg, you can use the style attribute of the HTML <img> element like this:
<body onclick = "hide()" onmousemove = "checkMenu(event)"> <H1>An Ajax-enabled menu system</H1> <img id = "image1" src="/books/1/252/1/html/2/image1.jpg" style="left:30; top:50; width:200; height:40;"> . . . <div id = "targetDiv"></div> </body>
| Note | Note the addition of a <div> element, targetDiv, which is used to display the user’s menu selection. |
This sets the location and dimensions of the “Fruits” image, setting its upper left-hand corner to (30, 50) in the browser’s client area (the client area is the area that you get to work with-it’s the browser’s display minus borders, menu bars, toolbars, and so on). That is, the x location of the image’s upper left corner will be at 30 pixels, and the y location will be 50 pixels. In a browser, positive x is to the right (and x = 0 on the left-hand edge of the client area), and positive y is downward (and y = 0 on the top of the client area). That way of measuring-especially positive y going downward instead of upward-might seem odd to you if you’ve never encountered it before, but the idea is that it follows the way you read text on a page: to the right, and down.
The text you assign to the style attribute, "left:30; top:50; width:200; height:40;", is made up of style rules, such as left:30;. Each rule is made up of a style property, such as left, which is assigned a value, such as 30. That’s the way you use CSS: you assign values to style properties, and the browser takes the new value and arranges things as you’ve directed.
Similarly, you can set the location of the second menu, the Vegetables menu:
<body onclick = "hide()" onmousemove = "checkMenu(event)"> <H1>An Ajax-enabled menu system</H1> <img id = "image1" src="/books/1/252/1/html/2/image1.jpg" style="left:30; top:50; width:200; height:40;"> <img id = "image2" style="left:270; top:50; width:200; height:40;" src="/books/1/252/1/html/2/image2.jpg"> . . . <div id = "targetDiv"></div> </body>
Besides the <img> elements, you’re going to need some way of displaying the drop-down menus themselves. You can display the drop-down menus in <div> elements, menuDiv1 and menuDiv2.
Here’s how to create those <div> elements:
<body onclick = "hide()" onmousemove = "checkMenu(event)"> <H1>An Ajax-enabled menu system</H1> <img id = "image1" src="/books/1/252/1/html/2/image1.jpg" style="left:30; top:50; width:200; height:40;"> <div id = "menuDiv1" style="left:30; top:100; width:100; height: 70; visibility:hidden;"><div></div></div> <img id = "image2" style="left:270; top:50; width:200; height:40;" src="/books/1/252/1/html/2/image2.jpg"> <div id = "menuDiv2" style="left:270; top:100; width:100; height: 70; visibility:hidden;"><div></div></div> <div id = "targetDiv"></div> </body>
Note in particular the visibility style property here. This property lets you specify whether or not a Web page element appears in the browser or is invisible. You set it to hidden, as here, to make an element invisible, or to visible to make the element appear. In other words, the two <div> elements here start off as invisible.
Besides using inline styles with the style attribute, you can also assign styles using a <style> element, which is usually placed in the <head> section of a page. In this case, you specify the element you want to set up styles for, and enclose the style rules you want to use-separated by semicolons-inside curly braces.
Here’s an example that sets the styles for the <body> element, setting the foreground (text) color, the background color, and the font to use:
<style> body { color: #000000; background-color: #FFFFFF; font-family: times; } . . . </style> | Note | You can specify colors using the same kind of hexadecimal color values that you use in HTML as color triplets like this: #rrggbb. |
You can specify the type of the styles you’re using with the type attribute, which you set to text/css for CSS styles-that’s the default, however, so you can omit this attribute without problem:
<style type="text/css"> body { color: #000000; background-color: #FFFFFF; font-family: times; } . . . </style> Some elements, like the <a> anchor element, let you style specific aspects of the element, such as the link color (you refer to links as a:link), the color of already visited links (a:visited), and the color that links display when clicked (a:active):
<style> body {background: white; color: black} a:link {color: red} a:visited {color: blue} a:active {color: green} . . . </style> You can also use the <style> element to set the styles for multiple elements of the same kind, such as <div> elements. But how can you tell two <div> elements apart in the <style> element? The present example, menus.html, contains a number of <div> elements that you can supply styles for in a <style> element:
<body onclick = "hide()" onmousemove = "checkMenu(event)"> <H1>An Ajax-enabled menu system</H1> <img id = "image1" src="/books/1/252/1/html/2/image1.jpg" style="left:30; top:50; width:200; height:40;"> <div id = "menuDiv1" style="left:30; top:100; width:100; height: 70; visibility:hidden;"><div></div></div> <img id = "image2" style="left:270; top:50; width:200; height:40;" src="/books/1/252/1/html/2/image2.jpg"> <div id = "menuDiv2" style="left:270; top:100; width:100; height: 70; visibility:hidden;"><div></div></div> <div id = "targetDiv"></div> </body>
Each such <div> element has a different ID value. To assign a style to a tag with a particular ID, you precede that ID with a pound sign (#) like this in the <style> element:
<style> #menuDiv1 { . . . } . . . </style> Then you can set style rules in menus.html for menuDiv1. For example, you can use the color style property to set the color of text in this menu <div> element, and the background-color property to set the background color:
<style> #menuDiv1 { color: #222222; background-color: #FFCCFF; . . . } . . . </style> You can specify more about the text in the <div> element with the font-weight and font family properties. The font-weight property lets you specify that you want your text bold, for example, and the font-family property lets you specify the font face you want to use (more about these properties is coming up in this chapter):
<style> #menuDiv1 { color: #222222; background-color: #FFCCFF; font-weight: bold; font-family: arial; . . . } . . . </style> For pop-up elements like the menu <div> elements, you also need to set the position style property to absolute (you can do this in the <style> element or with the style HTML property) to allow you to position the <div> elements where you want:
<style> #menuDiv1 { color: #222222; background-color: #FFCCFF; font-weight: bold; font-family: arial; position: absolute; . . . } . . . </style> And you can also set the cursor style property to hand, which makes Internet Explorer (only) change the mouse cursor to a hand when the mouse is over the <div> element:
<style> #menuDiv1 { color: #222222; background-color: #FFCCFF; font-weight: bold; font-family: arial; position: absolute; visibility: hidden; cursor: hand; } . . . </style> Here’s what the <style> element looks like in menus.html:
<style> #menuDiv1 { color: #222222; background-color: #FFCCFF; font-weight: bold; font-family: arial; position: absolute; visibility: hidden; cursor: hand; } #menuDiv2 { color: #222222; background-color: #FFCCFF; font-weight: bold; font-family: arial; position: absolute; visibility: hidden; cursor: hand; } #targetDiv { color: #9900FF; font-size: 24pt; font-weight: bold; font-family: arial; } </style> Another way of handling styles (which this example, menus.html, doesn’t use) is to use an external style sheet. For example, you could put the previous style rules from the <style> element into an external file named, say, style.css, which would have these contents:
#menuDiv1 { color: #222222; background-color: #FFCCFF; font-weight: bold; font-family: arial; position: absolute; visibility: hidden; cursor: hand; } #menuDiv2 { color: #222222; background-color: #FFCCFF; font-weight: bold; font-family: arial; position: absolute; visibility: hidden; cursor: hand; } #targetDiv { color: #9900FF; font-size: 24pt; font-weight: bold; font-family: arial; } You connect an external style sheet to a Web page with the <link> element, setting the rel attribute to stylesheet and the href attribute to the URL of the style sheet, like this:
<html> <head> <title> Using An External Style Sheet </title> <link rel="stylesheet" href="style.css"> </head> <body> <center> <h1> Using An External Style Sheet </h1> <P> This page uses an external style sheet. </center> </body> </html>
That includes the new style sheet, style.css, in the page, and applies the styles defined in it as appropriate. That’s how to set up an external style sheet (the current example, menus.html, sets up its styles using a <style> element and inline styles, not an external style sheet).
Now that the styles are set up and ready, how do you actually make something happen? You work with the mouse, which is described next.
Working with the mouse
Note the onclick and onmousemove attributes in this example’s <body> element:
<body onclick = "hide()" onmousemove = "checkMenu(event)"> <H1>An Ajax-enabled menu system</H1> <img id = "image1" src="/books/1/252/1/html/2/image1.jpg" style="left:30; top:50; width:200; height:40;"> <div id = "menuDiv1" style="left:30; top:100; width:100; height: 70; visibility:hidden;"><div></div></div> <img id = "image2" style="left:270; top:50; width:200; height:40;" src="/books/1/252/1/html/2/image2.jpg"> <div id = "menuDiv2" style="left:270; top:100; width:100; height: 70; visibility:hidden;"><div></div></div> <div id = "targetDiv"></div> </body>
The onclick attribute handles mouse clicks and connects to a JavaScript function named hide, which hides the menu after the user makes a selection, as will be discussed in a few pages. The onmousemove attribute is the one of interest here because when the user moves the mouse, you might need to display a menu.
For that reason, the onmousemove attribute is connected to a JavaScript function named checkMenu that checks whether you should display a menu. This function is passed a mouse event object (which, as usual, is null in Internet Explorer):
function checkMenu(evt) { . . . } The first step in checkMenu is to get a cross-browser mouse event object, as you saw when creating the drag-and-drop shopping cart in Chapter 8. As with the shopping cart, you create this cross-browser mouse object by calling a function named MouseEvent:
function checkMenu(evt) { var e = new MouseEvent(evt); . . . } The MouseEvent function creates a new object and stores the mouse event in the object’s e member:
function MouseEvent(e) { if(e) { this.e = e; } else { this.e = window.event; } . . . } It also creates an x member and a y member to hold the location at which the mouse event occurred:
function MouseEvent(e) { if(e) { this.e = e; } else { this.e = window.event; } if(e.pageX) { this.x = e.pageX; } else { this.x = e.clientX; } if(e.pageY) { this.y = e.pageY; } else { this.y = e.clientY; } . . . } And finally, the mouse object stores the target element of the mouse event in the member named target:
function MouseEvent(e) { . . . if(e.pageY) { this.y = e.pageY; } else { this.y = e.clientY; } if(e.target) { this.target = e.target; } else { this.target = e.srcElement; } } Now that you’ve created a cross-browser mouse event object, you can check where the mouse was. For example, if the mouse was moved so that it’s now over the first image, you can call a function named getData to download and display the first menu by passing a value of 1 to getData:
function checkMenu(evt) { var e = new MouseEvent(evt); var img; img = document.getElementById("image1"); if(e.target == img){ getData(1); } . . . } And if the mouse moved so that it’s now over the second image, you can call getData with a value of 2 to download and display the second menu:
function checkMenu(evt) { var e = new MouseEvent(evt); var img; img = document.getElementById("image1"); if(e.target == img){ getData(1); } img = document.getElementById("image2"); if(e.target == img){ getData(2); } . . . } Besides opening menus using the yet-to-be-written getData function, you also have to hide menus if the mouse moves away from a particular menu. You can do that if the menu is visible, which you check like this for the first menu:
function checkMenu(evt) { var e = new MouseEvent(evt); var target = null; var img; img = document.getElementById("image1"); if(e.target == img){ getData(1); } img = document.getElementById("image2"); if(e.target == img){ getData(2); } target = document.getElementById("menuDiv1"); if (target.style.visibility == "visible"){ . . . } . . . } Then you can check whether the mouse is outside both the menu’s image and the menu’s <div> element. To do that, you can check style properties such as target.style.left, which is the left-hand side of the <div> element. Those style properties are stored as text, however, so you have to convert them to numbers, which you can do with the JavaScript parseInt function. For example, here’s how you can check whether the mouse location is to the left of the <div> element:
function checkMenu(evt) { var e = new MouseEvent(evt); var target = null; . . . target = document.getElementById("menuDiv1"); if (target.style.visibility == "visible"){ if(e.x < parseInt(target.style.left) . . . } } . . . } You can add a check to determine whether the mouse is above the image’s top this way:
function checkMenu(evt) { var e = new MouseEvent(evt); var target = null; var img; . . . target = document.getElementById("menuDiv1"); img = document.getElementById("image1"); if (target.style.visibility == "visible"){ if(e.x < parseInt(target.style.left) || e.y < parseInt(img.style.top) . . . } } . . . } If the mouse is outside the menu’s <div> element and image, you can call a function named hide to hide the menu:
function checkMenu(evt) { var e = new MouseEvent(evt); var target = null; var img; . . . target = document.getElementById("menuDiv1"); img = document.getElementById("image1"); if (target.style.visibility == "visible"){ if(e.x < parseInt(target.style.left) || e.y < parseInt(img.style.top) || e.x > (parseInt(img.style.left) + parseInt(img.style.width)) || e.y > (parseInt(target.style.top) + parseInt(target.style.height))){ hide(); } } . . . } And you can do the same for the second menu as well, calling the hide method if needed:
function checkMenu(evt) { var e = new MouseEvent(evt); var target = null; var img; . . . target = document.getElementById("menuDiv1"); img = document.getElementById("image1"); if (target.style.visibility == "visible"){ if(e.x < parseInt(target.style.left) || e.y < parseInt(img.style.top) || e.x > (parseInt(img.style.left) + parseInt(img.style.width)) || e.y > (parseInt(target.style.top) + parseInt(target.style.height))){ hide(); } } target = document.getElementById("menuDiv2"); img = document.getElementById("image2"); if (target.style.visibility == "visible"){ if(e.x < parseInt(target.style.left) || e.y < parseInt(img.style.top) || e.x > (parseInt(img.style.left) + parseInt(img.style.width)) || e.y > (parseInt(target.style.top) + parseInt(target.style.height))){ hide(); } } } That completes the checkMenu function, which checks to see whether the mouse is inside or outside a menu and whether or not the menu should be shown or hidden. If the menu should be shown, checkMenu calls the getData function, which downloads the menu items.
Downloading the menu items
The getData function is responsible for downloading the menu items from the server, using Ajax. This function starts by getting an XMLHttpRequest object:
function getData(menu) { var XMLHttpRequestObject = false; if (window.XMLHttpRequest) { XMLHttpRequestObject = new XMLHttpRequest(); } else if (window.ActiveXObject) { XMLHttpRequestObject = new ActiveXObject("Microsoft.XMLHTTP"); } . . . You pass the menu number, 1 or 2, to the getData function, and the code in that function decides whether to download the items for menu 1, in items1.txt, or for menu 2, from items2.txt, using a JavaScript conditional operator:
function getData(menu) { var XMLHttpRequestObject = false; if (window.XMLHttpRequest) { XMLHttpRequestObject = new XMLHttpRequest(); } else if (window.ActiveXObject) { XMLHttpRequestObject = new ActiveXObject("Microsoft.XMLHTTP"); } var dataSource = (menu == 1) ? "items1.txt" : "items2.txt"; . . . Then the getData function downloads the items for the requested menu, and passes those items to a function named show:
function getData(menu) { var XMLHttpRequestObject = false; if (window.XMLHttpRequest) { XMLHttpRequestObject = new XMLHttpRequest(); } else if (window.ActiveXObject) { XMLHttpRequestObject = new ActiveXObject("Microsoft.XMLHTTP"); } var dataSource = (menu == 1) ? "items1.txt" : "items2.txt"; if(XMLHttpRequestObject) { XMLHttpRequestObject.open("GET", dataSource); XMLHttpRequestObject.onreadystatechange = function() { if (XMLHttpRequestObject.readyState == 4 && XMLHttpRequestObject.status == 200) { show(menu, XMLHttpRequestObject.responseText); } } XMLHttpRequestObject.send(null); } } Now that you’ve downloaded the menu items, all that’s left is to show them.
Showing a menu
The show method is designed to display menus, and you pass it the number of the menu to show (1 or 2) and the menu items to show. The menu items are stored in a single string, separated by commas, like this for menu 1:
Apples, Bananas, Oranges
It’s the job of the show function to separate those items and display them in a pop-up menu. Splitting the string "Apples, Bananas, Oranges" into separate items in an array turns out to be very easy: you only need to use the JavaScript split function, telling it that you want to split the text on the string ", " like this:
function show(menu, items) { arrayItems = items.split(", "); . . . } Now you have the menu items in an array of strings. To display those items, you can use an HTML table. The HTML for that table can be stored in a string named, say, data, which starts like this:
function show(menu, items) { var data = "<table width = '100%'>"; arrayItems = items.split(", "); . . . } There’s one more consideration here: you need to enable the user to click a displayed menu item and have something happen. To do that, you can connect each table <td> element’s onclick event attribute to a new function, display, which will display text like You selected Bananas. Here, then, is how you assemble the HTML for the menu’s table-based display:
function show(menu, items) { var data = "<table width = '100%'>"; var loopIndex; arrayItems = items.split(", "); if (arrayItems.length != 0) { for (var loopIndex = 0; loopIndex < arrayItems.length; loopIndex++) { var text = "display(" + loopIndex + ")"; data += "<tr><td " + "onclick='" + text + "'>" + arrayItems[loopIndex] + "</td></tr>"; } } data += "</table>"; . . . } Now you have the HTML for the menu’s table, stored in a string named data. All you have to do now is determine which menu should be displayed, and then display it. Here’s what that looks like:
function show(menu, items) { var data = "<table width = '100%'>"; var loopIndex; arrayItems = items.split(", "); var target; if (arrayItems.length != 0) { for (var loopIndex = 0; loopIndex < arrayItems.length; loopIndex++) { var text = "display(" + loopIndex + ")"; data += "<tr><td " + "onclick='" + text + "'>" + arrayItems[loopIndex] + "</td></tr>"; } } data += "</table>"; if(menu == "1"){ target = document.getElementById("menuDiv1"); } if(menu == "2"){ target = document.getElementById("menuDiv2"); } if(target.style.visibility == "hidden"){ target.innerHTML = data; target.style.visibility = "visible"; } } The next step is to handle the case where the user clicks an item in a menu.
Handling menu item clicks
When the user clicks a menu item, a function named display is called, and you can display the item the user selected (You selected Bananas.) in the <div> element named targetDiv. The display function is passed the index of the selected item in the array named arrayItems, which contains the text of the menu items, so all you need to do is recover the appropriate text from that array and display it.
First, you can get an object corresponding to the target <div> element in which to display text:
<script language = "javascript"> var arrayItems; . . . function display(index) { var targetDiv = document.getElementById("targetDiv"); . . . } then you can display the selected item in the target <div> element like this:
<script language = "javascript"> var arrayItems; . . . function display(index) { var targetDiv = document.getElementById("targetDiv"); targetDiv.innerHTML = "You selected " + arrayItems[index] + "."; } The target <div> element is styled like this in this application:
#targetDiv { color: #9900FF; font-size: 24pt; font-weight: bold; font-family: arial; } so text displayed in this <div> will appear large, as shown earlier in Figure 10.4.
That completes the display process. All that’s left is to hide a menu when needed with the hide function.
Hiding a menu
In this application, the hide function is responsible for hiding the menus when needed:
function hide() { . . . } Hiding a menu simply means hiding the <div> element it appears in, menuDiv1 or menuDiv2. Here’s how that works for menu 1:
function hide() { var menuDiv1 = document.getElementById("menuDiv1"); if(menuDiv1.style.visibility == "visible"){ menuDiv1.innerHTML = "<div></div>"; menuDiv1.style.visibility = "hidden"; } . . . } And here’s menu 2:
function hide() { var menuDiv1 = document.getElementById("menuDiv1"); if(menuDiv1.style.visibility == "visible"){ menuDiv1.innerHTML = "<div></div>"; menuDiv1.style.visibility = "hidden"; } var menuDiv2 = document.getElementById("menuDiv2"); if(menuDiv2.style.visibility == "visible"){ menuDiv2.innerHTML = "<div></div>"; menuDiv2.style.visibility = "hidden"; } } And that completes the menus.html application. Cool.