Replacing Elements Using the DOM
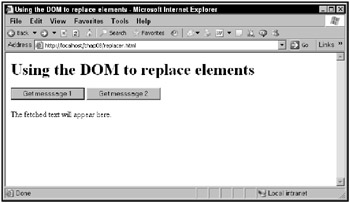
What if you didn’t want to append the new text to the text already displayed, but wanted to replace what’s already there with the newly downloaded text? Take a look at replacer.html, which is shown in Figure 8.4.

Figure 8.4: Using replacer.html
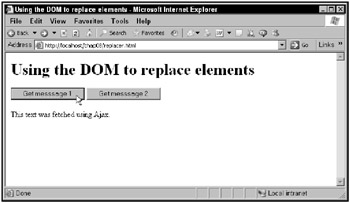
When you click the first button, a message is downloaded and displayed, as you see in Figure 8.5.

Figure 8.5: Using replacer.html to download text
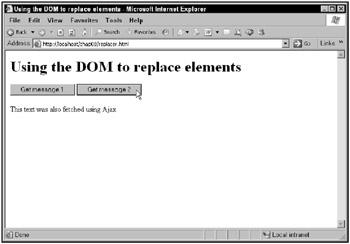
Clicking the second button replaces the current text with the newly downloaded text, as you see in Figure 8.6.

Figure 8.6: Using replacer.html to replace existing text with downloaded text
How does this work in code? You’re going to need two buttons for the two messages:
<body> <h1>Using the DOM to replace elements</h1> <form> <input type = "button" value = "Get message 1" onclick = "getData('1')"> <input type = "button" value = "Get message 2" onclick = "getData('2')"> </form> . . . </body> This example uses a <p> element with the ID text, contained in a <div> element with the ID targetDiv to display the downloaded text:
<body> <h1>Using the DOM to replace elements</h1> <form> <input type = "button" value = "Get message 1" onclick = "getData('1')"> <input type = "button" value = "Get message 2" onclick = "getData('2')"> </form> <div width =100 height=100> <p >The fetched text will appear here.</p> </div> </body> In the getData function, create an XMLHttpRequest object in preparation for downloading one or the other text file on the server that this examples uses, data1.txt or data2.txt:
function getData(number) { var XMLHttpRequestObject = false; if (window.XMLHttpRequest) { XMLHttpRequestObject = new XMLHttpRequest(); } else if (window.ActiveXObject) { XMLHttpRequestObject = new ActiveXObject("Microsoft.XMLHTTP"); } . . . then call the XMLHttpRequest object’s open method, configuring that object to download data1.txt or data2.txt, depending on which button was clicked:
function getData(number) { var XMLHttpRequestObject = false; if (window.XMLHttpRequest) { XMLHttpRequestObject = new XMLHttpRequest(); } else if (window.ActiveXObject) { XMLHttpRequestObject = new ActiveXObject("Microsoft.XMLHTTP"); } if(XMLHttpRequestObject) { XMLHttpRequestObject.open("GET", "data" + number + ".txt"); . . . Finally, add code to handle the downloaded text:
<html> <head> <title>Using the DOM to replace elements</title> <script language = "javascript"> . . . if(XMLHttpRequestObject) { XMLHttpRequestObject.open("GET", "data" + number + ".txt"); XMLHttpRequestObject.onreadystatechange = function() { if (XMLHttpRequestObject.readyState == 4 && XMLHttpRequestObject.status == 200) { . . . } } To replace the current text in the <p> element with the ID text in the Web page with the newly downloaded text, start by creating a new <p> element, also with the ID text (so it can be replaced the next time the user clicks a button). To create that <p> element, use the document object’s createElement method. To add the ID attribute to the <p> element, use that element’s setAttribute method:
XMLHttpRequestObject.onreadystatechange = function() { if (XMLHttpRequestObject.readyState == 4 && XMLHttpRequestObject.status == 200) { var newP = document.createElement("p"); newP.setAttribute("id", "text"); . . . } } then you can create the text node that will hold the newly downloaded text inside the <p> element:
XMLHttpRequestObject.onreadystatechange = function() { if (XMLHttpRequestObject.readyState == 4 && XMLHttpRequestObject.status == 200) { var newP = document.createElement("p"); newP.setAttribute("id", "text"); var newText = document .createTextNode(XMLHttpRequestObject.responseText); . . . } } and then append that text node to the new <p> element:
XMLHttpRequestObject.onreadystatechange = function() { if (XMLHttpRequestObject.readyState == 4 && XMLHttpRequestObject.status == 200) { var newP = document.createElement("p"); newP.setAttribute("id", "text"); var newText = document .createTextNode(XMLHttpRequestObject.responseText); newP.appendChild(newText); . . . } } The goal now is to replace the text in the current <p> element with the text in the new <p> element, which you can do using the enclosing <div> element’s replaceChild method:
XMLHttpRequestObject.onreadystatechange = function() { if (XMLHttpRequestObject.readyState == 4 && XMLHttpRequestObject.status == 200) { var newP = document.createElement("p"); newP.setAttribute("id", "text"); var newText = document .createTextNode(XMLHttpRequestObject.responseText); newP.appendChild(newText); var div = document.getElementById("targetDiv"); var oldP = document.getElementById("text"); . . . } } Now you can replace the old <p> element with the new <p> element, like this:
XMLHttpRequestObject.onreadystatechange = function() { if (XMLHttpRequestObject.readyState == 4 && XMLHttpRequestObject.status == 200) { var newP = document.createElement("p"); newP.setAttribute("id", "text"); var newText = document .createTextNode(XMLHttpRequestObject.responseText); newP.appendChild(newText); var div = document.getElementById("targetDiv"); var oldP = document.getElementById("text"); div.replaceChild(newP, oldP); } } And you’re done! That completes the code for replacer.html.