Fusion Rootkits: Bridging User and Kernel Modes
| < Day Day Up > |
| Rootkits can easily contain both user-mode and kernel-mode components (see Figure 2-3). The user-mode part deals with most of the features, such as networking and remote control, and the kernel-mode part deals with stealth and hardware access. Figure 2-3. A fusion rootkit using both user and kernel components.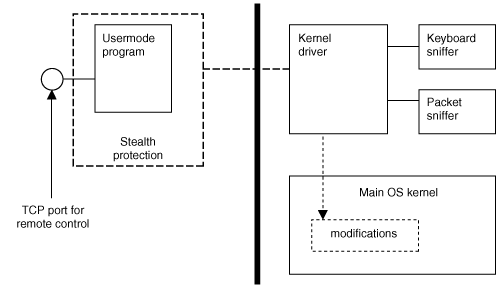 Most rootkits require kernel-level subversion while at the same time offering complex features. Because complex features may contain bugs and require use of system API libraries, the user-mode approach is preferred. A user-mode program can communicate with a kernel-level driver through a variety of means. One of the most common is the use of I/O Control (IOCTL) commands. IOCTL commands are command messages that can be defined by the programmer. You should understand the following device-driver concepts in order to build a rootkit that has both user- and kernel-mode components. I/O Request PacketsOne of the device-driver concepts to understand is I/O Request Packets (IRPs). In order to communicate with a user-mode program, a Windows device driver typically needs to handle IRPs. These are just data structures which contain buffers of data. A user-mode program can open a file handle and write to it. In the kernel, this write operation is represented as an IRP. So, if a user-mode program writes the string "HELLO DRIVER!" to the file handle, the kernel will create an IRP that contains the buffer and string "HELLO DRIVER!" Communication can take place between the user and kernel modes via these IRPs. In order to process IRPs, the kernel driver must include functions to handle the IRP. Just as we did in installing the unload routine, we simply set the appropriate function pointers in the driver object: NTSTATUS OnStubDispatch(IN PDEVICE_OBJECT DeviceObject, IN PIRP Irp ) { Irp->IoStatus.Status = STATUS_SUCCESS; IoCompleteRequest(Irp, IO_NO_INCREMENT ); return STATUS_SUCCESS; } VOID OnUnload( IN PDRIVER_OBJECT DriverObject ) { DbgPrint("OnUnload called\n"); } NTSTATUS DriverEntry( IN PDRIVER_OBJECT theDriverObject, IN PUNICODE_STRING theRegistryPath ) { int i; theDriverObject->DriverUnload = OnUnload; for(i=0;i< IRP_MJ_MAXIMUM_FUNCTION; i++ ) { theDriverObject->MajorFunction[i] = OnStubDispatch; } return STATUS_SUCCESS; } Figure 2-4 shows the path that user-mode function calls take as they are routed to a kernel-mode driver. Figure 2-4. Routing of I/O calls through "major-function" pointers.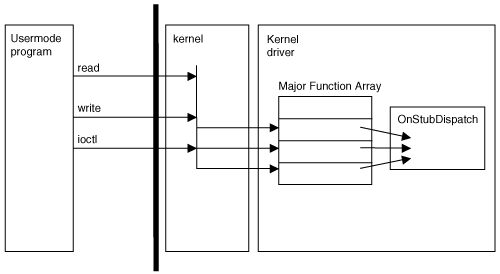 In the example code, and as shown in Figure 2-4, the Major Functions are stored in an array and the locations are marked with the defined values IRP_MJ_READ, IRP_MJ_WRITE, and IRP_MJ_DEVICE_CONTROL. All of these are set to point to the function OnStubDispatch, which is a stub routine that does nothing. In a real driver, we would most likely create a separate function for each major function. For example, let's assume we will be handling the READ and WRITE events. These events are triggered when a user-mode program calls ReadFile or WriteFile with a handle to the driver. A more-complete driver might handle additional functions, such as those for closing a file or sending an IOCTL command. An example set of major function pointers follows. DriverObject->MajorFunction[IRP_MJ_CREATE] = MyOpen; DriverObject->MajorFunction[IRP_MJ_CLOSE] = MyClose; DriverObject->MajorFunction[IRP_MJ_READ] = MyRead; DriverObject->MajorFunction[IRP_MJ_WRITE] = MyWrite; DriverObject->MajorFunction[IRP_MJ_DEVICE_CONTROL] = MyIoControl; For each Major Function that is being handled, the driver needs to specify a function that will be called. For example, the driver might contain these functions: NTSTATUS MyOpen(IN PDEVICE_OBJECT DeviceObject, IN PIRP Irp ) { // do something ... return STATUS_SUCCESS; } NTSTATUS MyClose(IN PDEVICE_OBJECT DeviceObject, IN PIRP Irp ) { // do something ... return STATUS_SUCCESS; } NTSTATUS MyRead(IN PDEVICE_OBJECT DeviceObject, IN PIRP Irp ) { // do something ... return STATUS_SUCCESS; } NTSTATUS MyWrite(IN PDEVICE_OBJECT DeviceObject, IN PIRP Irp ) { // do something ... return STATUS_SUCCESS; } NTSTATUS MyIOControl(IN PDEVICE_OBJECT DeviceObject, IN PIRP Irp ) { PIO_STACK_LOCATION IrpSp; ULONG FunctionCode; IrpSp = IoGetCurrentIrpStackLocation(Irp); FunctionCode=IrpSp->Parameters.DeviceIoControl.IoControlCode; switch (FunctionCode) { // do something ... } return STATUS_SUCCESS; } Figure 2-5 shows how user-mode program calls are routed though the Major Function array and eventually to the driver-defined functions MyRead, MyWrite, and MyIOCTL. Figure 2-5. The kernel driver can define specific callback functions for each type of "major function." Now that we know how function calls in user mode translate to function calls in the kernel driver, we will cover how you can expose your driver to user mode using file objects. Creating a File HandleAnother concept you should understand concerns file handles. In order to use a kernel driver from a user-mode program, the user-mode program must open a handle to the driver. This can occur only if the driver has first registered a named device. Once it has done that, the user-mode program opens the named device as though it were a file. This is very similar to the way devices work on many UNIX systems. Everything is treated like a file. For our example, the kernel driver registers a device using the following code: const WCHAR deviceNameBuffer[] = L"\\Device\\MyDevice"; PDEVICE_OBJECT g_RootkitDevice; // Global pointer to our device object NTSTATUS DriverEntry(IN PDRIVER_OBJECT DriverObject, IN PUNICODE_STRING RegistryPath ) { NTSTATUS ntStatus; UNICODE_STRING deviceNameUnicodeString; // Set up our name and symbolic link. RtlInitUnicodeString (&deviceNameUnicodeString, deviceNameBuffer ); // Set up the device. // ntStatus = IoCreateDevice ( DriverObject, 0, // For driver extension &deviceNameUnicodeString, 0x00001234, 0, TRUE, &g_RootkitDevice ); ... In this example code snippet, the DriverEntry routine promptly creates a device named MyDevice. Notice the fully qualified path that is used in the call: const WCHAR deviceNameBuffer[] = L"\\Device\\MyDevice"; The "L" prefix causes the string to be defined in UNICODE, which is required for the API call. Once the device is created, a user-mode program can open the device as though it were a file: hDevice = CreateFile("\\\\Device\\MyDevice", GENERIC_READ | GENERIC_WRITE, 0, NULL, OPEN_EXISTING, FILE_ATTRIBUTE_NORMAL, NULL ); if ( hDevice == ((HANDLE)-1) ) return FALSE; Once the file handle is open, it can be used as a parameter in user-mode functions such as ReadFile and WriteFile. It can also be used to make IOCTL calls. These operations cause IRPs to be generated which can then be handled in the driver program. File handles are easy to open and use from user-mode. Now we will explore how to make file handles easier to use via symbolic links. Adding a Symbolic LinkA third device-driver concept that's important to understand concerns symbolic links. Some drivers use symbolic links to make opening file handles easier for user-mode programs. This is not a required step, but it is nice to have: A symbolic name can be easier to remember. Such a driver would create a device, and then make a call to IoCreateSymbolicLink to create the symbolic link. Some rootkits will use this technique, while others skip it. const WCHAR deviceLinkBuffer[] = L"\\DosDevices\\vicesys2"; const WCHAR deviceNameBuffer[] = L"\\Device\\vicesys2"; NTSTATUS DriverEntry(IN PDRIVER_OBJECT DriverObject, IN PUNICODE_STRING RegistryPath ) { NTSTATUS ntStatus; UNICODE_STRING deviceNameUnicodeString; UNICODE_STRING deviceLinkUnicodeString; // Set up our name and symbolic link. RtlInitUnicodeString (&deviceNameUnicodeString, deviceNameBuffer ); RtlInitUnicodeString (&deviceLinkUnicodeString, deviceLinkBuffer ); // Set up the device // ntStatus = IoCreateDevice ( DriverObject, 0, // For driver extension &deviceNameUnicodeString, FILE_DEVICE_ROOTKIT, 0, TRUE, &g_RootkitDevice ); if( NT_SUCCESS(ntStatus)) { ntStatus = IoCreateSymbolicLink (&deviceLinkUnicodeString, &deviceNameUnicodeString ); Now that a symbolic link has been created, a user-mode program can open a handle to the device using the string "\\.\MyDevice." It really doesn't matter if you create a symbolic link. It just makes it easier for the user-mode code to find the driver, but it is not required. hDevice = CreateFile("\\\\.\\MyDevice", GENERIC_READ | GENERIC_WRITE, 0, NULL, OPEN_EXISTING, FILE_ATTRIBUTE_NORMAL, NULL ); if ( hDevice == ((HANDLE)-1) ) return FALSE; Now that we have discussed how to communicate between user mode and kernel mode using a file handle, we will discuss how you load a device driver to begin with. |
| < Day Day Up > |
EAN: 2147483647
Pages: 111