| Transitional effects are those between two clips. Dissolves, wipes, and page peels are examples of these types of effects. Many different categories of programmable transitions are available. You select them from one of two placesfrom the Effects tab in the Browser, or from the Effects menu, as shown in Figure 5.3. Here, Cross Dissolve is selected. A cross-dissolve is an opacity change between clips. As the outgoing clip lowers its opacity, the incoming clip raises its opacity. These clips overlap during the effect. Figure 5.3. The Effects menu with Cross Dissolve selected. 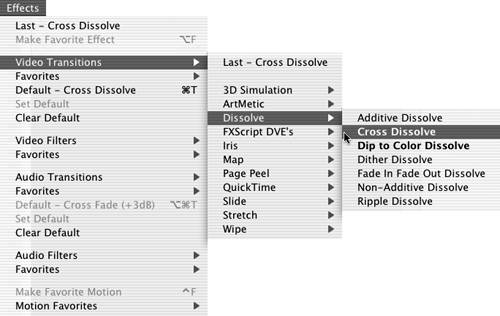 The same set of effects is available at each location, and they are organized the same way. You can add third-party transitions as well. They show up in both places. If you add a transition using the Effects tab in the Browser, you only need to drag the transition to the edit in the Timeline to add it to your sequence. To add transitions from the Effects menu, you must first select the edit you intend to add a transition to by clicking it with the Selection tool in the Timeline window. warning To add a transition of any type, you must have media available that is unused on both sides of the transition so that the transition will be centered on the edit point between two clips. For example, the outgoing clip must have 15 frames of video past the clip's Out edit point, and the incoming clip must contain 15 frames of video before the In point selected for its starting edit point to achieve a 30-frame transition that is centered on the edit point. You need even more unused media to perform longer effect durations. A transitional effect needs to have media unused originally before and after the cut point for the duration of the overlap of the two clips that are transitioning to each other.
Adding and Resetting the Default Transition You can add the default transition to any edit point by Ctrl-clicking the edit point in the Timeline window and selecting Add Transition from the resulting pop-up menu. A 1-second dissolve is the default transition in Final Cut Pro. To reset the default transition, Ctrl-click the transition you want to become the default transition in the Effects tab window of the Browser and select Set Default Transition from the pop-up menu (see Figure 5.4). When you Ctrl-click an edit point in the Timeline, right after the words Add Transition in this menu is the name of the default transition you have selected, as shown in Figure 5.5. This is useful if you have created a custom transition that you want to use over and over. It's easier than modifying one again and again the same way. You can create and save a custom transition in your Favorites bin or even the Browser and then select it as the default transition. Figure 5.4. Changing the default transition. 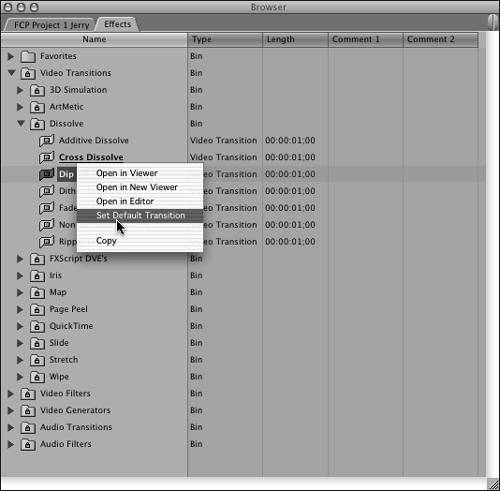 Figure 5.5. Ctrl-clicking an edit point to add a default transition. 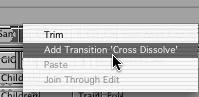 Modifying Transitions There are two ways to modify a transition: -
Double-click it in the sequence after you've added it to open it in the Effects Editor (where you can modify all the settings for the transitions). -
Modify it directly in the sequence (where you can modify the duration). Probably the simplest of these transitions is the one you'll use the most: a cross-dissolve. If you double-click an effect in the Effects tab, its Effects Editor opens in the Viewer window, as shown in Figure 5.6. At the top of the Viewer, a tab contains the effect's name. Just below that is the effect's duration. Typing in a new duration changes the length. In the top center area are buttons to select whether the effect starts, centers, or ends at the edit point. The button on the right works the same as the Viewer's Recent Clips button. On the far right, the effect icon with the hand is called the drag handle. It allows you to drag this effect to a transition or to your bins for later use. You can also drag the transition's ends to lengthen it. Figure 5.6. The Effects Editor in the Viewer window. 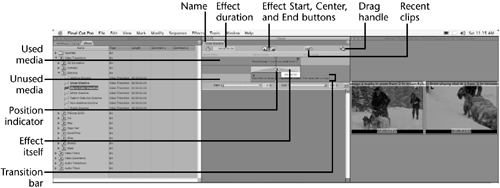 A good place to keep these custom effects is in your Favorites folder at the top of the Effects tab in the Browser. As shown in Figure 5.3, you can access these effects from the Effects menu. Clicking in the ruler, which is beneath the top row of controls, allows you to scrub through the effect by clicking its position indicator, which corresponds to the position indicator in the Timeline window. Beneath the ruler is the Transition Bar, which shows you the effect icon you are modifying. The outgoing clip is displayed on the top, with its available media past the edit point. The incoming clip is displayed on the bottom, with its available media before the edit point. You can see how the clips overlap this way. You must have overlap to perform any transitional effect. The darker blue area represents the media used in the sequence, and the lighter blue area is the "unused" media. The light gray area (if there is any) shows where there is media past an edit point of an outgoing clip or before the start of the incoming clip. Between them in the center row is the effect itself. If you have unused media past the edit point in the incoming clip, and/or if you have unused media before the In point of the incoming media, you can click and drag this transition and change its edit point. The Roll Edit tool is visible when you do this. While you move an edit point this way, a new two-up display appears in the Canvas window, as shown in Figure 5.7. In this case, it is a 3-second cross-dissolve that ends at the edit point. Figure 5.7. Rolling an edit point in the Effects Editor window. 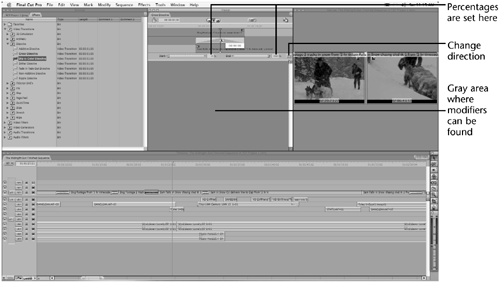 The two-up display in the Canvas shows the current frame at the transition's start point in the outgoing clip in the frame on the left, and the current frame at the transition's end point in the incoming clip in the frame on the right. The name and source timecode are displayed in the respective clips as well. The timecode updates as you drag the transition's edit point right or left. When you click and drag either end of the transition, you can change its duration by stretching it or squeezing it. You can use the Transition Bar to perform not only roll edits but ripple edits as well. Move the mouse pointer to the start of the incoming clip or the end of the outgoing clip and drag in either direction. This is a great way to fine-tune not only a transition but also the edit point itself. Below the Transition Bar you can select the percentages of the effect as it starts and ends. Just to the right is a button to change the effect's direction. In the case of more-complicated effects, the gray area is reserved for these modifiers. Modifiers such as the shape of a wipe and the color of an edge are found here. The red X button below this resets these changes only. Any change made in the Effects Editor window is immediately applied to the effect as it exists in your sequence. If you double-click an effect from the Effects tab window and open its editor, you can program the effect. By dragging on the drag handle, you can either apply the effect to an edit point or save it for later use in your Favorites folder or any bin you want to store it in. |